3-211-161-13 (1) Data Projector Operating Instructions for Network VPL-CX155/CX125 VPL-CW125 © 2007 Sony Corporation
© 2007 Sony Corporation. All rights reserved. • The software described herein may also be governed by the terms of a separate user license agreement. For usage of the software, refer to the end user license agreements of each software. • In no event shall Sony Corporation be liable for any incidental, consequential or special damages, whether based on tort, contract, or other wise, arising out of or in connection with this manual, the software or other information contained herein or the use thereof.
Before Operation Features This unit is equipped with the network presentation and control function. Any image of a computer, if it is connected to a LAN by wired or wireless connection, can be projected by connecting a network cable to the NETWORK connector (RJ45) of the projector. Operations such as power on/off or input selection of the projector or confirmation of the situation of the projector such as lamp used time is possible far from the projector.
first projector. If you use VPL-CW125 and another model at the same time, connect VPL-CW125 as the second or third, etc. • The [Simple Mode Setting] tab for the Simple Mode function is displayed in [Option]. However, it is not available for VPL-CX155/CX125/CW125 series, etc. About Version Compatibilities Air Shot supplied with VPL-CX85/CX75 is not compatible with Air Shot Version 2 supplied with VPL-CX86/CX76 or the network presentation function supplied with VPL-CX155/CX125/CW125 series.
• Microsoft Windows XP Professional Edition • Microsoft Windows Vista Home Basic • Microsoft Windows Vista Home Premium • Microsoft Windows Vista Business • Microsoft Windows Vista Ultimate Supported display Color resolution: 16 bit, 24 bit, 32 bit Usable browser Internet Explorer 5.0 or higher Available network RJ45 (10BASE-T/100BASE-TX) Note Projector Station for Air Shot Version 2 will not work on some computers and OS even though they satisfy the above requirements.
3 Install the software according to the “wizard” within the installer. When you use Windows XP Service Pack 2/Vista and the following dialog box appears during installation, check the [Register automatically] radio button and click [Next]. Starting from the hard disk or external memory without installing Projector Station for Air Shot Version 2 into the computer 1 Install the external memory (“Memory Stick”, USB memory, etc.) into the computer. It is not necessary to copy it to the hard disk.
Preparing the Projector Setting the projector Projector Station for Air Shot Version 2 starts up automatically. When you are not going to project the pictures, click [OK]. 1 Connect the network cable to the NETWORK connector of the projector. 2 Turn on the projector. 3 Press the INPUT C or AIR SHOT key on the remote commander. The home display of the network presentation appears. After executing [AutoConfig.exe], start up the application with [PjstnASv2.exe].
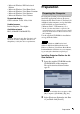
4 Press the ENTER key. The setting menu display appears. Network Simple Mode Manual Mode1 Manual Mode2 Manual Mode3 Manual Mode4 Internet Protocol(IP) IP Address Setting: Manual IP Address: 192.168.11.21 Subnet Mask: 255.255.255.0 Default Gateway: 192.168.11.253 Manual Mode5 Select [Setup] to set network setting items. Note To use the network function, set [Standby Mode] in the Function menu of the projector to [Standard].
Setting each mode In the initial display of the setting menu, the left edge of the mode currently used is displayed in light blue. You can switch the mode to be used and change the mode name and settings. x Displaying the setting items menu (action menu) You can select the item with V or v key and the selected item is highlighted. The status appears in the right pane of the window. Press the ENTER key to display the setting item menu (action menu).
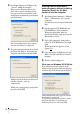
x Displaying the mode status When you select [Status] from the action menu, the status of the mode being used is displayed. Items Display contents Internet Protocol(IP) Displays [IP Address Setting (Manual/Auto)], [IP Address], [Subnet Mask], [Default Gateway], [Primary DNS], [Secondary DNS], [DHCP Server], and [Lease Obtained]/[Lease Expires]. [Lease Obtained]/[Lease Expires] means the valid period of the IP address assigned from the [DHCP Server] automatically.
Setting the System Setup When [System Setup] is selected in the initial display of the setting menu, the [System Setup] window is displayed. Select the desired item and press the ENTER (or right) key to activate its setting items. To input the desired value for the items, press the ENTER (or right) key. You can return to the setting menu with the ENTER (or left) key. Click [OK] to save the settings and return to the initial display of the setting menu.
Connection Connecting to wireless LAN using the computer access point LAN Connecting Examples Connecting to wired LAN Projector Access point Projector Computer Computer Computer Computer Notes Computer LAN Notes • For a LAN connection, contact your network administrator. • When the projector and a computer that has a different network segment (subnet) are connected, set [PC Registration List] (page 10) on the projector and [Projector Setting] (page 18) on the computer.
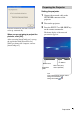
Connecting to several projectors at the same time Connecting/Disconnecting/ Switching from the Projector Connecting 1 Projector* Turn on the power of the projector and press the INPUT C or AIR SHOT key on the remote commander. The home display of the network presentation appears. 2 Projector* Projector* Start the Projector Station for Air Shot Version 2. When it starts, the [ ] icon appears in the task tray. When [Create Shortcut Icon into Startup Folder.
Appears when the computer is connected. Yamada PC (xxx. xxx. xx. x) Tanaka PC ( xx. x. xx. xx ) Suzuki PC (xxx. xxx. xx. x) Saito PC ( xx. x. xx. xx ) Sakuma PC (xxx. xxx. xx. x) Switching 1 Press the AIR SHOT key on the remote commander. 2 Press the M or m key on the remote commander to select the computer to be connected from the list and then the ENTER key.
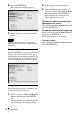
Disconnecting Items Functions Click the projector button to disconnect the project from the computer. 1 [Refresh] button The projector list, connected computer list, and connectable computer list are refreshed manually. 2 [Option Setting] button The [Option Setting] window for setting the Projector Station for Air Shot Version 2 is displayed. When the computer is not connected to the projector, you can display the window.
Items Functions qsProjector control buttons With the buttons, you can operate the projector selected on the controlled projector select menu.When only one projector is connected, the projector will be operated. Names and Functions of the tabs on the [Option Setting] dialog box For the details, click the [ ] button on the main window to display the online help. [Basic Setting] tab [Picture Muting] button: Click the button to clear the picture temporally. Click it again to display the picture.
[Profile Setting] tab [Connection Setting] tab Note When [Set PC desktop to Projector resolution] is checked, the window may be shown outside of the display due to the position of the window of ProjectorStation for AirShot Version2. The [Profile Setting] tab provides the profile settings for connecting to the projector. The [Connection Setting] tab provides detailed settings for connecting to the projector.
[Projector Setting] tab Setting/Operating via Web You can check the information of the projector from the computer or operate the projector on the computer. Check the connection and turn on the equipment. Accessing from the Computer You can access the Web page of the projector by either of the following two ways. The IP address of the projector must be specified when the projector has the different network segment (subnet) from the computer. Up to 100 projectors can be entered.
After access, the following display appears. Operating the Projector (Control) Click [Control]. You can control the projector on the computer. The functions of each button provide the same functions the button of the identical name. Confirming the State of Projector Settings (Information) Click [Information]. You can confirm the current state of the projector on the computer. You cannot change the settings of the projector. Setting the Connecting Mode Click [Network].
Owner information This information is used for the Mail Report function. Setting Up the Projector Click [Setup]. The Setup menu dialog box appears. You can set the Owner information, Password, Date and Time, Mail Report, etc. Click [Apply] in the lower part of each window to update the projector to the data input in each window. Owner Enter owner information. Projector Enter the location of the projector. Memo Enter a memo, if required.
Time Zone Select the region in which you are using the projector. Date/Time Set the date and time (MM, DD, YY, HH:MM). Time Server Enter the address of the time server when the time is set by a timer server. You can specify the transmission days and times of e-mail messages (Regular report). • Immediately report if any error occurs with the projector (Error Report). • Send warning e-mail messages when a preset time for use of the projector lamp has been reached (Lamp Reminder).
Mon/Tue/Wed/Thu/Fri/Sat/Sun: Specify the days of the week when e-mail is to be sent. You can check two or more days. Every Month on Day: Select this check box and select the day from the drop-down list to send e-mail on a pre-defined day every month. The Regular Report contains the product information, owner information, usage information (time) for the projector, lamp mode, memos, etc.
Notes • If the following items have not been set or are incorrectly set, an error message appears and the test e-mail message is disabled: - Address in the Address field. - “Mail Address” and “Outgoing Mail Server (SMTP)” in the Mail Account field. For details on the mail settings, consult your network administrator. • The mail report function is not available because the network which Outbound Port25 Blocking is used cannot be connected to the SMTP server.
Others Troubleshooting Symptom The projector cannot be detected. The projector cannot be connected. The projector is disconnected in midway. Cause and Remedy • If the Firewall is installed in the computer, communications with the Projector Station for Air Shot Version 2 may be blocked, which may cause an irregularity; the projector cannot be detected or connected, or the projector is disconnected in midway.
Symptom Cause and Remedy The computer and projector are connected in the main window of Projector Station for Air Shot Version 2 but the image cannot be projected on the projector. • The projector is set to a picture muting. c Press the PIC MUTING key on the remote commander to release the muting. • INPUT C is not selected on the projector. c Press the AIR SHOT key on the remote commander or select INPUT C using the INPUT button.
Messages on the Display PC: Message displayed on the computer PJ: Message displayed on the projector 26 Message PC PJ Now searching LAN Module. a • The connectable LAN module within the PC is being searched according to the priorities of the LAN modules specified in the [Option Setting] window. c If the message persists, check and set the LAN module to be used in [Basic Setting] of the [Option Setting] window. Waiting until the IP address is set.
Message PC PJ The Projector is busy. a • The projector you are trying to communicate is performing turning on/off operations. c After the projector operations are complete, communicate it and turn it off again. • The [Setting] window of the projector is open. c Close the [Setting] window and then communicate it and turn it off again. Selected PC is busy. a • The computer you are trying to communicate is performing turning on/off operations.
Message PC PJ Unable to switch resolution of PC desktop. a • When the screen resolution of the computer is not identical with the projector LCD panel resolution, and when the computer is connected to the projector with [Set PC desktop to Projector resolution] of the [Option Setting]-[Connection Setting] checked, the resolution switching of the computer cannot be done successfully.
Technical Terms Default Gateway This means a router address. DHCP The function to share the IP Address automatically with the equipment connected to the network. The DHCP server does not share a fixed IP Address but shares the IP Address with each equipment according to the situation. IP Address The address to recognize each connected machine in the TCP/IP network. LAN (Local Area Network) The network to be used in a limited area such as an office or home.
Sony Corporation