
Operating Instructions Data Projector VPL-CX155/CX125, VPL-CW125


10
Preparation
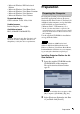
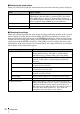
x Displaying the mode status
When you select [Status] from the action menu, the status of the mode being used is displayed.
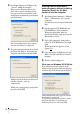
x Changing the settings
When you select [Setup] from the action menu, the [Network Setting] window of the selected
mode is displayed, where [Internet Protocol(IP)] and [PC Registration List] settings can be
changed. Select the desired item and press the ENTER (or right) key to activate its setting items.
To input the desired value for the items, press the ENTER (or right) key. You can return to the
setting menu with the ENTER (or left) key. Click [OK] to save the settings and return to the
initial display of the setting menu. If you select [Cancel], the settings will not be saved and the
initial display of the setting menu appears.
Items Display contents
Internet Protocol(IP) Displays [IP Address Setting (Manual/Auto)], [IP Address],
[Subnet Mask], [Default Gateway], [Primary DNS], [Secondary
DNS], [DHCP Server], and [Lease Obtained]/[Lease Expires].
[Lease Obtained]/[Lease Expires] means the valid period of the IP
address assigned from the [DHCP Server] automatically.
PC Registration List Displays the address of the entered PC.
Close Closes the [Network Status] window.
Items Functions
Internet Protocol(IP) Specify the [Internet Protocol(IP)] settings: [IP Address
Setting (Manual/Auto)], [IP Address], [Subnet Mask],
[Default Gateway], [Primary DNS], [Secondary DNS].
IP Address Setting Select [Auto(DHCP)] or [Manual].When the [Manual] is
selected, set [IP Address], [Subnet Mask] and [Default
Gateway].
IP Address Set the IP address for the projector.
(1.0.0.0~223.255.255.255)
Subnet Mask Set the subnet mask for the projector.
(128.0.0.0~255.255.255.254)
Default Gateway Set the default gateway for the projector.
(1.0.0.0 ~223.255.255.255)
Primary DNS Set the primary DNS server. (1.0.0.0~223.255.255.255)
Secondary DNS Set the secondary DNS server. (1.0.0.0~223.255.255.255)
PC Registration List Enter the IP address or the network address/broadcast IP
address in the IP address box to connect a computer that has
a different network segment (subnet) from the projector.
When the network address/broadcast IP address is entered,
select the subnet mask from the list. Up to 10 IP and
network/broadcast IP address can be entered.