
Operating Instructions Data Projector VPL-CX155/CX125, VPL-CW125


8
Preparation
4 Press the ENTER key.
The setting menu display appears.
5 Select [Setup] to set network setting
items.
To use the network function, set [Standby
Mode] in the Function menu of the projector to
[Standard].
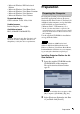
Projector Setting Items
When the ENTER key is pressed in the home
display of the network presentation, the
initial display of the setting menu appears. In
the initial display, you can switch the mode
to be used and change each mode settings.
Using the software keyboard
When inputting characters or numbers, the
software keyboard is displayed.
1 Select a character with the v/V/B/b
buttons and then press the ENTER
key.
The selected character is displayed at the
cursor position in the display column.
2 Repeat step 1 to input characters.
3 After you input the rest of the
characters, select [OK] with v/V/B/
b button and press the ENTER key.
Input characters are entered and the
software keyboard is closed.
To delete the character locating one
space before the cursor
S
elect [Delete] with v/V/B/b button and
press the ENTER key.
To redo the input from the beginning
Select [All Clear] with v/V/B/ b button
and press the ENTER key.
All the input characters are deleted.
To enter a space
Select [Space] with v/V/B/b button and
press the ENTER key.
Note
Simple Mode
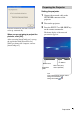
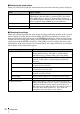
Internet Protocol(IP)
IP Address Setting:
IP Address:
Subnet Mask:
Default Gateway:
192.168.11.21
255.255.255.0
192.168.11.253
Manual
System Setup
Exit
Network
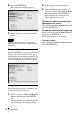
Manual Mode1
Manual Mode2
Manual Mode3
Manual Mode4
Manual Mode5
Simple Mode
Internet Protocol(IP)
IP Address Setting:
IP Address:
Subnet Mask:
Default Gateway:
192.168.11.21
255.255.255.0
192.168.11.253
Manual
System Setup
Exit
Network
Manual Mode1
Manual Mode2
Manual Mode3
Manual Mode4
Manual Mode5