4-095-441-41(1) Data Projector Operating Instructions for Memory Stick GB Mode d’emploi du Memory Stick FR Manual de instrucciones de Memory Stick ES VPL-CX6 2003 Sony Corporation
GB 2
Table of Contents Overview Features ............................................... 4 Precautions ......................................... 4 About This Manual ............................. 4 About a Memory Stick ................. 5 Setting Up Using the Memory Stick ............... 8 Operating the MS Home ..................... 9 Rotating a Picture File ................ 23 Registering a File as the Startup Picture .............................. 23 Deleting a Picture File ................
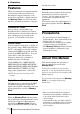
B Overview Features When you memorize presentation material converted by the Projector Station for Presentation (supplied software) or the picture file recorded by a digital camera in the Memory Stick, you can easily make effective presentations without a computer. Presentation Viewer After you have converted Microsoft PowerPoint files by the Projector Station for Presentation to the file which offers the most advantages for projection on the projector, you can make a slide show.
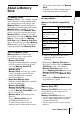
About a Memory Stick Memory Stick is a new compact, portable and versatile IC recording medium with a data capacity that exceeds a floppy disk. Memory Stick is specially designed for exchanging and sharing digital data among Memory Stick compatible products. Because it is removable, Memory Stick can also be used for external data storage. Memory Stick is available in two sizes: standard size and compact Memory Stick Duo size.
This device has been demonstrated the operation with up to 1GB Memory Stick. Operation is not guaranteed for Memory Stick PRO beyond this capacity. Note on Memory Stick Duo • To use a Memory Stick Duo with this device, attach it to a Memory Stick Duo adapter before inserting it into the device. If you insert a Memory Stick Duo without the Memory Stick Duo adapter, you may be unable to remove the Memory Stick Duo. • Make sure to attach a Memory Stick Duo to the adapter in the right direction.
Notes • Do not attach anything other than the supplied label to the Memory Stick labeling position. • Attach the label so that it does not stick out beyond the labeling position. • Do not write forcefully on the Memory Stick Duo memo area. • Carry and store the Memory Stick in its case. • Do not touch the connector of the Memory Stick with anything, including your finger or metallic objects. • Does not strike, bend, or drop the Memory Stick. • Do not disassemble or modify the Memory Stick.
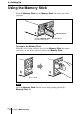
B Setting Up Using the Memory Stick Insert the Memory Stick into the Memory Stick slot on the side of the projector. ER POW SAVING MENU TA INPU O S VIDEO VIDE AU PRO DIO PUSHR ENTE /FAN TEMP ER /COV LAMP SS ACCE Memory Stick Insert the Memory Stick in the direction of the arrow until it clicks. To remove the Memory Stick When the access lamp is turned off, press the Memory Stick and remove your hand. As the lock is released, remove the Memory Stick.
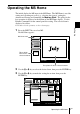
Operating the MS Home The initial display for MS input is the MS Home. The MS Home is used for setting and executing an event (e.g., selecting the viewer), setting the Autorun and Startup and formatting the Memory Stick. The guide for the key operation is displayed at the bottom of the MS Home display. Use the Remote Commander or the control panel for setting. The selected item is displayed in yellow. For details on each operation, see the relevant page. Setting Up 1 Press the INPUT key to select MS.
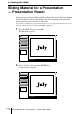
B Viewing the Slide Sliding Material for a Presentation — Presentation Viewer After you have converted Microsoft PowerPoint files by the Projector Station for Presentation to the file which offers the most advantages for projection on the projector, you can make a slide show. For details on making the presentation material, see the Operating Instructions of the Projector Station for Presentation (CD-ROM, supplied). 1 Press the INPUT key to select MS. The MS Home appears.
3 Select “Presentation Viewer”, then press the ENTER key. 4 Select “Select Contents”, then press the ENTER key. The Select Contents menu appears. MS Home Select Presentation Viewer Presentation1 Slide Show Option Index Display Normal Presentation2 Select Contents Presentation1 Presentation3 The Presentation Viewer can select the “contents” in units of a folder in which multiple JPEG files are contained.
Switching the File Display Mode You can display one picture file only (Normal mode) or thumbnails of picture files (Thumbnail mode). 1 Select “Index Display” in the MS Home, then press the ENTER key. 2 Select the setting, then press the ENTER key. Normal: to display a picture file Thumbnail: to display thumbnails of the picture files contained in the selected contents. Repeating the Slide Show 1 Select “Slide Show” in the MS Home, then press the ENTER key. 2 Select “Repeat,” then press the ENTER key.
Sliding a Picture File — Picture Viewer You can make the slide show by using still picture files (DCF-compatible) in the JPEG format recorded by a digital camera or movie picture files in the MPEG1 format recorded by the Sony MPEG MOVIE etc. For details on the operations regarding the picture files, see “Operating the Picture File” on page 20. 1 Press the INPUT key to select MS. The MS Home appears.
3 Select “Picture Viewer”, then press the ENTER key. Thumbnails of the picture files contained in the selected folder appear. MS Home Select Picture Viewer Picture viewer Slide Show Option Index display Normal Select Contents 100MSDCF No.: 1/1234 Size: 1024x768 File: SPJP0001.JPG Date: 2003.JUL.15 12:34PM : Appears when a file is protected. : Appears when a startup file is set. : Movie icon 4 Select “Select Contents”, then press the ENTER key. The Select Contents menu appears.
5 Select the current folder using the m or M key, then press the , key to select the Select Folders menu. MS Home Select Picture Viewer Off Slide Show Option Select Contents No.: 1/1234 Size: 1024x768 Select the folder for your presentation, then press the ENTER key. The title name and the first picture file of the selected folder are displayed. To select the folders which are not displayed, press the , key to select the slider in the Select Folders menu and press the m or M key.
To execute the slide show When “Advan. Slds.” in the slide show setting is set to “Auto”, the slides change automatically. When a movie file is selected, the movie plays back automatically, and after playback the next slide is displayed automatically. When you want to end the slide show, press the MS SLIDE or ENTER key. When it is set to “Manual”, press the following keys for the slide show. ,: to display the next slide <: to display the previous slide MS SLIDE: to end the slide show When “Advan. Slds.
Executing the Slide Show Promptly As the settings are memorized even if you change the input after the setting of steps 1 to 9 of “Sliding a Picture File — Picture Viewer”, press the MS SLIDE key on the Remote Commander just as you start the presentation. The input is changed to MS and the slide show starts promptly. To end the slide show, press the MS SLIDE or ENTER key when “Advan. Slds.” is set to “Auto”, or press the MS SLIDE key when “Advan. Slds.” is set to “Manual”.
When a movie file is selected by pressing the < or , key, the Movie Player appears on the screen. Operate the Movie Player as follows: [Movie Player] Prev. Next Full Screen Menu MS Home No.: 1/1234 Size: 320x240 File: BASEBALL.MPG Date: 2003.JUL.15 12:34PM N (play/pause): to play back. During playback, the button display is changed to the X (pause) button. x (stop): to stop playback Full Screen: to play back on the full screen Menu: to display the index screen [Guide display] < Prev.
To return to the MS Home without executing the movie play Select “MS Home”. Executing the Slide Show Promptly As the settings are memorized even if you change the input after the setting of steps 1 to 3 of “Playing Back a Movie File”, press the MS SLIDE key on the Remote Commander just as you start the presentation. The input is changed to MS and the slide show starts promptly. To end the slide show, press the MS SLIDE key.
B Setting/Displaying the Picture File Operating the Picture File To operate the picture file, display the index screen (see pages 21 and 22. ) When the Presentation Viewer is displayed To display the index screen, select the contents in the normal or thumbnail display mode, then press the ENTER key. You can enlarge a picture file on the full screen using the menu on the index screen. If you press the ENTER key when a full-screen picture is displayed, you can show or hide the picture file information.
Index screen of a still picture file MS Home Select Picture Viewer Full Screen Index screen Slide Show Appears when a file is protected Option Protect Rotate Appears when the Picture Viewer is displayed Startup Appears when a startup file is set Select Contents Delete Close Total number of picture files in the current content Order in the current content No.: 1/1234 Size: 1024x768 Resolution File: SPJP0001.JPG Date: 2003.JUL.
Index screen of a full-screen still picture file Appears when the Picture Viewer is displayed MS Home Information On Protect Protect Rotate Startup Delete Close Total number of picture files in the current content Order in the current content Appears when a file is protected Appears when a startup file is set No.: 1/1234 Size: 1024x768 Resolution File: SPJP0001.JPG Date: 2003.JUL.
Protecting an Important File After selecting the file you want to protect, set “Protect” to “On” or “All On”. When a file is protected, the protect mark is displayed. Rotating a Picture File After selecting the file you want to rotate, set “Rotate”. The picture rotates 90° on every pressing of the ENTER key. Note A protected file cannot be rotated.
When the Presentation Viewer is displayed, the number and size (resolution) of the picture file are displayed. When the Picture Viewer is displayed, the number, size (resolution), file format and recorded date of the picture file are displayed. Note For a picture file processed on a computer, the renewal date may be displayed instead of the recorded date. Switching the Sound of a Movie File 1 Select a movie file, then press the ENTER key. 2 Select “Movie Player,” then press the ENTER key.
Displaying Still Picture Files or Movie Files Only You can filter all picture files contained in a folder to display the still picture files or the movie files only. 1 Select “Option” in the MS Home, then press the ENTER key. 2 Select “File”, then press the , or ENTER key. 3 Select “Filter”, then press the ENTER key. 4 Select the item you want to set, then press the ENTER key.
B Useful Settings Displaying the Picture Files Recorded by a Digital Camera Only The unit can choose and display the JPEG and MPEG1 picture files recorded by a digital camera (DCF-compatible) only from among picture files stored in a Memory Stick. 1 2 Select “Select Contents” in the MS Home, then press the ENTER key. Select “Digi. Camera Mode”, then press the ENTER key. MS Home Select Picture Viewer Off On Off Slide Show Option Select Contents No.: 1/1234 Size: 1024x768 3 File: SPJP0001.
Starting a Presentation Automatically — Autorun When the Memory Stick with the picture file for which the Autorun function is set by the Projector Station for Presentation is inserted in the Memory Stick slot, the input is automatically switched to MS and the slide show starts. Setting the Autorun function 1 Select “Option” in the MS Home, then press the ENTER key. 2 Select “Setting”, then press the ENTER key. 3 Select “Autorun”, then press the ENTER key.
Projecting a Selected File When the Power is Turned on — Startup When the power is turned on, the selected picture file is projected for about 30 seconds. When you want to use the registered picture file as the startup file, you must register a picture file as the startup file in the index screen (see page 23.) 1 Select “Option” in the MS Home, then press the ENTER key. 2 Select “Setting”, then press the ENTER key. 3 Select “Startup”, then press the ENTER key.
B Operating Memory Stick Displaying the Memory Stick Information You can display the type and the used and remaining capacity of the Memory Stick in use. The remaining capacity of the Memory Stick is also displayed at the right bottom of the MS Home. 1 Select “Option” in the MS Home, then press the ENTER key. 2 Select “Memory Stick”. The information of the Memory Stick in use is displayed. MS Home Select Picture Viewer Slide Show File Option Setting Type: MEMORYSTICK 128M Capacity: 123.
Formatting a Memory Stick When a Memory Stick cannot be used, format it by the projector. When a Memory Stick is formatted, its data is cleared. 1 Select “Option” in the MS Home, then press the ENTER key. 2 Select “Memory Stick”, then press the , or ENTER key. 3 Press the ENTER key again. MS Home Select Picture Viewer Slide Show File Option Type: MEMORYSTICK 128M Setting Capacity: 123.3MB Memory Stick Used: All files deleted Select Contents 30.8MB Remaining: 92.
B Other Troubleshooting If you have a problem with the MS Home, check the following. If the problem persists, contact your nearest Sony dealer. Problem Cannot insert the Memory Stick into the drive. Cannot save a file. Cause and solution • The Memory Stick is not facing in the correct direction. c Insert the Memory Stick with the arrow mark pointing toward the Memory Stick slot of the projector. • The Memory Stick is full. c Delete unwanted files in the Memory Stick.
On Display When the following displays appear in the screen, make the material for a presentation again by using the Projector Station for Presentation. The picture file is in the JPEG format or MPEG format unacceptable. There is a thumbnail that it is not DCF-compatible. There is no selected picture file. There is a picture file but the thumbnail is broken. The picture file is broken. Caution regarding messages while using a Memory Stick Use the list below to check the message meanings.
Message Solution Format error c The Memory Stick has not been formatted correctly. Format it on this projector correctly. c Formatting was not successful. File error c The selected folder has not been named correctly. Enter the name again using less than 66 characters (including “/”) by displaying the Select Folder menu. Read Only Memory c A read-only Memory Stick containing picture files has been inserted. You cannot record or delete data with a read-only Memory Stick. Access denied.
FR 2
Table des matières Présentation Caractéristiques .................................. 4 Précautions ......................................... 4 A propos de ce manuel ....................... 4 Utilisation d’un Memory Stick ...... 5 Configuration Utilisation du Memory Stick ......... 9 Utilisation de l’écran Origine MS .................................... 10 Rotation d’un fichier image ........ 24 Enregistrement d’un fichier en tant qu’image de lancement .... 24 Suppression d’un fichier image ..
B Présentation Caractéristiques Si vous mémorisez un support de présentation converti avec le Projector Station for Presentation (logiciel fourni) ou le fichier image enregistré avec une caméra numérique dans le Memory Stick, vous pouvez facilement réaliser sans ordinateur des présentations efficaces.
Utilisation d’un Memory Stick Le Memory Stick est un nouveau support d’enregistrement IC extrêmement compact, facile à transporter et ergonomique, avec une capacité de stockage de données supérieure à celle d’une disquette. Ce support est conçu pour l’échange et le partage de données numériques avec des produits compatibles Memory Stick. De plus, étant amovible, il peut également être utilisé pour le stockage de données externes.
Remarque concernant la capacité de mémoire des Memory Stick PRO produit compatible Memory Stick utilisée. Les caractéristiques des Memory Stick PRO varient en fonction de la conception des appareils hôtes. Emplacement pour support Memory Stick PRO: • ne prend pas en charge les transferts de données à haut débit ; • ne prend pas en charge la technologie de protection des droits d’auteur MagicGate ; • ne prend pas en charge la fonction de sécurité avec accès contrôlé.
Informations relatives au MagicGate La technologie de protection des droits d’auteur MagicGate utilise la technique de cryptage des données. Format de sauvegarde d’un fichier Un support de présentation converti avec le Projector Station for Presentation est enregistré dans les formats de fichiers suivants sur le Memory Stick. • Fichiers image (compatibles DCF), compressés au format JPEG (Joint Photographic Experts Group) avec l’extension .jpg.
Avertissement concernant le formatage des Memory Stick sur un ordinateur Prenez bien en compte les points suivants lors du formatage de Memory Stick sur un ordinateur. Le fonctionnement des Memory Stick formatés sur un ordinateur n’est pas garanti sur cet appareil. Pour utiliser un Memory Stick formaté sur un ordinateur, le Memory Stick doit être reformaté sur cet appareil. Notez que, dans ce cas, toutes les données mémorisées sur le Memory Stick sont perdues.
B Configuration Utilisation du Memory Stick Insérez le Memory Stick dans l’emplacement prévu à cet effet sur le côté du projecteur. ER POW SAVING MENU TA INPU S VIDEO VIDEO O Configuration AUDI PRO PUSHR ENTE /FAN TEMP ER /COV LAMP SS ACCE Memory Stick Insérez le Memory Stick dans le sens indiqué par la flèche et poussez jusqu’au déclic. Pour retirer le Memory Stick Si le témoin d’accès est éteint, appuyez sur le Memory Stick et retirez votre main.
Utilisation de l’écran Origine MS L’affichage initial du MS est Origine MS. L’écran Origine MS est utilisé pour la configuration et l’exécution d’un événement (par exemple, sélection du visualiseur), la configuration de l’exécution automatique et du démarrage ainsi que le formatage du Memory Stick. Le guide des opérations de base est affiché en bas de l’affichage Origine MS. Utilisez la télécommande ou le panneau de configuration pour effectuer les réglages. Le paramètre sélectionné est affiché en jaune.
B Affichage de la diapositive Diapositives de présentation — Visualiseur de présentation Après avoir converti des fichiers Microsoft PowerPoint avec le Projector Station for Presentation en fichiers offrant les principales qualités requises pour la projection sur le projecteur, vous pouvez réaliser un diaporama. Pour obtenir davantage de détails sur le support de présentation, consultez le mode d’emploi de Projector Station for Presentation (CD-ROM fourni).
3 Sélectionnez « Visual. présent. », puis appuyez sur la touche ENTER. 4 Sélectionnez « Sél. contenu », puis appuyez sur la touche ENTER. Le menu Sél. contenu apparaît. Origine MS Sélection Visual. présent. Presentation1 Diaporama Option Affichage index Normal Presentation 2 Sél. contenu Presentation1 Presentation 3 n°: 1/1234 Ampl: 1024x768 Le visualiseur de présentation peut sélectionner le «contenu» sous forme d’unités d’un dossier dans lequel se trouvent de nombreux fichiers JPEG.
Passer au mode d’affichage des fichiers Vous pouvez afficher un seul fichier image (mode Normal) ou des miniatures des fichiers image (mode Miniatures). 1 Sélectionnez « Affichage index » dans l’écran Origine MS, puis appuyez sur la touche ENTER. 2 Sélectionnez le réglage, puis appuyez sur la touche ENTER. Normal : pour afficher un fichier image Miniatures : pour afficher des miniatures des fichiers image dub contenu sélectionné.
Défilement d’un fichier image — Visualiseur d’images Vous pouvez réaliser le diaporama en mélangeant des fichiers d’images fixes (compatibles DCF) au format JPEG enregistrés avec une caméra numérique ou des fichiers d’images vidéos au format MPEG1 enregistrés avec le MPEG MOVIE de Sony etc. Pour obtenir plus de détails sur les fonctions des fichiers image, reportez-vous à la section «Ouverture du fichier image» page 21. 1 Appuyez sur la touche INPUT pour sélectionner MS. L’écran Origine MS apparaît.
3 Sélectionnez « Visualiseur d’images », puis appuyez sur la touche ENTER. Les miniatures des fichiers image contenus dans le dossier sélectionné apparaissent. Origine MS Sélection Visualiseur d'images Picture viewer Diaporama Option Index display Normal Sél. contenu 100MSDCF Affichage de la diapositive n°: 1/1234 Ampl: 1024x768 Fichier: SPJP0001.JPG Date: 15.JUL.
5 Sélectionnez le dossier en cours à l’aide de la touche m ou M, puis appuyez sur la touche , pour sélectionner le menu Sélectionner dossiers. Origine MS Sélection Visualiseur d'images Mode photo num. Désactivé Diaporama Option Sél. contenu n°: 1/1234 Ampl: 1024x768 Fichier: SPJP0001.JPG Date: 15.JUL.2003 12:34 6 Sélectionnez le dossier pour votre présentation, puis appuyez sur la touche ENTER. Le titre et le premier fichier image du dossier sélectionné apparaissent.
Pour lancer le diaporama Lorsque l’option « Diapo avan. » du réglage du diaporama est réglée sur « Auto », les diapositives changent automatiquement. Lorsqu’un fichier vidéo est sélectionné, la vidéo est lue automatiquement, puis, après la lecture, la diapositive suivante est automatiquement affichée. Si vous souhaitez terminer le diaporama, appuyez sur la touche MS SLIDE ou sur la touche ENTER. Si la fonction est réglée sur « Manuel », appuyez sur les touches suivantes pour lancer le diaporama.
Lancement rapide du diaporama Puisque les réglages sont mémorisés même si vous modifiez l’entrée après le réglage des étapes 1 à 9 de « Défilement d’un fichier image —Visualiseur d’images », il vous suffit d’appuyer sur la touche MS SLIDE de la télécommande au début de la présentation. L’entrée est paramétrée sur MS et le diaporama commence rapidement. Pour terminer le diaporama, appuyez sur la touche MS SLIDE ou ENTER lorsque « Diapo avan.
Pour lancer le diaporama Appuyez sur les touches suivantes. , : pour afficher la diapositive suivante < : pour afficher la diapositive précédente MS SLIDE : pour mettre fin au diaporama Lorsqu’un fichier vidéo est sélectionné à l’aide de la touche < ou ,, le Lecteur vidéo apparaît sur l’écran. Activez le Lecteur vidéo de la façon suivante : [Lecteur vidéo] Suiv. Préc. Affichage de la diapositive Écran complet Menu Origine MS n°: 1/1234 Ampl: 320x240 Fichier: BASEBALL.MPG Date: 15.JUL.
Pour effectuer une lecture en écran complet Sélectionnez « Écran Complet », puis appuyez sur la touche ENTER. L’image est agrandie sur la totalité de l’écran et la lecture commence. Lorsque vous appuyez sur les touches M, m, <, , ou ENTER en cours de lecture, le Lecteur vidéo réapparaît sur l’écran. Remarque Lorsque l’image est petite, elle n’est pas agrandie sur l’écran complet si vous sélectionnez « Écran complet ».
B Réglages/Affichage des fichiers image Ouverture du fichier image Pour ouvrir le fichier image, affichez l’écran d’index. (Voir pages 22 et 23.) Si le visualiseur de présentation est affiché Pour afficher l’écran d’index, sélectionnez le contenu en mode d’affichage Normal ou Miniatures, appuyez ensuite sur la touche ENTER. Vous pouvez agrandir un fichier image sur l’écran complet en utilisant le menu de l’écran d’index.
Ecran d’index d’un fichier d’image fixe Origine MS Sélection Visualiseur d'images Apparaît lorsqu’un fichier est protégé Écran complet Diaporama Option Protect. Ecran d’index Rotation Lancmnt Apparaît lorsqu’un fichier de lancement est défini Sél. contenu Suppr. Fermer Nombre total de fichiers image du contenu en cours de lecture Ordre du contenu en cours de lecture n°: 1/1234 Ampl: 1024x768 Fichier: SPJP0001.JPG Date: 15.JUL.
Ecran d’index d’un fichier d’image fixe en écran complet Apparaît lorsque le visualiseur d’images est affiché Origine MS Informations Act Protect. Protect Rotation Lancmnt Nombre total de fichiers image du contenu en cours de lecture Suppr. Fermer Ordre du contenu en cours de lecture Apparaît lorsqu’un fichier est protégé Fichier: SPJP0001.JPG Date: 15.JUL.
Protection d’un fichier important Après avoir sélectionné le fichier à protéger, réglez « Protect. » sur « Act » ou « Tt act ». Lorsqu’un fichier est protégé, le symbole de protection est affiché. Rotation d’un fichier image Après avoir sélectionné le fichier que vous souhaitez faire pivoter, sélectionnez « Rotation ». L’image pivote de 90° à chaque fois que vous appuyez sur la touche Enter. Remarque Il est impossible de faire pivoter un fichier protégé.
Affichage/Masquage des informations relatives au fichier image Sélectionnez un fichier image, sélectionnez « Informations » dans « Menu » sur l’écran d’index de l’image fixe plein écran ou sur le Lecteur vidéo, puis appuyez sur la touche ENTER. Si vous souhaitez afficher les informations relatives au fichier image, sélectionnez « Act ». Les informations apparaissent en bas de l’écran. Si vous ne souhaitez pas afficher les informations, sélectionnez « Dés ».
Affichage de fichiers d’images fixes ou de fichiers vidéo uniquement Vous pouvez filtrer tous les fichiers image d’un dossier pour afficher les fichiers d’images fixes ou les fichiers vidéo uniquement. 1 Sélectionnez « Option » dans Origine MS, puis appuyez sur la touche ENTER. 2 3 4 Select « Fichier », puis appuyez sur la touche , ou ENTER. Sélectionnez « Filtre », appuyez ensuite sur la touche ENTER. Sélectionnez le paramètre de votre choix, puis appuyez sur la touche ENTER.
B Réglages utiles Affichage des fichiers image enregistrés avec une caméra numérique uniquement L’appareil peut choisir et afficher les fichiers image JPEG et MPEG1 enregistrés avec une caméra numérique (compatible DCF) uniquement parmi les fichiers image enregistrés sur un Memory Stick. 1 Sélectionnez « Sél. Contenu » dans Origine MS, puis appuyez sur la touche ENTER. 2 Sélectionnez « Mode photo num. », puis appuyez sur la touche ENTER. Origine MS Sélection Visualiseur d'images Mode photo num.
Remarques • Cette fonction est inopérante si plus de 2 000 fichiers image enregistrés avec une caméra numérique sont mémorisés sur un Memory Stick. • Pour un fichier image enregistré avec la fonction Voice Memo de l’appareil photo numérique Sony, seul le fichier d’image fixe est affiché. • Si vous supprimez un fichier image repéré par le symbole de fichier portant un nom similaire ( ), le fichier image portant un nom similaire est également supprimé.
Lancement automatique d’une présentation — Exé. Auto Lorsque le Memory Stick contenant le fichier image pour lequel la fonction Exé. Auto est activée avec le Projector Station for Presentation, est inséré dans l’emplacement Memory Stick, l’entrée est automatiquement commutée sur MS et le diaporama commence. Paramétrage de la fonction Exécution auto 1 Sélectionnez « Option » dans Origine MS, puis appuyez sur la touche ENTER. 2 Sélectionnez « Réglage », puis appuyez sur la touche ENTER.
Projection d’un fichier sélectionné lorsque le projecteur est sous tension — Lancement A la mise sous tension, le fichier image sélectionné est projeté pendant environ 30 secondes. Si vous souhaitez utiliser le fichier image enregistré en tant que fichier de lancement, vous devez enregistrer un fichier image en tant que fichier de lancement dans l’écran d’index (voir page 24). 1 Sélectionnez « Option » dans Origine MS, puis appuyez sur la touche ENTER.
B Utilisation du Memory Stick Affichage des informations relatives au Memory Stick Vous pouvez afficher le type, ainsi que la capacité utilisée et la capacité restante du Memory Stick en cours d’utilisation. La capacité restante du Memory Stick est également affichée en bas à droite de l’écran Origine MS. 1 Sélectionnez « Option » dans Origine MS, puis appuyez sur la touche ENTER. 2 Sélectionnez « Memory Stick ». Les informations concernant le Memory Stick utilisé sont affichées.
Formatage d’un Memory Stick Si un Memory Stick ne peut pas être utilisé, réinitialisez-le à l’aide du projecteur. Lors de l’initialisation du Memory Stick, les données sont effacées. 1 Sélectionnez « Option » dans Origine MS, puis appuyez sur la touche ENTER. 2 Sélectionnez « Memory Stick », puis appuyez sur la touche , ou ENTER. 3 Appuyez de nouveau sur la touche ENTER. Origine MS Sélection Visualiseur d'images Diaporama Fichier Option Type: MEMORYSTICK 128M Réglage Capacité: 123.
B Autres informations Dépannage Si vous rencontrez des problèmes dans Origine MS, vérifiez les points suivants. Si le problème persiste, contactez votre revendeur Sony le plus proche. Problème Impossible d’insérer le Memory Stick dans le lecteur. Cause et solution Impossible d’enregistrer un fichier. • Le Memory Stick est saturé. c Supprimez les fichiers inutiles du Memory Stick. • L’onglet de protection en écriture du Memory Stick a été réglé sur LOCK. c Déverrouillez le Memory Stick.
Affichage Si les indications suivantes s’affichent à l’écran, réalisez de nouveau le support de présentation à l’aide du Projector Station for Presentation. Le fichier image est au format JPEG ou MPEG et ne peut pas être utilisé. La vignette est affichée mais elle n’est pas compatible DCF. Aucun fichier image n’est sélectionné. La vignette est endommagée. Le fichier image est affiché mais la vignette est cassée. Le fichier image est endommagé.
Message Solution Erreur de format c Le Memory Stick n’a pas été formaté correctement. Formatez-le correctement sur ce projecteur. c Le formatage a échoué. Erreur fichier c Le dossier sélectionné n’a pas été nommé correctement. Saisissez à nouveau le nom en utilisant moins de 66 caractères (« / » compris), en affichant le menu Sélectionner dossiers. Mémoire morte (ROM) c Un Memory Stick en lecture seule contenant des fichiers image a été inséré.
ES 2
Índice Descripción general Características ..................................... 4 Precauciones ....................................... 4 Acerca de este manual ........................ 4 Acerca de los Memory Stick .............. 5 Instalación Uso del Memory Stick ........................ 9 Funcionamiento de la página Inicio MS ........................... 10 Visualización de la diapositiva Material de diapositivas para una presentación — Visor de presentaciones ...............................
B Descripción general Características Si memoriza en el Memory Stick material de presentación convertido mediante Projector Station for Presentation (software suministrado) o el archivo de imagen grabado mediante una cámara digital, podrá realizar fácilmente las presentaciones sin utilizar un ordenador.
Acerca de los Memory Stick Puede seleccionar la memoria que desee utilizar para cualquier fin a través del selector de memoria situado en la parte posterior del Memory Stick. No se puede utilizar toda la memoria disponible a la vez ni de forma continua. El Memory Stick es un nuevo sporte de grabación IC compacto, portátil y versátil con una capacidad de datos superior a la de un disquete.
• no admite la transferencia de datos a alta velocidad; • no admite la tecnología de protección de copyright MagicGate; • no admite la función de seguridad de control de acceso. Se ha probado que este dispositivo funciona con un Memory Stick de hasta 1 GB. No se garantiza el funcionamiento para Memory Stick PRO que excedan esta capacidad.
Antes de utilizar un Memory Stick • No desmonte ni cambie ninguna pieza del Memory Stick. • Evite que el Memory Stick se moje.
Indicador de acceso Si el indicador de acceso está iluminado o parpadeando, se están leyendo o escribiendo datos en el Memory Stick. No mueva el ordenador ni el proyector ni los someta a sacudidas. No desactive la alimentación del ordenador ni del proyector, ni desconecte el cable USB o extraiga el Memory Stick. Esto podría dañar los datos. ...................................................................... son marcas • Memory Stick y comerciales de Sony Corporation.
B Instalación Uso del Memory Stick Inserte el Memory Stick en la ranura para Memory Stick del lateral del proyector. ER POW SAVING MENU TA INPU O S VIDEO VIDE PRO PUSHR ENTE Instalación O AUDI /FAN TEMP ER /COV LAMP SS ACCE Memory Stick Inserte el Memory Stick en la dirección de la flecha hasta que oiga un “clic”. Para extraer el Memory Stick Cuando el indicador de acceso esté apagado, presione el Memory Stick y retire la mano. Extraiga el Memory Stick cuando se haya liberado el bloqueo.
Funcionamiento de la página Inicio MS La pantalla inicial de entrada de MS es la página Inicio MS. La pantalla Inicio MS se emplea para configurar y ejecutar el evento (por ejemplo, seleccionar el visor), definir las funciones de ejecución automática y inicio y formatear el Memory Stick. La guía de funcionamiento de las teclas se muestra en la parte inferior de la pantalla de la página Inicio MS. Utilice el mando a distancia o el panel de control para realizar ajustes.
B Visualización de la diapositiva Material de diapositivas para una presentación — Visor de presentaciones Después de convertir archivos de Microsoft PowerPoint mediante Projector Station for Presentation en el archivo que ofrece el mayor número de ventajas para proyectarlo en el proyector, podrá realizar la presentación de diapositivas.
3 Seleccione “Visor pres.” y pulse la tecla ENTER. 4 Seleccione “Sel. cont.” y pulse la tecla ENTER. Aparecerá el menú Sel. cont. Inicio MS Selec. Visor pres. Presentation1 Diapos. Opción Present. Índice Normal Presentation2 Sel. cont. Presentation1 Presentation3 Num.: 1/1234 Tamaño: 1024x768 El Visor de presentaciones puede seleccionar el “contenido” en unidades de una carpeta con varios archivos JPEG.
Cambio del modo de visualización de archivos Puede visualizar un solo archivo de imagen (modo Normal) o miniaturas de los archivos de imagen (modo Miniatura). 1 Seleccione la opción “Present. Índice” en Inicio MS y, a continuación, pulse la tecla ENTER. 2 Seleccione el ajuste y pulse la tecla ENTER. Normal: para visualizar un archivo de imagen Miniatura: para visualizar miniaturas de los archivos de imagen en los contenidos seleccionados.
Presentación con un archivo de imagen — Visor de imágenes Puede crear una presentación de diapositivas al mezclar archivos de imagen fija (compatibles con DCF) en el formato JPEG grabado con una cámara digital o archivos de imagen de película en el formato MPEG1 grabados con Sony MPEG MOVIE, etc. Para obtener detalles sobre las operaciones relacionadas con archivos de imagen, consulte “Funcionamiento de un archivo de imagen” en la página 21. 1 Pulse la tecla INPUT para seleccionar MS.
3 Seleccione “Visor de imágenes” y pulse la tecla ENTER. Aparecerán miniaturas de los archivos de imagen de la carpeta seleccionada. Inicio MS Selec. Visor de imágenes Picture viewer Diapos. Opción Index display Normal Sel. cont. 100MSDCF Num.: 1/1234 Tamaño: 1024x768 Archivo: SPJP0001.JPG Fecha: 15.JUL.2003 12:34 Visualización de la diapositiva : Aparecerá cuando un archivo esté protegido : Aparecerá cuando un archivo se haya ajustado como archivo de inicio : Icono Película 4 Seleccione “Sel. cont.
5 Seleccione la carpeta actual mediante las teclas m o M y, a continuación, pulse la tecla , para elegir el menú Seleccionar carpetas. Inicio MS Selec. Visor de imágenes Modo cámara digi. No Diapos. Opción Sel. cont. Num.: 1/1234 Tamaño: 1024x768 6 Archivo: SPJP0001.JPG Fecha: 15.JUL.2003 12:34 Seleccione la carpeta para la presentación y pulse la tecla ENTER. Aparecerán el título y el primer archivo de imagen de la carpeta seleccionada.
Para ejecutar la presentación de diapositivas Si la opción “Av. diap.” del ajuste de presentación de diapositivas se ajusta en “Auto”, las diapositivas cambian automáticamente. Si se selecciona un archivo de película, la película se reproduce automáticamente. Después de la reproducción, aparecerá automáticamente la diapositiva subsiguiente. Cuando desee finalizar la presentación de diapositivas, pulse la tecla MS SLIDE o ENTER.
Ejecución inmediata de la presentación de diapositivas Puesto que los ajustes se memorizan aunque cambie la entrada después del ajuste de los pasos 1 a 9 de “Presentación con un archivo de imagen — Visor de imágenes”, pulse la tecla MS SLIDE del mando a distancia al iniciar la presentación. La entrada cambia a MS y la presentación se inicia de forma inmediata. Para finalizar la presentación de diapositivas, si el ajuste “Av. diap.” está en “Auto”, pulse la tecla MS SLIDE o ENTER.
Si se selecciona un archivo de película mediante la tecla < o ,, aparecerá el Reproductor de películas en la pantalla. Utilice el Reproductor de películas de la siguiente manera: [Reproductor de películas] Ant. Sig. Pant. Completa Menú Inicio MS Archivo: BASEBALL.MPG Fecha: 15.JUL.2003 12:34 N(reproducir/pausa): para reproducir. Durante la reproducción, el botón cambia al botón X (pausa). x(detener): para detener la reproducción Pant.
Ejecución inmediata de la presentación de diapositivas Puesto que los ajustes se memorizan incluso si se cambia la entrada después del ajuste de los pasos 1 a 3 de “Reproducción de un archivo de película”, pulse la tecla MS SLIDE del mando a distancia en el momento en el que se inicia la presentación. La entrada cambia a MS y la presentación de diapositivas se inicia inmediatamente. Para finalizar la presentación, pulse la tecla MS SLIDE.
B Ajuste/Visualización de un archivo de imagen Funcionamiento de un archivo de imagen Para utilizar un archivo de imagen, visualice la pantalla de índice. (Consulte las páginas 22 y 23.) Si se visualiza el Visor de presentaciones Para visualizar la pantalla de índice, seleccione el contenido en el modo de visualización Normal o Miniatura y pulse la tecla ENTER. Puede utilizar el menú de la pantalla de índice para agrandar un archivo de imagen en modo de pantalla completa.
Pantalla de índice de un archivo de imagen fija Inicio MS Selec. Visor de imágenes Pant. Complet Aparece cuando un archivo está protegido Diapos. Opción Protec. Pantalla de índice Rotar Aparece cuando un archivo se ha ajustado como archivo de inicio Iniciar Sel. cont. Borrar Cerrar Número total de archivos de imagen en el contenido actual Orden en el contenido actual Num.: 1/1234 Tamaño: 1024x768 Archivo: SPJP0001.JPG Fecha: 15.JUL.
Pantalla de índice de un archivo de imagen fija en modo de pantalla completa Aparece cuando se visualiza el Visor de imágenes Inicio MS Information Sí Protec. Protect Rotar Iniciar Borrar Cerrar Número total de archivos de imagen en el contenido actual Orden en el contenido actual Num.: 1/1234 Tamaño: 1024x768 Aparece cuando un archivo está protegido Aparece cuando un archivo se ha ajustado como archivo de inicio Resolución Archivo: SPJP0001.JPG Fecha: 15.JUL.
Protección de un archivo importante Tras seleccionar el archivo que desee proteger, ajuste “Protec.” en “Sí” o “Todo sí”. Cuando un archivo está protegido, se muestra la marca de protección. Giro de un archivo de imagen Tras seleccionar el archivo que desee girar, ajuste “Rotar”. La imagen gira 90° cada vez que se pulsa la tecla ENTER. Nota Un archivo protegido no se puede girar.
Visualización/ocultación de la información de archivo de imagen Seleccione un archivo de imagen y, a continuación, la opción “Información” de “Menú” en la pantalla de índice de la imagen fija en modo de pantalla completa o en el Reproductor de películas. Pulse la tecla ENTER. Si desea visualizar la información del archivo de imagen, seleccione “Sí”. La información aparecerá en la parte inferior de la pantalla. Si no desea visualizarla, seleccione “No”.
Visualización sólo de los archivos de imagen fija o sólo de los archivos de película Es posible filtrar todos los archivos de imagen de una carpeta con el fin de visualizar sólo los archivos de imagen fija o sólo los archivos de película. 1 Seleccione “Opción” en Inicio MS y, a continuación, pulse la tecla ENTER. 2 Seleccione “Archivo” y pulse la tecla , o ENTER. 3 Seleccione “Filtrar” y pulse la tecla ENTER. 4 Seleccione el elemento que desee ajustar y pulse la tecla ENTER.
B Ajustes útiles Visualización sólo de los archivos de imagen grabados con una cámara digital La unidad puede seleccionar y visualizar sólo los archivos de imagen JPEG y MPEG1 grabados con una cámara digital (compatible con DCF) de entre los archivos de imagen que se almacenan en un Memory Stick. 1 Seleccione “Sel. cont.” en Inicio MS y, a continuación, pulse la tecla ENTER. 2 Seleccione “Modo cámara digi.” y pulse la tecla ENTER. Inicio MS Selec. Visor de imágenes Modo cámara digi. No Sí No Diapos.
Inicio automático de una presentación — Ejecución automática Cuando en la ranura para Memory Stick se inserta el Memory Stick con el archivo de imagen para el que se ha establecido la función de ejecución automática mediante Projector Station for Presentation, la entrada cambia automáticamente a MS y se inicia la presentación de diapositivas. Configuración de la función de ejecución automática 1 Seleccione “Opción” en la página Inicio MS y pulse la tecla ENTER.
Proyección de un archivo seleccionado con la alimentación activada — Inicio Al activar la alimentación, el archivo de imagen seleccionado se proyecta durante 30 segundos aproximadamente. Cuando desee utilizar el archivo de imagen registrado como archivo de inicio, es preciso registrar un archivo de imagen como archivo de inicio en la pantalla de índice (consulte la página 24). 1 Seleccione “Opción” en la página Inicio MS y pulse la tecla ENTER. 2 Seleccione “Ajuste” y pulse la tecla , o ENTER.
B Funcionamiento del Memory Stick Visualización de la información del Memory Stick Es posible visualizar el tipo y la capacidad utilizada y restante del Memory Stick que se está utilizando. La capacidad restante del Memory Stick también se muestra en la parte inferior derecha de Inicio MS. 1 Seleccione “Opción” en Inicio MS y, a continuación, pulse la tecla ENTER. 2 Seleccione “Memory Stick”. Aparecerá la información del Memory Stick que se está utilizando. Inicio MS Selec. Visor de imágenes Diapos.
Formateo de un Memory Stick Cuando no pueda utilizar un Memory Stick, formatéelo mediante el proyector. Los datos se borran al formatear el Memory Stick. 1 Seleccione “Opción” en la página Inicio MS y pulse la tecla ENTER. 2 Seleccione “Memory Stick” y pulse la tecla ENTER. 3 Pulse la tecla ENTER de nuevo. Inicio MS Selec. Visor de imágenes Diapos. Archivo Opción Tipo: MEMORYSTICK 128M Ajuste Capacidad: 123.3MB Memory Stick Usada: Eliminados todos los archivos Sel. cont. 30.
B Otros Solución de problemas Si tiene cualquier problema con la página Inicio MS, realice las siguientes comprobaciones. Si el problema persiste, consulte con el distribuidor Sony más próximo. Problema Causa y solución No es posible insertar el Memory Stick en la unidad. • El Memory Stick no está orientado en el sentido correcto. c Inserte el Memory Stick con la marca de flecha orientada hacia la ranura para Memory Stick del proyector. No es posible guardar un archivo. • El Memory Stick está lleno.
Indicaciones en pantalla Si las siguientes indicaciones aparecen en pantalla, cree el material de presentación de nuevo mediante Projector Station for Presentation. El archivo de imagen está en un formato JPEG o MPEG no compatible. Hay una miniatura que no es compatible con DCF. No hay ningún archivo de imagen seleccionado. Hay un archivo de imagen, pero la miniatura está dañada. El archivo de imagen está dañado.
Message c Se ha insertado un Memory Stick que no es compatible o que no puede utilizarse con el proyector. Error formato c No se ha formateado correctamente el Memory Stick. Formatéelo correctamente en el proyector. c El formateo no se ha completado correctamente. Error archivo c No se ha asignado el nombre correcto a la carpeta seleccionada. Introduzca el nombre de nuevo usando menos de 66 caracteres (incluyendo “/”) mediante el menú Seleccionar carpetas.