4-103-418-13 (1) Data Projector Operating Instructions for Memory Stick VPL-CX85 VPL-CX75 2004 Sony Corporation
Table of Contents Overview Features ............................................... 4 Precautions ......................................... 4 About This Manual ............................. 4 About a Memory Stick .................... 5 Setting Up Using the Memory Stick .................. 9 Operating the Memory Stick Home ............................................. 10 Viewing the Slide Sliding Material for a Presentation — Presentation Viewer ................. 11 Executing the Slide Show Promptly .......
B Overview Features When you memorize presentation material converted by the Projector Station for Presentation (supplied software) or a picture file recorded by a digital camera in the Memory Stick, you can easily make effective presentations without a computer.
About a Memory Stick Memory Stick is a new compact, portable and versatile IC recording medium with a data capacity that exceeds that of a floppy disk. Memory Stick is specially designed for exchanging and sharing digital data among Memory Stick compatible products. Because it is removable, Memory Stick can also be used for external data storage. Memory Stick is available in two sizes: standard size and compact Memory Stick Duo size.
*1: Data recording/playback that requires MagicGate functions cannot be performed. Note on Memory Stick Duo/ Memory Stick PRO Duo *2: Does not support high speed data transfer using a parallel interface. For VPL-CX85: • To use a Memory Stick Duo/Memory Stick PRO Duo with this unit, attach it to a Memory Stick Duo adapter before inserting it into the unit.
Format to save a file This unit cannot read Memory Stick that has Access Control with other units. To read/write data on the Access Control Memory Stick, unlock the Memory Stick with the unit that has locked it. Material for a presentation converted by the Projector Station for Presentation is saved in the following file formats in the Memory Stick. • Image files (DCF-compatible) compressed in the JPEG (Joint Photographic Experts Group) format (extension .jpg).
Notes • Do not attach anything other than the supplied label to the Memory Stick labeling position. • Attach the label so that it does not stick out beyond the labeling position. • Do not write forcefully on Memory Stick Duo/Memory Stick PRO Duo memo area. • Carry and store the Memory Stick in its case. • Do not touch the terminal of the Memory Stick with anything, including your finger or metallic objects. • Does not strike, bend, or drop the Memory Stick. • Do not disassemble or modify the Memory Stick.
B Setting Up Using the Memory Stick To remove the Memory Stick When the access lamp is turned off, press the Memory Stick and remove your hand. As the lock is released, remove the Memory Stick. Insert the Memory Stick into the Memory Stick slot on the side of the projector until it clicks. For VPL-CX85 Setting Up Access lamp Memory Stick Insert the Memory Stick in the direction of the arrow.
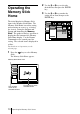
Operating the Memory Stick Home The initial display for Memory Stick input is the Memory Stick Home. The Memory Stick Home is used for setting and executing an event (e.g., selecting the viewer), setting the Autorun and Startup and formatting the Memory Stick. The guide for the key operation is displayed at the bottom of the Memory Stick Home display. Use the Remote Commander or the control panel for setting. The selected item is displayed in yellow. For details on each operation, see the relevant page.
B Viewing the Slide Sliding Material for a Presentation — Presentation Viewer 3 Select “Presentation Viewer”, then press the ENTER key. 4 Select “Select Folder”, then press the ENTER key. The Select Folder menu appears. Memory Stick Home Select Presentation Viewer Presentation1 Slide Show Option After you have converted Microsoft PowerPoint files by the Projector Station for Presentation to a file which offers the most advantages for projection on the projector, you can make a slide show.
6 Select “Slide Show”, then press the ENTER key. 7 Select “Start”, then press the ENTER key. To execute the slide show When the slide show setting is set to “Auto” by the Projector Station for Presentation, the slide show is executed according to the settings made by the Projector Station for Presentation. When you want to end the slide show, press the or ENTER key. When the slide show setting is set to “Manual”, press the following keys for the slide show.
Repeating the Slide Show 1 Select “Slide Show” in Memory Stick Home, then press the ENTER key. 2 Select “Repeat”, then press the ENTER key.
Sliding a Picture File — Picture Viewer 3 Thumbnails of the picture files contained in the selected folder appear. Memory Stick Home Select Picture Viewer Picture viewer Slide Show You can make a slide show by using still picture files (DCF-compatible) in the JPEG format recorded by a digital camera or movie picture files in the MPEG1 format recorded by Sony MPEG MOVIE etc. Option Index display Normal Select Folder 100MSDCF No.
5 Select the current folder using the m or M key, then press the , key to select the Select Folders menu. Memory Stick Home Select Picture Viewer 8 Select each item, then press the ENTER key. 9 Set each item, then press the ENTER key. Off 10 Select “Start”, then press the ENTER Slide Show Option key. Select Folder No.: 1/1234 Size: 1024x768 6 File: SPJP0001.JPG Date: 2004.JUL.15 12:34PM The title name and the first picture file of the selected folder are displayed.
Starting a Slide Show from the Selected Index Picture You can run a slide show by selecting a thumbnail in the normal or thumbnail display mode. 1 Press the M, m, < or , key to select the picture file from which you want to start the slide show, and press the ENTER key. 2 Press the m or M key to select “Slide Show” in the picture setting menu, and press the ENTER key. Displaying a Picture File on the Full Screen 1 Select a picture file in the thumbnail display, then press the ENTER key.
2 Set “Advan. Slds.” to “Manual” in the Slide Show setting menu. Memory Stick Home Select Picture Viewer Start Slide Show Effect Off Option Advan. Slds. Manual Interval 5sec Select Folder Repeat On [Guide display] < Prev. : to display the previous slide in the movie pause mode. During playback, the guide display is changed to < Rew (rewind). , Next : to display the next slide in the movie pause mode. During playback, the guide display is changed to , FF (fast forward). Close No.
Executing the Slide Show Promptly As the settings are memorized even if you change the input after the setting of steps 1 to 3 of “Playing Back a Movie key on the Remote File”, press the Commander just as you start the presentation. The input is changed to key again Memory Stick. Press the and the slide show starts promptly. To key. end the slide show, press the To start full-screen playback when the thumbnails are displayed 1 Select a movie file, then press the ENTER key.
B Setting/Displaying the Picture File Operating the Picture File To operate the picture file, display the index screen (see pages 20 and 21). When the Presentation Viewer is displayed To display the index screen, select the contents in the normal or thumbnail display mode, then press the ENTER key. You can execute the slide show or enlarge a picture file on the full screen using the menu on the index screen.
Index screen of a still picture file Index screen of a movie file Appears for a movie picture. Index screen Appears when a startup file is set. Appears when a file is protected. Appears when the Picture Viewer is displayed. Appears when a file is protected.
Index screen of a full-screen still picture file Movie Player Movie icon Appears when the Picture Viewer is displayed. Order of the current content/ Total number of picture files in the current content Prev. Next Information On Full Screen Audio Select L/R Menu Return Return Information On Protect Protect Delete Protect Rotate Close Startup No.: 1/1234 Size: 320x240 Delete File: BASEBALL.MPG Date: 2004.JUL.15 12:34PM Close Resolution No.
Protecting an Important File After selecting the file you want to protect, set “Protect” to “On” or “All On”. When a file is protected, the protect mark is displayed. Rotating a Picture File After selecting the file you want to rotate, set “Rotate”. The picture rotates 90° on every pressing of the ENTER key. Note A protected file cannot be rotated.
Switching the Sound of a Movie File Note For a picture file processed on a computer, the displayed data may be different from the renewal date. 1 Select a movie file, then press the ENTER key. 2 Select “Movie Player,” then press the ENTER key. 3 Select “Menu,” then press the ENTER key. You can filter all picture files contained in a folder to display the still picture files or the movie files only. 4 Select “Audio Select,” then press the ENTER key.
B Useful Settings Displaying the Picture Files Recorded by a Digital Camera Only The unit can choose and display the JPEG and MPEG1 picture files recorded by a digital camera (DCF-compatible) only from among picture files stored in a Memory Stick. 1 Select “Select Folder” in Memory Stick Home, then press the ENTER key. 2 Select “Digi. Camera Mode”, then press the ENTER key. (Relative file mark): Appears if another file with the same name in the last four characters is stored in the Memory Stick.
When you do not want to use the autorun function Set “Autorun” to “Off”. Starting a Presentation Automatically — Autorun Notes When a Memory Stick with the picture file for which the Autorun function is set by the Projector Station for Presentation or “Setting the Autorun function” on page 13 is inserted in Memory Stick slot, the input is automatically switched to Memory Stick and the slide show starts. To set the Autorun function Select “Option” in Memory Stick Home, then press the ENTER key.
Projecting a Selected File When the Power is Turned on — Startup Off : when you do not want to set the startup Notes • When you want to use the registered file with the custom setting, insert the Memory Stick where the registered file is saved in the projector, then turn on the power. • You can register one startup file per Memory Stick. When the power is turned on, the selected picture file is projected for about 30 seconds.
B Operating Memory Stick Displaying the Memory Stick Information You can display the type and the used and remaining capacity of the Memory Stick in use. The remaining capacity of the Memory Stick is also displayed at the bottom right of Memory Stick Home. Formatting a Memory Stick When a Memory Stick cannot be used, format it with the projector. When a Memory Stick is formatted, its data is cleared. 1 Select “Option” in Memory Stick Home, then press the ENTER key.
B Other Troubleshooting If you have a problem with Memory Stick Home, check the following. If the problem persists, contact your nearest Sony dealer. Problem Cause and solution Cannot insert the Memory Stick into the drive. • The Memory Stick is not facing in the correct direction. c Insert the Memory Stick with the arrow mark pointing toward the Memory Stick slot of the projector. Cannot save a file. • The Memory Stick is full. c Delete unwanted files in the Memory Stick.
Problem Cause and solution Movies skip or stutter during playback. • This is not a unit malfunction. c For usable movie file format, see page 16. Black bands appear on the upper and lower screen during playback of a movie on the full screen. • The setting of “Wide Mode” in the INPUT SETTING menu of the projector may be set to “On”. c For setting of “Wide Mode”, see Operating Instructiions of the projector.
Caution regarding messages while using a Memory Stick Use the list below to check the message meanings. Message Solution No Memory Stick c Insert a Memory Stick into the Memory Stick slot correctly. No files that can be displayed. c No presentation files are contained in the Memory Stick. c Digital Camera Mode is selected, although no DCF compatible picture file are contained. No files in this folder that can be displayed. c No picture files are contained in the currently selected folder.