4-090-533-04 (1) Data Projector 特約店様用設置説明書 3∼ 10、46∼ 63 ページ この特約店様用設置説明書には、レンズの交換方法、別売りのレンズ使用時や天井吊りの場合の設置寸法 など、製品の設置時に必要な情報を記載しています。 Installation Manual for Dealers Pages 3, 11 to 16 and 46 to 63 This installation Manual for Dealers explains how to install the projector. For example, it explains lens replacement, installation measurements when using the optional lens and hanging the projector from the ceiling.
安全のために ソニー製品は安全に充分配慮して設計されています。しかし、電気製品は、 まちがった使いかたをすると、 火災や感電などにより死亡や大けがなど人身 事故につながることがあり、危険です。 事故を防ぐために次のことを必ずお守りください。 安全のための注意事項を守る 警告表示の意味 取扱説明書および製品では、次 のような表示をしています。表 示の内容をよく理解してから本 文をお読みください。 4 (JP)∼ 5 (JP)ページの注意事項をよくお読みください。 定期点検をする 5 年に 1 度は、内部の点検を、お買い上げ店またはテクニカルインフォメー ションセンターにご依頼ください(有料)。 この表示の注意事項を守らない と、火災や感電などにより死亡 や大けがなど人身事故につなが ることがあります。 故障したら使わない すぐに、 お買い上げ店またはテクニカルインフォメーションセンターにご連 絡ください。 万一、異常が起きたら ・煙が出たら ・異常な音、におい がしたら ・内部に水、異物が 入ったら ・製品を落としたり キャビネットを破 損したときは , 1電源を切る。 2電源コードや接続コー
English 日本語 Français 目次 Table of Contents Table des matières 警告 .............................................. 4 注意 .............................................. 4 電池についての安全上のご注意 .......... 5 本機の性能を保持するために .............. 6 概要 .................................................... 6 レンズ交換のしかた ............................ 7 リア投影(打ち込み角0°)時の レンズ位置の変更のしかた .............. 8 設置寸法 ........................................... 46 Precautions ................................... 11 Overview ........................
電源コードのプラグおよびコネクターは突き あたるまで差し込む 下記の注意を守らないと、 まっすぐに突きあたるまで差し込まないと、 火災や感電の原因となります。 火災や感電により死亡や大けがに つながることがあります。 通風孔をふさぐような場所に設置しない 通風孔をふさぐと内部に熱がこもり、火災や 故障の原因となることがあります。風通しを よくするために次の項目をお守りください。 • 壁から 30cm 以上離して設置する。 • 密閉された狭い場所に押し込めない。 • 毛足の長い敷物(じゅうたんや布団など) の上に設置しない。 • 布などで包まない。 容量の低い電源延長コードを使用しない 容量の低い延長コードを使うと、ショートし たり火災や感電の原因となることがありま す。 下記の注意を守らないと、 天井への取り付けには細心の注意をはらう • 天井への取り付け強度が不十分だと、落下 により死亡や大けがにつながることがあり ます。必ずソニー製のプロジェクターサス ペンションサポート PSS-610 を使用してく ださい。 • 取り付けを安全に行うために、本書、取扱 説明書、および PSS-610 の取付説明
コード類は正しく配置する 電源コードや接続コードを足に引っかけると 転倒したり、プロジェクターの落下によりけ がの原因となることがあります。十分注意し て接続・配置してください。 低い天井に天吊りしない 頭などをぶつけてけがをすることがありま す。 電池についての安全上の ご注意 ここでは、本機での使用が可能なソニー製乾電池についての 注意事項を記載しています。 万一、異常が起きたら 電池の液が目に , ちに医師の治療を受ける。 入ったら レンズをのぞかない 投影中にプロジェクターのレンズをのぞくと 光が目に入り、目に悪影響を与えるおそれが あります。 すぐにきれいな水で洗い、ただ , 煙が出たら お買い上げ店またはテクニカル インフォメーションセンターに連 絡する。 電池の液が皮膚や , すぐにきれいな水で洗い流す。 , よくふき取ってから、新しい電 衣服に付いたら キャビネットのカバー類はしっかり固定する 天吊りの場合、カバー類が固定されていない と落下して、けがの原因となることがありま す。 安全アースを接続する 安全アースを接続しないと、感電の原因とな ることがあ
日本語 本機の性能を保持するた めに 設置場所について • 底面の吸気口および前面の排気口は、内部の温度上昇を防ぐ ためのものです。風通しの悪い場所を避け、吸気口および排気 口をふさがないように設置してください。 • 温度・湿度が非常に高い場所や温度が著しく低い場所、ほこり の多い場所での使用は避けてください。 • 床置きおよび天井つり以外の設置でお使いになると、色むらや ランプ寿命の劣化などの問題が起こることがありますので避けて ください。 ファンの音について プロジェクターの内部には温度上昇を防ぐためにファンが取り付け られており、電源を入れると多少音を生じます。 これらは液晶プロ ジェクターの構造によるもので故障ではありません。しかし、異常 音が発生した場合にはお買い上げ店にご相談ください。 部屋の照明について 直射日光や室内灯などで直接スクリーンを照らさないでください。 美しく見やすい画像にするために、以下の点を参考にしてくださ い。 • 集光型のダウンライトにする。 • 蛍光灯のような散光照明にはメッシュを使用する。 • 太陽の差し込む窓はカーテンやブラインドでさえぎる。 • 光を反射する
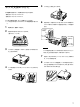
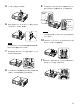
レンズ交換のしかた 5 レンズを上に持ち上げてはずす。 6 交換するレンズ側のストッパーをプロジェクター本体側のス 次の種類の別売りのレンズを取り付けることができます。 • 長焦点ズームレンズ VPLL-ZM102 • 短焦点ズームレンズ VPLL-ZM32 レンズを交換するときは、以下の手順で行ってください。 ◆ レンズを交換するときは、 それぞれのレンズの取扱説明書もご覧くださ い。 1 2 トッパーに押し当てる様にして位置を合わせ、 レンズを組み 込む。 電源を切り、電源コードを抜く。 底面のネジをプラスドライバーではずす。 ストッパー (本体側) (長いネジ(M3)1 本) ストッパー (レンズ側) ストッパー (本体側) ストッパー (レンズ側) 3 ご注意 トップカバー(天面部レンズカバー)を前にスライドさせなが レンズを組み込む際、 レンズに取り付けられたストッパー (レン ら上方向にはずす。 ズ側)が上から見える向きにして取り付けてください。 7 交換レンズを4本のネジ(M3×10、ワッシャー付)で締め付 け、しっかりと固定する。 8 トップカバーのレ
9 トップカバーを後側へつき当るまでスライドさせる。 リア投影(打ち込み角0°) 時のレンズ位置の変更の しかた リア投影などの場合、打ち込み角を0°にすることができます。 この 場合、レンズ位置を変更する必要があります。次の手順で、変更 10 底面にネジ(長いネジ(M3)1本)を締め付ける。 してください。 打ち込み角を0° にする場合、取り付けられるレンズは以下の通り です。 • 標準レンズ • 長焦点ズームレンズ VPLL-ZM102 • 短焦点固定レンズ VPLL-FM22 • 短焦点ズームレンズ VPLL-ZM32 レンズ交換の際のご注意 • 取りはずしたレンズまたは取り付けるレンズを置くときは、 しっか りした水平な台の上に静かに置いてください。 レンズ面は傷つき 1 電源を切り、電源コードを抜く。 2 底面のネジをプラスドライバーではずす。 (長いネジ(M3)1本) やすいので取り扱いには充分注意してください。 • レンズ面には手を触れないようにしてください。 3 トップカバー(天面部レンズカバー)を前にスライドさせなが ら上方向にはずす。 4 レンズを固定している4
5 レンズを上に持ち上げてはずす。 9 レンズ側のストッパーをプロジェクター本体側のストッパーに 押し当てるようにして位置を合わせ、レンズを組み込む。 ストッパー (本体側) ストッパー (レンズ側) 6 ストッパー (本体側) 図示した左右のスペーサーの4本(M3×6、黒色)のネジを ストッパー (レンズ側) プラスドライバーではずし、取り除く。 ご注意 • レンズを組み込む際、 レンズのストッパーが上から見えるよう にしてください。 10 4本のネジ(M3×10、ワッシャー付)をプラスドライバーで締 め付け、レンズをしっかりと固定する。 ご注意 ここではずしたスペーサーとネジは後日必要となる場合があり ますので大切に保管しておいてください。 7 図の部分から2 本のネジ(M3×8、銀色)をはずし、レンズ ボトムカバーを取りはずす。 11 はずしたレンズボトムカバーを、レンズの上に図示向きに 2 本のネジ(M3×8、銀色)で取りつける。 8 レンズボトムカバーの左側を持ち上げて傾け、 そのまま右側 に寄せて、その状態のまま右上方向に取り外す。 9
12トップカバーのレンズ下突起部をベースの凹部に合わせて から (左下図参照) トップカバー側のツメ (6ヶ所) をプロジェ クター本体のスリットにはめ込む。 13トップカバーを後側につき当るまでスライドさせる。 14 底面にネジ(長いネジ(M3)1本)を締め付ける。 10
English Precautions On safety • Check that the operating voltage of your unit is identical with the voltage of your local power supply. If voltage adaptation is required, consult with qualified Sony personnel. • Should any liquid or solid object fall into the cabinet, unplug the unit and have it checked by qualified Sony personnel before operating it further. • Unplug the unit from the wall outlet if it is not to be used for several days. • To disconnect the cord, pull it out by the plug.
On cleaning • To keep the cabinet looking new, periodically clean it with a soft cloth. Stubborn stains may be removed with a cloth lightly dampened with a mild detergent solution. Never use strong solvents, such as thinner, benzene, or abrasive cleansers, since these will damage the cabinet. • Avoid touching the lens. To remove dust on the lens, use a soft dry cloth. Do not use a damp cloth, detergent solution, or thinner. • Clean the filter at regular intervals.
Replacing the Lens 5 Lift and remove the lens. 6 Align the positions so that the stopper for the new lens is in contact with the stopper of the projector unit, and then attach the lens. You can install the following types of lenses in the projector. • VPLL-ZM102 Long Focus Zoom Lens • VPLL-ZM32 Short Focus Zoom Lens Follow the steps below to replace the lens. For details on replacing the lens, also refer to the installation manual supplied with the lens.
9 Slide the top cover back until it makes contact with the rear side. 10 Tighten the screw (single long screw (M3)) in the bottom base. Note • The lens scratches easily, so when handling it, always place it gently on a stable and level surface in a horizonal position. • Avoid touching the lens surface. 14 Changing the Lens Position for Rear Projection (Optical Axis Angle: 0 degree) For rear projection, you can set the optical axis angle to 0 (zero).
5 Lift and remove the lens. 9 Align the positions so that the stopper for the lens is in contact with the stopper of the projector unit, and then attach the lens. Stopper (Projector) 6 Using a Philips screwdriver, remove the four screws (M3×6, black) holding the left and right spacers as shown in the diagram, and then remove the spacers. Stopper (Lens) Stopper (Projector) Stopper (Lens) Note For ease in identification when you install the lens, make sure that the lens stopper is facing up.
12 Line up the bump under the lens on the top cover with the depression in the base (refer to the diagram below), and then insert the six tabs on the sides of the top cover into the slits on the projector. 13 Slide the top cover back until it makes contact with the rear side. 14 Tighten the screw (single long screw (M3)) in the bottom base.
Français Précautions Sécurité • Vérifiez si la tension de service de votre appareil est identique à la tension secteur locale. Si une adaptation de la tension s’avère nécessaire, consultez votre revendeur Sony ou un personnel qualifié. • Si des liquides ou des solides pénètrent dans le châssis, débranchez l’appareil et faites-le vérifier par un personnel Sony qualifié avant de le remettre en service. • Débranchez l’appareil de la prise murale si vous prévoyez de ne pas l’utiliser pendant plusieurs jours.
Comment éviter l’accumulation de chaleur à l’intérieur du projecteur Aperçu • Après avoir mis l’appareil hors tension à l’aide de la touche I / 1 du panneau de commande ou de la télécommande, ne déconnectez pas l’appareil de la prise murale tant que le ventilateur de refroidissement fonctionne. • Ne débranchez pas le cordon d’alimentation de la prise murale aussi longtemps que le ventilateur tourne.
Remplacement de l’objectif 5 Retirez l’objectif en le soulevant. 6 Alignez les positions de façon que la butée du nouvel objectif soit en contact avec la butée du projecteur, puis montez l’objectif. Vous pouvez installer les types d’objectifs suivants sur le projecteur : • Zoom à focale longue VPLL-ZM102 • Zoom à focale courte VPLL-ZM32 Pour remplacer l’objectif, procédez comme suit.
9 Faites coulisser le couvercle supérieur en arrière jusqu’à ce qu’il touche le côté arrière. 10 Serrez la vis (longue vis unique (M3)) dans le socle inférieur. Remarques • L’objectif se raye facilement. Manipulez-le avec précautions et placez-le toujours délicatement à l’horizontale sur une surface stable et plane. • Évitez de toucher la surface de l’objectif.
5 Retirez l’objectif en le soulevant. 9 Alignez les positions de façon que la butée du objectif soit en contact avec la butée du projecteur, puis montez l’objectif. Butée (Projecteur) 6 Butée (Objectif) Ôtez les quatre vis (M3×6, noires) maintenant les entretoises gauche et droite, comme indiqué sur le schéma, à l’aide d’un tournevis cruciforme, puis retirez les entretoises.
12 Alignez la bosse du couvercle supérieur située sous l’objectif sur le creux du socle (voir le schéma ci-dessous), puis insérez les six languettes situées sur les côtés du couvercle supérieur dans les fentes du projecteur. 13 Faites coulisser le couvercle supérieur en arrière jusqu’à ce qu’il touche le côté arrière. 14 Serrez la vis (longue vis unique (M3)) dans le socle inférieur.
Español Precauciones Seguridad • Asegúrese de que la tensión de funcionamiento de la unidad coincide con la del suministro eléctrico local. Si es necesario adaptar la tensión, consulte con personal Sony especializado. • Si se introduce algún objeto sólido o líquido en la unidad, desenchúfela y haga que sea examinada por personal Sony especializado antes de volver a utilizarla. • Desenchufe la unidad de la toma de red si no va a utilizarla durante varios días.
Prevención del recalentamiento interno • Tras desactivar la alimentación con la tecla I / 1 del panel de control o del mando a distancia, no desconecte la unidad de la toma de red hasta que se detenga el ventilador de enfriamiento. • No desconecte el cable de alimentación de CA de la toma de red mientras sigue funcionando el ventilador. Precaución El proyector va equipado con orificios de ventilación de aspiración en la parte inferior y de exhaustación en la parte frontal.
Sustitución del objetivo 5 Levante y quite el objetivo. 6 Alinee las posiciones de forma que se toquen los topes del nuevo objetivo y de la unidad del proyector, y a continuación coloque el objetivo. Es posible instalar estos tipos de objetivo en el proyector. • Objetivo zoom de enfoque largo VPLL-ZM102 • Objetivo zoom de enfoque corto VPLL-ZM32 Siga estos pasos para sustituir el objetivo.
9 Vuelva a poner la cubierta superior deslizándola hasta que toque contra el lado posterior. 10 Apriete el tornillo (un único tornillo largo(M3)) de la parte inferior de la unidad. Notas • El objetivo se raya fácilmente. Por tanto, al manipularlo es conveniente colocarlo suavemente sobre una superficie estable y nivelada en posición horizontal. • Procure no tocar la superficie del objetivo.
5 Levante y extraiga el objetivo. 9 Alinee las posiciones de forma que se toquen los topes del objetivo y de la unidad del proyector, y a continuación coloque el objetivo. Tope (Proyector) Tope (Objetivo) 6 Utilizando un destornillador Philips, quite los cuatro tornillos (M3×6, negros) sujetando los espaciadores izquierdo y derecho como se muestra en el diagrama, y después quite los espaciadores.
12 Alinee la protuberancia de debajo de la lente de la cubierta superior con la depresión de la base (consulte el diagrama de abajo), y después inserte las seis lengüetas de los lados de la cubierta superior en las hendiduras del proyector. 13 Vuelva a poner la cubierta superior deslizándola hasta que toque contra el lado posterior. 14 Apriete el tornillo (un único tornillo largo(M3)) de la parte inferior de la unidad.
Deutsch Sicherheitsmaßnahmen Sicherheit • Achten Sie darauf, daß die Betriebsspannung des Geräts der lokalen Stromversorgung entspricht. Wenn die Betriebsspannung angepaßt werden muß, wenden Sie sich bitte an qualifiziertes Fachpersonal von Sony. • Sollten Fremdkörper oder Flüssigkeiten in das Gerät gelangen, trennen Sie es von der Netzsteckdose. Lassen Sie das Gerät von qualifiziertem Fachpersonal von Sony überprüfen, bevor Sie es wieder benutzen.
Vermeiden eines internen Hitzestaus • Nachdem Sie das Gerät mit der Taste I / 1 auf dem Bedienfeld oder mit der Fernbedienung ausgeschaltet haben, trennen Sie es nicht von der Netzsteckdose, solange der Ventilator noch läuft. • Lösen Sie nicht das Netzkabel von der Netzsteckdose, solange der Ventilator noch läuft. Achtung Der Projektor ist an der Unterseite mit Ansaugöffnungen und an der Vorderseite mit Auslaßöffnungen ausgestattet.
Austauschen des Objektivs 5 Heben Sie das Objektiv nach oben heraus. 6 Richten Sie die Positionen so aus, dass der Stopper des neuen Objektivs den Stopper der Projektoreinheit berührt, und setzen Sie dann das Objektiv ein. Die folgenden Objektivtypen können im Projektor installiert werden. • Zoomobjektiv VPLL-ZM102 mit langer Brennweite • Zoomobjektiv VPLL-ZM32 mit kurzer Brennweite Tauschen Sie das Objektiv nach dem folgenden Verfahren aus.
9 Schieben Sie die Abdeckhaube zurück, bis sie die Rückseite berührt. 10 Ziehen Sie die Schraube (einzelne lange Schraube (M3)) auf der Unterseite an. Hinweise • Legen Sie das empfindliche Objektiv bei der Handhabung immer sachte und waagerecht auf eine stabile und ebene Unterlage, um es vor Kratzern zu schützen. • Vermeiden Sie eine Berührung der Linsenoberfläche.
5 Heben Sie das Objektiv nach oben heraus. 9 Richten Sie die Positionen so aus, dass der Stopper des Objektivs den Stopper der Projektoreinheit berührt, und setzen Sie dann das Objektiv ein. Stopper (Projektor) 6 Entfernen Sie mit einem Kreuzschlitzschraubenzieher die vier Schrauben (M3×6, schwarz), während Sie die Abstandsstücke auf der linken und rechten Seite halten, wie in der Abbildung gezeigt, und nehmen Sie dann die Abstandsstücke ab.
12 Richten Sie den Vorsprung unter dem Objektiv an der Abdeckhaube auf die Vertiefung in der Basis aus (siehe nachstehende Abbildung), und führen Sie dann die sechs Zungen an den Seiten der Abdeckhaube in die Schlitze des Projektors ein. 13 Schieben Sie die Abdeckhaube zurück, bis sie die Rückseite berührt. 14 Ziehen Sie die Schraube (einzelne lange Schraube (M3)) auf der Unterseite an.
Italiano Precauzioni Sicurezza • Verificare che la tensione operativa dell’apparecchio corrisponda a quella dell’alimentazione locale. Se fosse necessario un adattatore di tensione, contattare il personale qualificato Sony. • Se dovessero penetrare corpi liquidi o solidi all’interno dell’apparecchio, scollegarlo e farlo controllare da personale qualificato Sony prima di riutilizzarlo. • Scollegare l’apparecchio dalla presa di rete se non si intende utilizzarlo per diversi giorni.
Prevenzione del surriscaldamento interno • Dopo aver disattivato l’alimentazione con il tasto I / 1 sul pannello di controllo o sul telecomando, non scollegare l’apparecchio dalla presa di rete mentre la ventola è ancora in funzione. • Non scollegare il cavo di alimentazione CA dalla presa di rete mentre la ventola è ancora in funzione. Attenzione Il proiettore è dotato di prese di ventilazione (aspirazione) sul fondo e di prese di ventilazione (scarico) sulla parte anteriore.
Sostituzione dell’obiettivo È possibile installare nel proiettore seguenti tipi di obiettivi. • Obiettivo zoom con messa a fuoco lunga VPLL-ZM102 • Obiettivo zoom con messa a fuoco breve VPLL-ZM32 5 Sollevare e rimuovere l’obiettivo. 6 Allineare le posizioni del fermo dell’obiettivo nuovo e del fermo dell’unità proiettore in modo che siano in contatto, quindi montare l’obiettivo. Per sostituire l’obiettivo procedere come segue.
9 Fare scorrere indietro la parte superiore del copriobiettivo finché raggiunge il lato posteriore. 10 Stringere la vite (n. 1 vite lunga (M3)) sul fondo. Note • L’obiettivo si graffia facilmente quindi, nel maneggiarlo, appoggiarlo sempre su una superficie stabile e in piano, in posizione orizzontale. • Non toccare la superficie dell’obiettivo.
5 Sollevare e rimuovere l’obiettivo. 9 Allineare le rispettive posizioni in modo che il fermo dell’obiettivo sia in contatto con il fermo dell’unità proiettore, quindi montare l’obiettivo. Fermo (proiettore) 6 Usare un cacciavite a croce per rimuovere le quattro viti (M3×6, nere) che fissano i distanziatori sinistro e destro come illustrato nella figura, quindi rimuovere i distanziatori.
12 Allineare la protuberanza sotto l’obiettivo sulla parte superiore del copriobiettivo con la sagomatura nella base (fare riferimento alla figura che segue), quindi inserire le sei linguette sui lati della parte superiore del coperchio nelle fessure sul proiettore. 13 Fare scorrere indietro la parte superiore del copriobiettivo finché raggiunge il lato posteriore. 14 Stringere la vite (n. 1 vite lunga (M3)) sul fondo.
中文 使用前须知 安全须知 • 请核查本机的工作电压是否与当地的供电电压一 致。若需进行电压适配,请向 Sony 公司的专业 技术人员咨询。 • 万一有液体或固体落入机壳内,请拔下本机的电 源插头,并请 Sony 公司的专业技术人员检查后 再使用。 • 数日不使用本机时,请将本机的电源插头从墙上 电源插座拔出。 • 拔取电源线时,请手持插头将其拔出,切勿拉扯 电线本身。 • 本机应靠近墙上电源插座以便接线。 • 即使本机的电源已关闭,只要其电源插头还连接 在墙上电源插座上,本机便未脱离交流电源。 • 投影灯点亮时,请勿直视透镜。 • 请勿将手或物体放在通风孔附近旄因排出的空气 很热。 • 避免使用低压上限的延长导线,否则会导致短路 或人身伤害。 • 搬运投影机时,一定要使用搬运把手。请勿抓住 投影机的其他部位(特别是透镜)搬运,也不要 让手指夹在把手,地板和投影机之间。 • 移动落地安装的投影机时,请勿让手指夹在投影 机和地面之间。 • 小心勿让冷却扇夹住手指。 • 请勿在机壳及盖板打开状态下不要搬运投影机。 安装须知 • 要将投影机安装在天花板上时,必须使用 Sony PSS-610 投影机悬挂支架进行
清洁须知 • 为使机壳外观一往如新,请定期用软布擦拭。顽 固的污迹可用稍沾中性洗涤剂的布擦除。切勿使 用稀释剂、汽油或抛光剂等强性溶剂,否则会损 坏机壳。 • 请勿触摸透镜。透镜上的灰尘请用柔软的干布擦 除。请勿使用湿布、洗涤剂或稀释剂。 • 请定期清洁滤网。 S- 更换透镜 可将下列几种类型的透镜安装在投影机上。 • VPLL-ZM102长焦距变焦透镜 • VPLL-ZM32短焦距对焦透镜 请按照下列步骤更换透镜。 有关更换透镜的详细说明,请同时参照随透镜所 附的安装手册。 重新包装须知 1 关闭电源,拔下电源线。 • 请保存原有的包装箱和包装材料;当您要运送本 机时,它们会给您带来方便。为尽量保护好机 体,请按照出厂时的包装方法重新包装本机。 2 用菲立浦螺丝刀从本机底部卸下螺钉。 (一个长螺钉(M3)) 3 将顶盖(透镜头盖)向前滑动,然后抬起将其 取下。 4 卸下固定透镜的4颗螺钉(M3×10,带垫 圈)。 0 概要 本手册说明如何安装 Sony 数据投影机 VPL-PX40/ PX35,如何更换透镜,如何改变用于后投影的透 镜位置(光轴角:0 度),并介绍安装图。更换透
5 提起并取出透镜。 9 6 将新透镜的挡块与投影机挡块彼此接触来对 齐其位置,然后安装透镜。 10 紧固底面上的螺钉(一个长螺钉(M3))。 将顶盖向后滑动直至接触到后侧为止。 挡块 (投影机) 挡块 (透镜) 挡块 (投影机) 挡块 (透镜) 注意 当安装透镜时,要将挡块(透镜侧)安装到 透镜上,使其可从上方看得见。 7 用4颗螺钉(M3×10,带垫圈)将更换透镜固 定到位。 8 将顶盖上透镜下面的凸起与其板内的沟槽对 齐,然后将顶盖边侧上的6个翼片插入投影机 上的槽缝内。 注意 • 透镜易刮伤,因此在使用时一定要将其轻轻放在 平稳的水平面上。 • 请勿触摸透镜表面。 43
改变用于后投影的透镜位置 (光轴角∶0度) 5 提起并取出透镜。 6 用菲立浦螺丝刀,如图所示握持左侧和右侧 垫片,卸下4颗螺钉(M3×6,黑色),然后 卸下垫片。 进行后投影时,可将光轴角设为0(零)度。此 时,需如下设定透镜的位置。 对零度光轴角,可安装下列类型的透镜。 • 标准透镜 • VPLL-ZM102长焦距变焦透镜 • VPLL-FM22固定短焦距透镜 • VPLL-ZM32短焦距对焦透镜 1 关闭电源,拔下电源线。 2 用菲立浦螺丝刀从本机底部卸下螺钉。 (一个长螺钉(M3)) 注意 以后可能还要用到垫片和螺钉,请将其保管 好。 3 4 44 7 从图中所示的部分卸下2颗螺钉(M3×8,银 制),然后卸下透镜底盖。 8 抬起并倾斜透镜底盖左侧,使其朝向右侧, 然后保持这一倾斜状态沿向右上的方向将其 取出。 将顶盖(透镜头盖)向前滑动,然后抬起将 其取下。 用菲立浦螺丝刀卸下固定透镜的4颗螺钉 (M3×10,带垫圈)。
9 将透镜的挡块与投影机挡块彼此接触来对齐 其位置,然后安装上透镜。 12 将顶盖上透镜下面的凸起与其板内的沟槽对 齐,然后将顶盖边侧上的6个翼片插入投影机 上的槽缝内。 挡块 (投影机) 挡块 (透镜) 挡块 (投影机) 挡块 (透镜) 13 将顶盖向后滑动直至接触到后侧为止。 注意 为了安装透镜时便于识别,务必要将透镜挡块朝 上。 10 用菲立浦螺丝刀拧紧4颗螺钉(M3×10,带垫 圈)固定透镜。 14 紧固底面上的螺钉(一个长螺钉(M3))。 11 用2颗螺钉(M3×8,银制),按下图所示的 方向,将卸下的透镜底盖安到透镜上。 45
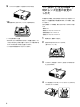
English 日本語 設置寸法 床置き、フロント投影 Français Installation Diagram Schéma d’installation Floor Installation (Front Projection) Installation au sol (projection frontale) A スクリーンの中心 Center of the screen Centre de l’écran Centro de la pantalla Mitte des Projektionsschirms Centro dello schermo 壁 Wall Mur Pared Wand Parete レンズの中心 / Center of the lens / Centre de l’objectif / Centro del objetivo / Mitte des Objektivs / Centro dell’obiettivo x c a プロジェクターを机などの上に置いて設置する 場合の設置例を示します。A This section describes th
Español Deutsch Italiano Diagrama de instalación Installationsdiagramm Diagramma di installazione Instalación en el suelo (proyección frontal) Installation am Boden (Frontprojektion) Installazione sul pavimento (proiezione frontale) キャビネットの前面からレンズ中心までの 距離 Distance between the front of the cabinet and the center of the lens Distance entre l’avant du châssis et le centre de l’objectif Distancia entre la parte frontal de la unidad y el centro del objetivo Abstand zwischen der Gehäusevorderseite und de
English 日本語 設置寸法 床置き、フロント投影 Français Installation Diagram Schéma d’installation Floor Installation (Front Projection) Installation au sol (projection frontale) ■ 標準レンズ / Standard lens / Objectif standard / Objetivo estándar / Standardobjektiv / Uso Obiettivo standard 単位:mm(インチ) / Unit: mm (inches) / Unité: mm (pouces) / Unidad: mm (pulgadas) / Einheit: mm (Zoll) / Unità: mm (pollici) SS 40 60 80 100 120 150 180 200 250 300 N 1490 (58 7/8) 2270 (89 3/8) 3040 (119 7/8) 3820 (150 3/8)
Español Deutsch Italiano Diagrama de instalación Installations-diagramm Diagramma di installazione Instalación en el suelo (proyección frontal) Installation am Boden (Frontprojektion) Installazione sul pavimento (proiezione frontale) ■ VPLL-ZM102 単位:mm(インチ) / Unit: mm (inches) / Unité: mm (pouces) / Unidad: mm (pulgadas) / Einheit: mm (Zoll) / Unità: mm (pollici) SS 40 60 80 100 120 150 180 200 250 300 N 2610 (102 3/4) 4000 (157 5/8) 5390 (212 1/2) 6790 (267 1/4) 8180 (322 1/8) 102
English 日本語 天井つり、フロント投影 Français Ceiling Installation (Front Projection) Installation au platfond (projection frontale) B 天井への 取り付け穴 Ceiling mounting hole L’orifice de montage au plafond El orificio de montaje del techo Deckenmontageloch Foro di montaggio sul soffitto (1433/4) レンズの中心(水平) Center of the lens (H) Centre de l’objectif (H) Centro del objetivo (H) Mitte des Objektivs (H) Centro dell’obiettivo (O) 168 (6 5/8) スクリーンの中心(水平) Center of the screen (H) Centre de l’écran (H) Centro de la pantall
Español Deutsch Instalación en el techo (proyección frontal) Italiano Installation an der Decke (Frontprojektion) 116.5 (4 5/8) 35 (1 7/16) レンズの中心(水平) Center of the lens (H) Centre de l’objectif (H) Centro del objetivo (H) Mitte des Objektivs (H) Centro dell’obiettivo (O) Installazione sul soffitto (proiezione frontale) スクリーンの中心(水平) Center of the screen (H) Centre de l’écran (H) Centro de la pantalla (H) Mitte des Projektionsschirms (H) Centro dello schermo (O) 46.5 (1 7/8) a’’ 150.
English 日本語 天井つり、フロント投影 Français Ceiling Installation (Front Projection) Installation au platfond (projection frontale) ■ 標準レンズ / Standard lens / Objectif standard / Objetivo estándar / Standardobjektiv / Uso Obiettivo standard 単位:mm(インチ) / Unit: mm (inches) / Unité: mm (pouces) / Unidad: mm (pulgadas) / Einheit: mm (Zoll) / Unità: mm (pollici) PSS-610使用時 / When using PSS-610 / Lors de l’utilisation du PSS-610 / Cuando se utiliza el PSS-610 / Bei Verwendung des PSS-610 / Quando viene utilizzato il PS
Español Deutsch Instalación en el techo (proyección frontal) Italiano Installation an der Decke (Frontprojektion) Installazione sul soffitto (proiezione frontale) ■ VPLL-ZM102 単位:mm(インチ) / Unit: mm (inches) / Unité: mm (pouces) / Unidad: mm (pulgadas) / Einheit: mm (Zoll) / Unità: mm (pollici) PSS-610使用時 / When using PSS-610 / Lors de l’utilisation du PSS-610 / Cuando se utiliza el PSS-610 / Bei Verwendung des PSS-610 / Quando viene utilizzato il PSS-610 SS 80 100 120 150 180 200 250 300 N
English 日本語 天井つり、フロント投影 Français Ceiling Installation (Front Projection) Installation au platfond (projection frontale) ■ VPLL-ZM32 単位:mm(インチ) / Unit: mm (inches) / Unité: mm (pouces) / Unidad: mm (pulgadas) / Einheit: mm (Zoll) / Unità: mm (pollici) PSS-610使用時 / When using PSS-610 / Lors de l’utilisation du PSS-610 / Cuando se utiliza el PSS-610 / Bei Verwendung des PSS-610 / Quando viene utilizzato il PSS-610 SS 80 100 120 150 180 200 250 300 N 2690 (106) 3300 (130) 3910 (154) 4830 (19
Español Deutsch Italiano Instalación en el techo (proyección frontal) Installation an der Decke (Frontprojektion) Installazione sul soffitto (proiezione frontale) Las medidas de instalación y sus métodos de cálculo para cada objetivo se muestran anteriormente. Die Installationsabmessungen und das jeweilige Berechnungsverfahren für die einzelnen Objektive sind auf der vorigen Seite angegeben.
日本語 プロジェクターサスペンション サポートPSS-610を取り付け た場合の寸法図 English Français Detailed view of the mounting when using the projector suspension support PSS-610 Vue détaillée du montage lors de l'utilisation du support de suspension du projecteur PSS-610 D 250 (9 7/8) 43 (1 3/4) 68.9 (2 3/4) 97.9 (3 7/8) 216.6 (8 5/8) 146 (5 3/4) 253.5 (10) 170 (6 3/4) 144.5 (5 3/4) 166.5 (6 5/8) For more details on the ceiling installation, refer to the Installation manual for Dealers of the PSS610.
Español Italiano Deutsch Vista detallada del montaje cuando se utiliza el soporte de suspensión del proyector PSS-610 Detailansicht der Montage bei Verwendung des ProjektorDeckenhalters PSS-610 E Vista dettagliata del montaggio quando viene usato il supporto per appendere il proiettore PSS-610 F 216.6 (8 5/8) 144.5 (5 3/4) 68.9 (2 3/4) b 83.8 (3 3/8) b 83.8 (3 3/8) 123.5 (4 7/8) 146.
日本語 床置き、リア投影(打ち 込み角0゚) English Français Floor Installation (Rear Projection: Optical Axis Angle 0 Degree) Installation au sol (Rétroprojection: angle d’axe optique de 0 degré) 壁 Wall Mur Pared Wand Parete G スクリーンの中心(水平) Center of the screen (H) Centre de l’écran (H) Centro de la pantalla (H) Mitte des Projektionsschirms (H) Centro dello schermo (O) 水平:水平方向、上下:上下方向 H: horizontal direction, V: vertical direction H: sens horizontal, V:sens vertical H: dirección horizontal, V: dirección vertical H: hori
Español Deutsch Instalación en el suelo (proyección posterior: ángulo de eje óptico de 0 grados) Installation am Boden (Rückprojektion: Winkel der optischen Achse = 0 Grad) Italiano Installazione sul pavimento (proiezione posteriore: grado zero dell’angolo di asse ottico) 150.6 (6) a’’ 88.4 (3 1/2) レンズの中心(水平) Center of the lens (H) Centre de l’objectif (H) Centro del objetivo (H) Mitte des Objektivs (H) Centro dell’obiettivo (H) 46.5 (1 7/8) 35 (1 7/16) 116.5 5 261.4 (4 /8) (10 3/8) 34.
Français English 日本語 床置き、リア投影(打ち込み角 0°) Floor Installation (Rear Projection: Optical Axis Angle 0 Degree) Installation au sol (Rétroprojection: angle d’axe optique de 0 degré) ■ 標準レンズ / Standard lens / Objectif standard / Objetivo estándar / Standardobjektiv / Uso Obiettivo standard 単位:mm(インチ) / Unit: mm (inches) / Unité: mm (pouces) / Unidad: mm (pulgadas) / Einheit: mm (Zoll) / Unità: mm (pollici) SS 40 60 80 100 120 150 180 200 250 300 N 1560 (61 3/8) 2330 (91 7/8) 3110 (122 1/2) 388
Español Deutsch Instalación en el suelo (proyección posterior: ángulo de eje óptico de 0 grados) Italiano Installazione sul pavimento (proiezione posteriore: grado zero dell’angolo di asse ottico) Installation am Boden (Rückprojektion: Winkel der optischen Achse = 0 Grad) ■ VPLL-FM22 単位:mm(インチ) / Unit: mm (inches) / Unité: mm (pouces) / Unidad: mm (pulgadas) / Einheit: mm (Zoll) / Unità: mm (pollici) SS 40 60 80 100 120 150 180 200 250 300 a” 760 (30) 1130 (44 1/2) 1500 (59 1/8) 1870 (7
寸法図 / Dimensions / Dimensions / Dimensiones / Abmessungen / Dimensioni 前面 Front view Vue avant Vista frontal Vorderseite Vista anteriore 420 86.5 220.5 22.5 52.5 42.8 20.1 87.2 56.6 8.6 125.3 52.5 145.3 37.5 40 175 本体中心 Center of unit Centre du projecteur Centro de la unidad Gerätemitte Centro dell’unità 4 32.9 316.
側面 Side view Vue de côté Vista lateral Seite Vista laterale 287.3 92.4 25.7 11.9 31.1 19.9 4.9 23.1 16.7 52.8 115.2 197.1 58.4 71 256.3 底面 Bottom view Vue de dessous Vista inferior Unterseite Vista dal basso 349.8 113.6 55 163 133 125.8 4 10 33 264.8 197.3 34.7 233.5 30.4 46.6 105.8 150.6 67.4 66 209.3 89.9 34.2 24 48.2 123.3 24 70 126.5 259.7 137.4 58.4 81.5 118 140 本体中心 Center of unit Centre du projecteur Centro de la unidad Gerätemitte Centro dell’unità 47.4 32.
中文 安装图 落地安装(前投影) 墙壁 机壳前面和透镜中心之间的距离 屏幕的中心 标准:4 mm VPLL-ZM32:7 mm 透镜的中心 VPLL-ZM102: 32 mm VPLL-FM22: 6 mm x c b 地板 a a:屏幕和透镜中心之间的距离 b:地板和透镜中心之间的距离 c:地板和投影机底部之间的距离 x:任意 单位:mm 使用标准透镜时 屏幕尺寸(英寸) 40 60 80 100 120 150 180 200 250 300 最小 1490 2270 3040 3820 4590 5750 6920 7690 9630 11570 最大 1890 2860 3830 4800 5770 7220 8680 9650 12070 14500 b x-305 x-457 x-610 x-762 x-914 x-1143 x-1372 x-1524 x-1905 x-2286 c x-392 x-544 x-697 x-849 x-1002 x-1230 x-145
使用VPLL-ZM32短焦距对焦透镜时 屏幕尺寸(英寸) 40 60 80 100 120 150 180 200 250 300 最小 1160 1770 2390 3000 3610 4520 5440 6050 7580 9110 最大 1290 1970 2640 3320 3990 5000 6010 6690 8370 10060 b x-305 x-457 x-610 x-762 x-914 x-1143 x-1372 x-1524 x-1905 x-2286 c x-392 x-544 x-697 x-849 x-1002 x-1230 x-1459 x-1611 x-1992 x-2373 a 计算方法(单位:mm) a (最小) = {(SS ×29.43/0.9827) – 57} × 1.02 a (最大) = {(SS × 33.794268/0.9827) – 56} × 0.98 b = x – (SS/0.9827 × 7.488) c = x – (SS/0.
使用标准透镜时 ■当使用PSS-610 时 屏幕尺寸(英寸) a’ 80 100 120 150 180 200 250 300 最小 3350 4130 4900 6070 7230 8000 9940 11880 最大 4140 5110 6080 7530 8990 9960 12380 14810 b+693 b+846 b+998 b+1227 b+1455 b+1608 b+1989 b+2370 x 如果未使用 PSS-610 设备,您可以将其设定为任意希望值。 使用调节管(b):150/175/200 mm 使用调节管(c):250/275/300 mm b ■当使用PSS-610 以外时 屏幕尺寸(英寸) a” 80 100 120 150 180 200 250 300 最小 3110 3880 4660 5820 6980 7760 9690 11630 最大 3890 4860 5830 7290 8740 9710 12140 14560 b+693 b
■当使用PSS-610 以外时 屏幕尺寸(英寸) a” 80 100 120 150 180 200 250 300 最小 2450 3060 3670 4590 5500 6110 7640 9170 最大 2700 3380 4050 5060 6070 6750 8430 10120 b+693 b+846 b+998 b+1227 b+1455 b+1608 b+1989 b+2370 x 如果未使用 PSS-610 设备,您可以将其设定为任意希望值。 使用调节管(b):150/175/200 mm 使用调节管(c):250/275/300 mm b 计算方法(单位:mm) a (最小) = {(SS × 29.43/0.9827) – 57} × 1.02 a (最大) = {(SS × 33.794268/0.9827) – 56} × 0.98 x = b + (SS/0.9827 × 7.488) + 83.8 a’ = a + 91.1+ 216.6 = a + 303.7 a” = a + 62.
落地安装(后投影:光轴角 0 度) 墙壁 a” 150.6 88.4 46.5 35 屏幕的中心 (水平方向) 116.5 透镜的中心 (水平方向) 261.4 34.
使用VPLL-ZM102长焦距变焦透镜时 屏幕尺寸(英寸) a” 40 60 80 100 120 150 180 200 250 300 最小 2710 4100 5500 6890 8280 10370 12460 13850 17330 20810 最大 4030 6070 8110 10160 12200 15270 18330 20380 25490 30590 b x c x–79.7 计算方法(单位:mm) a” (最小) = {(SS × 67.077/0.98268) – 172.01} × 1.02 + 100.9 a” (最大) = {(SS × 102.47/0.98268) – 166.84} × 0.98 + 100.9 b=x c = x – 79.
外形尺寸 正视图 420 86.5 220.5 22.5 52.5 42.8 20.1 87.2 56.6 8.6 125.3 52.5 145.3 37.5 40 175 投影机中心 透镜的中心 4 32.9 316.
侧视图 287.3 92.4 25.7 31.1 19.9 11.9 4.9 16.7 52.8 23.1 115.2 197.1 58.4 71 256.3 底视图 349.8 113.6 55 163 133 125.8 4 10 33 264.8 197.3 34.7 233.5 30.4 46.6 105.8 150.6 67.4 66 209.3 89.9 34.2 24 48.2 123.3 24 70 126.5 259.7 137.4 58.4 81.5 118 140 47.4 32.
製品ご相談窓口のご案内 [プロジェクターの技術相談窓口] テクニカルインフォメーションセンター 電話番号: 053-577-3861 (電話のおかけ間違いにご注意ください) 受付時間: 月∼金曜日 土、日、祝日 午前9時∼午後8時 午前9時∼午後5時 製品の品質には万全を期しておりますが、万一本機のご使用中に、正常に動作しないなどの不具合が生じた場合は、上記の「テクニカルインフォメー ションセンター」までご連絡ください。 修理に関するご案内をさせていただきます。 Printed in Japan この説明書は100%古紙再生紙を使用しています キャビネットにハロゲン系難燃剤を不使用 はんだ付けに無鉛はんだ使用 包装用緩衝材から発砲スチロールを全廃 Halogenated flame retardants are not used in cabinets. Lead-free solder is used for soldering. Polystyrene foam for the packaging cushions is not used in packaging.