4-485-163-02 (1) Video Projector Operating Instructions Before operating the unit, please read this manual and supplied Quick Reference Manual thoroughly and retain them for future reference.
Table of Contents Location of Controls Front/Right Side ................................. 3 Rear/Left Side/Bottom ....................... 4 Remote Control .................................. 5 Connections and Preparations Installing the Unit .............................. 6 Adjusting the Picture Position ........... 7 Connecting to Video Equipment or a Computer ...................................... 12 About the Preset Memory ...........40 Using Network Features Connecting the unit to the network ........
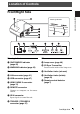
Location of Controls Front/Right Side Location of Controls Warning indicators Warning indicators Others a ON/STANDBY indicator (page 45) i Lamp cover (page 48) b WARNING indicator (page 45) j 3D Sync Transmitter Located on the inside of the lamp cover.
Rear/Left Side/Bottom The buttons on the control panel have the same names as those on the remote control.
Remote Control a LIGHT button Illuminates the buttons on the remote control.
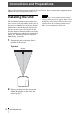
Connections and Preparations This section describes how to install the unit and screen, how to connect the equipment from which you want to project the picture, etc. Installing the Unit The installation distance between the unit and a screen varies depending on the size of the screen or whether or not you use the lens shift features. Install this unit so that it fits the size of your screen.
Adjusting the Picture Position Project an image on the screen and then adjust the picture position. Note Depending on the installation location of the unit, you may not be able to control it with the remote control. In this case, point the remote control at the remote control detector of the unit or the screen. 1 After connecting the AC power cord to the unit, plug the AC power cord into a wall outlet.
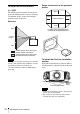
3 Adjust the focus. Press the LENS ADJUSTMENT (FOCUS) button to display the Lens Focus adjustment window (test pattern). Then adjust the focus of the picture by pressing the M/m/
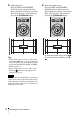
5 Adjust the picture position. Press the LENS ADJUSTMENT (SHIFT) button to display the Lens Shift adjustment window (test pattern). Then adjust to the proper position of the picture by pressing the M/m/
To adjust the vertical position Range of movement of the projected picture Press M/m. 0.85V The picture projected on the screen moves up by a maximum of 85% or moves down by a maximum of 80% of the screen height from the center of the lens. 0.31H 0.31H Projected Picture Side view 0.
Lens adjustment window (test pattern) 1.78:1 (16:9) 1.33:1 (4:3) 2.35:1 Connections and Preparations 1.85:1 The dashed lines show the screen sizes of each aspect ratio.
Connecting to Video Equipment or a Computer You can enjoy high picture quality by connecting a DVD player/recorder, Blu-ray Disc player/ recorder, or PlayStation® equipped with HDMI output to the HDMI input of the unit. When making connections, be sure to do the following: • Turn off all equipment before making any connections. • Use the proper cables for each connection. • Insert the cable plugs properly; poor connection at the plugs may cause a malfunction or poor picture quality.
Notes Connecting to Video Equipment or a Computer Connections and Preparations • Use a high-speed HDMI cable. With a standard HDMI cable, images of 1080p, DeepColor, 3D video and 4K video may not be displayed properly. • When connecting an HDMI cable to the unit, make sure the V mark on the upper part of the HDMI input of the unit and the v mark on the connector of the cable is set at the same position.
Projecting This section describes how to operate the unit to view the picture from the equipment connected to the unit. It also describes how to adjust the quality of the picture to suit your taste. Projecting the Picture 1 Turn on both the unit and the equipment connected to the unit. 2 Press INPUT to display the input palette on the screen. Turning Off the Power 1 Press the ?/1 (ON/STANDBY) button. A message “POWER OFF?” appears on the screen.
Watching 3D Video Images You can enjoy powerful 3D video images, such as from 3D games and 3D Blu-ray Discs, using the optional Active 3D Glasses (TDG-BT500A). 1 Turn on the HDMI equipment for 3D compatibility connected to the unit, then play the 3D content. Adjusting/Setting the 3D functions You can adjust/set the 3D functions by pressing the 3D button on the remote control or with the “3D Settings” of the Function menu. For details, see “3D Settings” (page 34).
Top or side view Projector 10 m 10 m 10 m Using the Picture Position You can store up to five combinations of lens settings (focus, picture size, picture position) and aspect ratio, and you can recall those settings. 1 Press POSITION. 10 m The Picture Position selecting palette is displayed. 2 Press POSITION repeatedly, or press M/m/ to select the position. The settings of the position selected is recalled.
Image of the lens moving In the example below, the images with aspect ratio of 1.78:1 (16:9) and 2.35:1 are projected on a 2.35:1 screen. When a 1.78:1 (16:9) image is input Projecting When a 2.35:1 image is input Press the POSITION button. The 2.35:1 image expands to fill the screen. Notes • After you have selected and confirmed the lens position, the lens starts to move. Do not touch, or place anything near, the lens, otherwise it may cause injury or a malfunction.
Selecting the Aspect Ratio According to the Video Signal You can select an aspect ratio best suited for the video signal received. Press ASPECT. Each time you press the button, you can select the “Aspect” setting.You can also select it using the menu (page 31). Original image ASPECT button Recommended setting and resultant images 1.85:1 Zoom 1.85:1 Squeezed 1.85:1 2.35:1 Zoom 2.35:1 Squeezed 2.
Original image Recommended setting and resultant images Normal 1.78:1 (16:9) 1.33:1 (4:3) Projecting 1.33:1 (4:3) with side panels V Stretch 2.
Original image Recommended setting and resultant images Stretch Squeezed Notes • Selectable aspect modes vary depending on the input signal (page 58). • The aspect cannot be selected for an input signal from a computer, or an input signal with a resolution of 4096 × 2160 (page 53). Notes on switching the “Aspect” setting • Select the aspect mode taking into account that changing the aspect ratio of the original picture will provide a different look from that of the original image.
Selecting the Picture Viewing Mode You can select the picture viewing mode that best suits the type of video source or room conditions. You can save and use different preset modes for 2D/3D respectively. Press one of the CALIBRATED PRESET buttons. CALIBRATED PRESET buttons Description CINEMA FILM 1 Picture quality suited to reproducing the highly dynamic and clear images typical of master positive film.
Using the Menus This section describes how to make various adjustments and settings using the menus. Operation through the Menus The unit is equipped with an on-screen menu for making various adjustments and settings. If you select an item name followed by an arrow (B), the next menu window with setting items appears. 1 Press MENU. 3 Press M/m to select an item you want to set or adjust and press , or . The menu window appears.
Setting menu To reset the picture that has been adjusted Select “Reset” from the Picture Adjustment menu Next menu window menu. When the screen display appears, select “Yes” using < and press . All of the following settings are reset to its factory preset value: “Reality Creation,” “Cinema Black Pro,” “Motionflow,” “Contrast,” “Brightness,” “Color,” “Hue,” “Color Temp.
Picture Menu The Picture menu is used for adjusting the picture. Note These items may not be available, depending on the type of input signal. For details, see “Input Signals and Adjustable/Setting Items” (page 55). Item names in brackets represent those printed on the remote control. Setting items Description Calib. Preset [CALIBRATED PRESET] You can select the picture viewing mode that best suits the type of video source or the environment.
Setting items Description Reset Resets all currently selected Calib. Preset mode settings to their default values (page 23). Tip Reset does not affect settings saved for the Custom 1 to 5 items of “Color Temp.” Reality Creation [REALITY CREATION] Adjusts the detail and noise processing of images. (Super-resolution function) On: Adjusts the settings of “Reality Creation.” Database: Select “Normal” or “Mastered in 4K.
Setting items Description Motionflow [MOTIONFLOW] Smooth High: Provides smoother picture movement; especially effective for film-based content. Smooth Low: Provides smoother picture movement for standard use. Impulse: Reproduces original picture quality. Provides cinema-like picture, which may flicker. Combination: Reduces motion blur while maintaining brightness for high-speed picture content. True Cinema: Images, such as a movie created in 24 frames per second, are reproduced at the original framerate.
Setting items Description Expert Setting NR (Noise Reduction) Reduces the roughness or noise of the picture. Auto: Detects the noise level to reduce the roughness or noise of the picture automatically. High/Middle/Low: Select a setting according to the roughness or noise of the input signal source. Off: The NR (noise reduction) function is not applied. Tip The noise level may not be detected accurately with “Auto” depending on the input signal source.
Setting items Color Correction Description On: Adjusts Hue, Color or Brightness of the selected colors. Repeat steps 1 and 2 described below to specify the target color. 1 Press M/m to select “Color Select,” then press
Advanced Picture Menu You can adjust the gaps in color that have occurred after a long period of use. Notes Tips • dE is an indicator of changing color. The smaller the value of dE, the fewer the changes caused by the color. • Perform the calibration after the power has been on for more than 30 minutes. • It takes a few minutes for “Pre Check” or “Adjust” to complete. • When “Pre Check” or “Adjust” starts, the screen position may shift, as the lens returns to its factory default position.
Screen Menu You can set the picture size, aspect mode, etc. Note These items may not be available, depending on the type of input signal. For details, see “Input Signals and Adjustable/Setting Items” (page 55). Item names in brackets represent those printed on the remote control. Setting items Description Picture Position [POSITION] You can store up to five combinations of lens settings and aspect ratio. After setting the lens and aspect, select from “1.85:1,” “2.
Description Aspect [ASPECT] You can set the aspect ratio of the picture to be displayed for the current input signal (page 18). You can set the function only when a video signal other than a resolution of 4096 × 2160 pixels is input. 1.85:1 Zoom: A 1.85:1 aspect ratio picture is displayed in its original aspect ratio, enlarged so that black bands do not appear at the top and bottom of the screen. 2.35:1 Zoom: A 2.
Setup Menu The Setup menu is used to change the factory preset settings, etc. Setting items Description Status Sets whether or not the on-screen display is displayed. Set to “Off” to turn off the on-screen displays except for certain menus, message when turning off the power, and warning messages. Language Selects the language used in the menu and on-screen displays.
Setting items Description Power Saving Sets the power saving mode. Standby: If no signal is input for 10 minutes, power is turned off automatically and the projector goes into standby mode. Off: Disables the power saving function. Lamp Setting When replacing the lamps, set the desired lamp setting (page 48).
Function Menu The Function menu is used for changing the settings of the various functions of the unit. Setting items Description 3D Settings You can change the settings of the 3D function. 2D-3D Display Sel. For Switching the video images to “2D” or “3D.” Auto: Displays 3D video images when HDMI signals with 3D information* are input. Displays 2D video images when other signals are input. 3D: Displays 3D video images according to the 3D system selected in “3D Format.
Setting items 3D Depth Adjust Description For adjusting the depth of the 3D video images on the screen. The setting can be made only when a 3D Format other than “Simulated 3D” is selected. Depth Front Normal Depth We recommend that “3D Depth Adjust” be set to “0.” The 3D video images may be difficult to perceive, depending on the setting of “3D Depth Adjust.” Simulated 3D Effect For adjusting the 3D effect when 2D content is converted to 3D video images.
Items Locked by Settings Lock Group 1 Picture menu Reset Reality Creation Advanced Iris Contrast Enhancer Lamp Control Motionflow Contrast Brightness Color Hue Color Temp. Sharpness NR MPEG NR Smooth Gradation Film Mode Gamma Correction Color Correction Clear White x.v.
Installation Menu The Installation menu is used for changing the installation settings. Description Image Flip Flips the picture on the screen horizontally and/or vertically. HV: Flips the picture horizontally and vertically. H: Flips the picture horizontally. V: Flips the picture vertically. Off: The picture does not flip. Use this item for installation for the backside projection or ceiling installation.
Setting items Description Blanking This feature allows you to adjust the displayable region within the four directions of the screen. Select the edge to adjust by highlighting Left, Right, Top, or Bottom using the M/m buttons. Adjust the amount of blanking using the
Setting items Description When “Zone” is selected: Select the position to adjust with
Information Menu The Information menu displays the model name, serial number, input signal type, software version and the cumulated hours of usage of the lamp. Model name Serial No. Signal type Software version Items Description Model Name Displays the model name Serial No. Displays the serial number. Signal type Displays the type of the input signal. When input signals with 3D information are input, the type of input signals and the 3D format are displayed.
Using Network Features Connecting the unit to the network 1 Connect the LAN cable. LAN cable (straight type) (not supplied) LAN Connector Hub, router, etc. 2 Set the network settings for the unit using “Network Setting” on the Installation menu (page 39). Using Network Features Supported network monitoring and control protocols • SDAP (Advertisement) • SDCP (PJ Talk) • DDDP (AMX) Note The network functions above are constantly enabled.
Error Handling Troubleshooting If the unit appears to be operating erratically, try to diagnose and correct the problem using the following instructions. If the problem persists, consult with qualified Sony personnel. Power Symptom Cause and Remedy The power is not turned on. The power may not turn on if you turn the power off with ?/ 1 (ON/STANDBY) button and turn it on again in a short time. After about 1 minute, turn the power on.
Symptom Cause and Remedy Page The color of characters or Select the desired color registration in “Panel Alignment” of the Installation menu. the picture is not appropriate. 38 Image is left on the screen. (image retention) – When high contrast non-moving images are displayed for a long period of time, there may be some image retention on the screen. This is only a temporary condition. Turning off the power for a while will eliminate the retained image.
3D video images Symptom Cause and Remedy The video image does not Check if the 3D glasses are turned on. seem like 3D video Make sure that the battery in the 3D glasses could be weak images. or is sufficiently charged. Page 15 – Set “2D-3D Display Sel.” to “Auto” or “3D.” 34 Check if the input signals are compatible 3D signals. 56 The 3D signals may not be input depending on the specifications of the connected AV selector/AV amplifier/ external equipment.
Warning Indicators The ON/STANDBY or WARNING indicator lights up or flashes if there is any trouble with your projector. ON/STANDBY indicator Flashing/Lighting indicators The number of flashes Cause and Remedy Twice Close the lamp cover securely, then tighten the screws securely (page 49). Three times The temperature of lamp is unusually high. Turn off the power and wait for the lamp to cool, then turn on the power again. If the symptom persists, the lamp may be at the end of its service life.
Message Lists Warning messages Symptom Cause and Remedy Page High temp.! Lamp off in 1 min. Turn off the power. – Check to ensure that nothing is blocking the ventilation holes. 3, 4 Frequency is out of range! Frequency is out of range. Input a signal that is within the acceptable frequency range of the unit. 53 Please replace the Lamp. It is time to replace the lamp. Replace the lamp. If this message appears again after you replace the lamp, the lamp replacement process is not complete.
Others Updating the Software You can download files to update the software of the unit. Copy the downloaded files to your USB memory, insert the USB memory to the USB terminal of the unit, then perform the update. To use the features updated, insert a USB memory device into a PC connected to the internet. Download the update files from the following Sony website: http://esupport.sony.com/US/p/selectsystem.pl The website also explains how to install the update. About the x.v.Color • “x.v.
Replacing the Lamp The lamp used for the light source has a certain lifespan. When the lamp dims, the color balance of the picture becomes strange, or “Please replace the Lamp.” appears on the screen, the lamp may be exhausted. Replace the lamp with a new one (not supplied) without delay. 2 Note Be sure that the unit is placed on a stable surface. 3 While pressing the part indicated in the lamp cover illustration, slide 1 and then open 2 the lamp cover.
5 Loosen the 3 screws on the lamp with the Phillips screwdriver. Hold up the handle, then pull the lamp straight out. Handle 7 Close the lamp door (inner cover), and then tighten the screw. 8 Close the lamp cover. 9 Wipe dust off the ventilation holes (intake) with a soft cloth. Notes • Do not loosen other screws except the 3 specified screws. • Hold the lamp by the handle to remove and attach it.
10Turn on the unit, then select the lamp setting item on the Setup menu. The menu screen below will be appeared. Tip If “Settings Lock” is set to “Level B,” set to “Off” once. 11Select “Yes.” Note The lamp contains mercury. The disposal rules for used fluorescent tubes depend on where you live. Follow the waste disposal policy in your area.
Cleaning Cleaning the cabinet • To remove dust from the cabinet, wipe gently with a soft cloth. If dust is persistent, wipe with a soft cloth slightly moistened with a diluted mild detergent solution. • Never use any type of abrasive pad, alkaline/acid cleaner, scouring powder, or volatile solvent, such as alcohol, benzene, thinner or insecticide. • Clean the unit with a cleaning cloth. Wiping with a dirty cloth may scratch the unit.
Specifications Item Description Display system SXRD panel, projection system Display device 52 Size of effective display area 0.74-inch (18.8 mm) SXRD Number of pixels 26,542,080 pixels (8,847,360 pixels × 3) Projection lens 2.06 times zoom lens (motorized) f = 21.7 mm to 44.7 mm F3.0 to F4.
Notes • The values for mass and dimensions are approximate. • Not all optional accessories are available in all countries and area. Please check with your local Sony Authorized Dealer. • Information on accessories in this manual is current as of October 2013. Design and specifications of this unit and its optional accessories are subject to change without notice. Preset Signals The following table shows the signals and video formats which you can project using this unit.
Preset memory no. Preset signal (resolution) fH (kHz) fV (Hz) Sync 72 1920 × 1080/50i (Frame packing) 1080/50i (1920 × 1080i) 56.250 50.000 – 74 3840 × 2160/60p* 3840×2160/60p (3840 × 2160) 135.000 60.000 – 75 3840 × 2160/50p* 3840 × 2160/50p (3840 × 2160) 112.500 50.000 – 76 4096 × 2160/60p* 4096 × 2160/60p (4096 × 2160) 135.000 60.000 – 77 4096 × 2160/50p* 4096 × 2160/50p (4096 × 2160) 112.500 50.000 – 78 4096 × 2160/30p 4096 × 2160/30p (4096 × 2160) 67.500 30.
Input Signals and Adjustable/Setting Items The items in the menus available to adjust differ depending on the input signal. The following tables indicate them. The items that cannot be adjusted/set are not displayed in the menu.
Screen menu Item Aspect* 1 Input signal Component signal Video GBR signal Computer signal z (excluding preset z (excluding preset memory numbers 76 memory numbers 78, to 79 and 96) 79 and 96) – z: Adjustable/can be set –: Not adjustable/cannot be set *1: For further details, refer to the tables in “Aspect Mode” (page 58). Note When connecting a cable such as an HDMI cable, etc.
3D signals Item 720/60p, 720/50p 1080/60i, 1080/50i 1080/24p 1080/60p, 1080/50p – Smooth Gradation – – – Film Mode – z – – x.v.Color z z z z Aspect*2 z z z z z: Adjustable/can be set –: Not adjustable/cannot be set *1: The item is not available for Frame Packing/Over-Under on 720/60p, or Over-Under on 1080/ 60p. *2: For further details, refer to the tables in “Aspect Mode” (page 58).
Aspect Mode Selectable items vary depending on the type of input signal or 3D format. For details, see the tables below. Items that cannot be selected are not displayed in the menu. 2D Acceptable signals 4096 × 2160 3840 × 2160 1920 × 1080 1280 × 720 720 × 480 720 × 576 Others Preset memory number (page 53) 76 to 79, 96 74, 75, 93 to 95 7, 8, 10 to 14 5, 6 26, 32, 37, 45, 47, 50, 55 – 1.85:1 Zoom – – z z 2.
Picture menu Item Storage conditions Calib. Preset For each input connector Reset For each input connector and Calib. Preset Reality Creation Advanced Iris Contrast Enhancer Lamp Control Motionflow Contrast Brightness Color Hue Color Temp. D93-D55 Custom 1-5 Gain R For each Color Temp., Custom 1-5 Gain G Gain B Bias R Bias G Bias B Sharpness For each input connector and Calib. Preset NR MPEG NR Smooth Gradation Film Mode Gamma Correction Color Correction Clear White x.v.
Projection Distance and Lens Shift Range The projection distance refers to the distance between the front of the lens and the projected surface. Projection distance L Projected image Front of the lens The lens shift range represents the distance in percent (%) by which the lens can be shifted from the center of the projected image.
When projecting in 1.90:1 (Native Full Display 17:9) format 1.90 1 Projection distance Unit: m (inches) Projection image size Diagonal Width × Height 80" (2.03 m) 1.80 × 0.95 (71 × 37) Projection distance L 2.32 – 4.77 (91 – 187) 100" (2.54 m) 2.25 × 1.18 (88 × 47) 2.90 – 5.97 (115 – 235) 120" (3.05 m) 2.70 × 1.42 (106 × 56) 3.49 – 7.18 (138 – 282) 150" (3.81 m) 3.37 × 1.78 (133 × 70) 4.38 – 8.98 (173 – 353) 200" (5.08 m) 4.49 × 2.37 (177 × 93) 5.85 – 11.
When projecting in 1.78:1 (16:9) format 1.78 Video display area 1 Projection area Projection distance Unit: m (inches) Projection image size Projection distance L Diagonal Width × Height 80" (2.03 m) 1.77 × 1.00 (70 × 39) 2.44 – 5.01 (96 – 197) 100" (2.54 m) 2.21 × 1.25 (87 × 49) 3.05 – 6.28 (121 – 247) 120" (3.05 m) 2.66 × 1.49 (105 × 59) 3.67 – 7.55 (145 – 297) 150" (3.81 m) 3.32 × 1.87 (131 × 74) 4.60 – 9.44 (181 – 371) 200" (5.08 m) 4.43 ×2.49 (174 × 98) 6.15 – 12.
When projecting in 2.35:1 format 2.35 Video display area 1 Projection area Projection distance Unit: m (inches) Projection image size Diagonal Width × Height 80" (2.03 m) 1.87 × 0.80 (74 × 31) Projection distance L 2.41 – 4.96 (95 – 195) 100" (2.54 m) 2.34 × 0.99 (92 × 39) 3.02 – 6.22 (119 – 244) 120" (3.05 m) 2.80 × 1.19 (110 × 47) 3.64 – 7.47 (143 – 294) 150" (3.81 m) 3.51 × 1.49 (138 × 59) 4.55 – 9.35 (180 – 368) 200" (5.08 m) 4.67 × 1.99 (184 × 78) 6.08 – 12.
Dimensions Front Unit: mm (inches) 495.6 (19 1/2) 247.8 (9 3/4) Center of the lens 108 (4 1/4) 195.3 (7 11/16) 202.3 (7 31/32) 247.8 (9 3/4) Bottom Unit: mm (inches) 98 (3 27/32) 98 (3 27/32) 81.5 (3 7/32) 81.5 (3 7/32) 187.9 (7 13/32) 187.9 (7 13/32) Front of the cabinet 87.3 (3 7/16) 142.8 (5 5/8) 150.6 (5 15/16) 408.9 (16 3/32) 463.6 (18 1/4) 64 Dimensions 7.
The distance between the front of the lens and the front of the cabinet Unit: mm (inches) 36.
Side view Unit: mm (inches) 213.5 (8 13/32) 130 (5 1/8) Front of the cabinet 258.5 (10 3/16) 463.6 (18 1/4) Top view Unit: mm (inches) 213.4 (8 13/32) 130 (5 1/8) Front of the cabinet 258.5 (10 3/16) Upper ceiling mount bracket Center of the supporting pole (The center of the supporting pole is different from that of the unit.
NOTICES AND LICENSES FOR SOFTWARE USED IN THIS PRODUCT GPL/LGPL LICENSED SOFTWARE The following GPL executables and LGPL libraries are used in this product and are subject to the GPL/LGPL License Agreements included as part of this documentation: GNU GENERAL PUBLIC LICENSE Version 2, June 1991 Copyright (C) 1989, 1991 Free Software Foundation, Inc., 51 Franklin Street, Fifth Floor, Boston, MA 02110-1301, USA.
avoid the danger that redistributors of a free program will individually obtain patent licenses, in effect making the program proprietary. To prevent this, we have made it clear that any patent must be licensed for everyone’s free use or not licensed at all. The precise terms and conditions for copying, distribution and modification follow. GNU GENERAL PUBLIC LICENSE TERMS AND CONDITIONS FOR COPYING, DISTRIBUTION AND MODIFICATION 0.
access to copy the source code from the same place counts as distribution of the source code, even though third parties are not compelled to copy the source along with the object code. 4. You may not copy, modify, sublicense, or distribute the Program except as expressly provided under this License. Any attempt otherwise to copy, modify, sublicense or distribute the Program is void, and will automatically terminate your rights under this License.
redistribution of the Program by all those who receive copies directly or indirectly through you, then the only way you could satisfy both it and this License would be to refrain entirely from distribution of the Program. If any portion of this section is held invalid or unenforceable under any particular circumstance, the balance of the section is intended to apply and the section as a whole is intended to apply in other circumstances.
(INCLUDING BUT NOT LIMITED TO LOSS OF DATA OR DATA BEING RENDERED INACCURATE OR LOSSES SUSTAINED BY YOU OR THIRD PARTIES OR A FAILURE OF THE PROGRAM TO OPERATE WITH ANY OTHER PROGRAMS), EVEN IF SUCH HOLDER OR OTHER PARTY HAS BEEN ADVISED OF THE POSSIBILITY OF SUCH DAMAGES. GNU LESSER GENERAL PUBLIC LICENSE Version 2.1, February 1999 Copyright (C) 1991, 1999 Free Software Foundation, Inc. 51 Franklin Street, Fifth Floor, Boston, MA 02110-1301, USA.
change it. By contrast, the GNU General Public Licenses are intended to guarantee your freedom to share and change free software-to make sure the software is free for all its users. This license, the Lesser General Public License, applies to some specially designated software packagestypically libraries--of the Free Software Foundation and other authors who decide to use it.
little to gain by limiting the free library to free software only, so we use the Lesser General Public License. In other cases, permission to use a particular library in non-free programs enables a greater number of people to use a large body of free software. For example, permission to use the GNU C Library in non-free programs enables many more people to use the whole GNU operating system, as well as its variant, the GNU/Linux operating system.
when the facility is invoked, then you must make a good faith effort to ensure that, in the event an application does not supply such function or table, the facility still operates, and performs whatever part of its purpose remains meaningful. (For example, a function in a library to compute square roots has a purpose that is entirely well-defined independent of the application.
library functions into the executable, and (2) will operate properly with a modified version of the library, if the user installs one, as long as the modified version is interfacecompatible with the version that the work was made with. c) Accompany the work with a written offer, valid for at least three years, to give the same user the materials specified in Subsection 6a, above, for a charge no more than the cost of performing this distribution.
b) Give prominent notice with the combined library of the fact that part of it is a work based on the Library, and explaining where to find the accompanying uncombined form of the same work. 8. You may not copy, modify, sublicense, link with, or distribute the Library except as expressly provided under this License. Any attempt otherwise to copy, modify, sublicense, link with, or distribute the Library is void, and will automatically terminate your rights under this License.
Library does not specify a license version number, you may choose any version ever published by the Free Software Foundation. 14. If you wish to incorporate parts of the Library into other free programs whose distribution conditions are incompatible with these, write to the author to ask for permission. For software which is copyrighted by the Free Software Foundation, write to the Free Software Foundation; we sometimes make exceptions for this.
You should also get your employer (if you work as a programmer) or your school, if any, to sign a “copyright disclaimer” for the library, if necessary. Here is a sample; alter the names: Yoyodyne, Inc., hereby disclaims all copyright interest in the library ‘Frob’ (a library for tweaking knobs) written by James Random Hacker.
ARISING IN ANY WAY OUT OF THE USE OF THIS SOFTWARE, EVEN IF ADVISED OF THE POSSIBILITY OF SUCH DAMAGE. This product includes cryptographic software written by Eric Young (eay@cryptsoft.com). This product includes software written by Tim Hudson (tjh@cryptsoft.com). Original SSLeay License ---------------------Copyright (C) 1995-1998 Eric Young (eay@cryptsoft.com) All rights reserved. This package is an SSL implementation written by Eric Young (eay@cryptsoft.com).
written by Eric Young (eay@cryptsoft.com)”. The word ‘cryptographic’ can be left out if the routines from the library being used are not cryptographic related:-). 4. If you include any Windows specific code (or a derivative thereof) from the apps directory (application code) you must include an acknowledgement: “This product includes software written by Tim Hudson (tjh@cryptsoft.com)”.
that the above copyright notice and this permission notice appear in all copies. THE SOFTWARE IS PROVIDED “AS IS”, WITHOUT WARRANTY OF ANY KIND, EXPRESS OR IMPLIED, INCLUDING BUT NOT LIMITED TO THE WARRANTIES OF MERCHANTABILITY, FITNESS FOR A PARTICULAR PURPOSE AND NONINFRINGEMENT OF THIRD PARTY RIGHTS.
original IEEE Standard is the referee document. In the following statement, the phrase “This material’’ refers to portions of the system documentation. This material is reproduced with permission from American National Standards Committee X3, on Information Processing Systems. Computer and Business Equipment Manufacturers Association (CBEMA), 311 First St., NW, Suite 500, Washington, DC 20001-2178. The developmental work of Programming Language C was completed by the X3J11 Technical Committee.
PROFITS, WHETHER IN AN ACTION OF CONTRACT, NEGLIGENCE OR OTHER TORTIOUS ACTION, ARISING OUT OF OR IN CONNECTION WITH THE USE OR PERFORMANCE OF THIS SOFTWARE. Internet Systems Consortium, Inc. 950 Charter Street Redwood City, CA 94063 info@isc.org https://www.isc.
WARRANTIES OF MERCHANTABILITY AND FITNESS. IN NO EVENT SHALL THE AUTHOR BE LIABLE FOR ANY SPECIAL, DIRECT, INDIRECT, OR CONSEQUENTIAL DAMAGES OR ANY DAMAGES WHATSOEVER RESULTING FROM LOSS OF USE, DATA OR PROFITS, WHETHER IN AN ACTION OF CONTRACT, NEGLIGENCE OR OTHER TORTIOUS ACTION, ARISING OUT OF OR IN CONNECTION WITH THE USE OR PERFORMANCE OF THIS SOFTWARE. =============================== boost Boost Software License - Version 1.
following disclaimer in the documentation and/or other materials provided with the distribution. 3. The name of any author may not be used to endorse or promote products derived from this software without their specific prior written permission. ALTERNATIVELY, this product may be distributed under the terms of the GNU General Public License, in which case the provisions of the GNU GPL are required INSTEAD OF the above restrictions.
Index Numerics 3D glasses 3D glasses communication range ........ 15 Using the 3D glasses ........................... 15 3D Settings 2D-3D Display Sel. (Select) ................ 34 3D Brightness ...................................... 34 3D Depth Adjust ................................. 35 3D Format ........................................... 34 Simulated 3D Effect ............................ 35 3D video .................................................. 15 D Dimensions ....................................
Picture ..................................................24 Screen ..................................................30 Setup ....................................................32 Menu Position .........................................32 Messages Caution ................................................46 Warning ...............................................46 Motionflow ..............................................26 MPEG NR (MPEG Noise Reduction) .....27 N Network connection .........................
© 2013 Sony Corporation