4-485-164-01 (1) Video Projector Quick Reference Manual Before operating the unit, please read this manual thoroughly and retain it for future reference.
About the Quick Reference Manual This Quick Reference Manual explains the installation and basic operations for projecting pictures. It also describes important notes and cautions to which you have to pay attention when handling and using this unit. Refer to “Warning Indicators” and “Replacing the Lamp,” as necessary. For details on the operations, refer to the Operating Instructions contained in the supplied CDROM. 2 Step 1 Preparing ....................................................
WARNING To reduce the risk of fire or electric shock, do not expose this apparatus to rain or moisture. To avoid electrical shock, do not open the cabinet. Refer servicing to qualified personnel only. WARNING THIS APPARATUS MUST BE EARTHED. WARNING When installing the unit, incorporate a readily accessible disconnect device in the fixed wiring, or connect the power plug to an easily accessible socket-outlet near the unit.
Caution on replacement/disposal of the battery for the 3D glasses Danger of explosion if battery is incorrectly replaced. Replace only with the same or equivalent type recommended by the manufacturer. When you dispose of the battery, you must obey the law in the relative area or country. Für Kunden in Deutschland Entsorgungshinweis: Bitte werfen Sie nur entladene Batterien in die Sammelboxen beim Handel oder den Kommunen.
Precautions On safety • Check that the operating voltage of your unit is identical with the voltage of your local power supply. • Should any liquid or solid object fall into the cabinet, unplug the unit and have it checked by qualified personnel before operating it further. • Unplug the unit from the wall outlet if it is not to be used for several days. • To disconnect the cord, pull it out by the plug. Never pull the cord itself. • The wall outlet should be near the unit and easily accessible.
SONY WILL NOT BE LIABLE FOR DAMAGES OF ANY KIND RESULTING FROM A FAILURE TO IMPLEMENT PROPER SECURITY MEASURES ON TRANSMISSION DEVICES, UNAVOIDABLE DATA LEAKS RESULTING FROM TRANSMISSION SPECIFICATIONS, OR SECURITY PROBLEMS OF ANY KIND. Notes on Installation and Usage Unsuitable installation Do not place the unit in the following situations, which may cause malfunction or damage to the unit.
Hot and humid Do not install the unit anywhere other than on a level surface or on the ceiling. Installing the unit in such a location may result in uneven color uniformity or reduce the reliability of the effects of the lamp. If the unit is tilted up or down, the image on the screen may be trapezoidal. Position the unit so that the lens is parallel to the screen.
effects, such as reducing the reliability of certain components. Safety precautions for installing the unit on a ceiling • Never mount the projector on the ceiling or move it by yourself. Be sure to consult with qualified Sony personnel (charged). • When installing the unit on a ceiling, be sure to use a safety wire, etc., to prevent the unit from falling. Entrust the installation to an experienced contractor or installer.
Step 1 Preparing Checking the Supplied Accessories Check the carton to make sure it contains the following items: • Remote control RM-PJ24 (1) • Size AA (R6) manganese batteries (2) • Lens cap (1) When you purchase the projector, a lens cap is on the lens. Remove the lens cap before you use the projector. • AC power cord for the projector (1) • Quick Reference Manual (this manual) (1) • Operating Instructions (CD-ROM) (1) Inserting the Batteries into the Remote Control Push and slide to open.
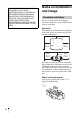
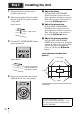
Step 2 1 2 Installing the Unit Position the unit so that the lens is parallel to the screen. After connecting the AC power cord to the unit, plug the AC power cord into a wall outlet. a Adjust the focus. Press the LENS ADJUSTMENT (FOCUS) button to display the Lens Focus adjustment window (test pattern). Then adjust the focus of the picture by pressing the M/m/
Step 3 Connecting the Unit When making connections, be sure to do the following: • Turn off all equipment before making any connections. • Use the proper cables for each connection. • Insert the cable plugs properly; poor connection at the plugs may cause a malfunction or poor picture quality. When pulling out a cable, be sure to pull it out from the plug, not the cable itself. • Refer to the operating instructions of the connected equipment.
Step 4 Selecting the Menu Language You can select one of 16 languages for displaying the menu and other on-screen displays. The factory default setting is English. To change the current menu language, set the desired language with the menu screen. 1 3 Press M/m to select “Language,” and press , or . 4 Press M/m/
Step 5 Projecting Projecting the Picture 1 Turn on both the unit and the equipment connected to the unit. 2 Press INPUT to display the input palette on the screen. 3 Select the equipment from which you want to display images. The power is turned off completely, and you can disconnect the AC power cord. Note Never disconnect the AC power cord while the indicator is flashing. You can turn off the unit by holding the ?/1 (ON/STANDBY) button for about 1 second, instead of performing the above steps.
Selecting the Picture Viewing Mode Press one of the CALIBRATED PRESET buttons. CALIBRATED PRESET buttons Setting items Description CINEMA FILM 1 Picture quality suited to reproducing the highly dynamic and clear images typical of master positive film. CINEMA FILM 2 Picture quality suited to reproducing the rich tone and color typical of a movie theater, based on the tones changed for FILM 1.
Error Handling Warning Indicators The ON/STANDBY or WARNING indicator lights up or flashes if there is any trouble with your projector. ON/STANDBY indicator Flashing/Lighting indicators The number of flashes Cause and Remedy Twice Close the lamp cover securely, then tighten the screws securely. Three times The temperature of lamp is unusually high. Turn off the power and wait for the lamp to cool, then turn on the power again. If the symptom persists, the lamp may be at the end of its service life.
Maintenance Replacing the Lamp The lamp used for the light source has a certain lifespan. When the lamp dims, the color balance of the picture becomes strange, or “Please replace the Lamp.” appears on the screen, the lamp may be exhausted. Replace the lamp with a new one (not supplied) without delay.
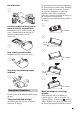
5 Loosen the 3 screws on the lamp with the Phillips screwdriver. Hold up the handle, then pull the lamp straight out. Note Be careful not to touch the optical block inside the unit. 7 Close the lamp door (inner cover), and then tighten the screw. 8 Close the lamp cover. Handle Notes • Do not loosen other screws except the 3 specified screws. • Hold the lamp by the handle to remove and attach it.
9 Wipe dust off the ventilation holes (intake) with a soft cloth. • The unit will not turn on unless the lamp cover are securely closed. • To clear a message displayed on the screen, press any button either on the remote control or the control panel of the unit once. Note on replacing the lamp when broken, in the case of a ceiling installation If the lamp breaks, broken lamp pieces may scatter and cause injury.
Mettre à disposition de la lampe usagée Pour les clients aux États-Unis La lampe dans ce produit contient du mercure. La disposition de ces matériaux peut être réglementée suite à des considérations environnementales. Pour obtenir des informations de disposition ou de recyclage, veuillez communiquer avec vos autorités locales ou la Telecommunications Industry Association (www.eiae.org).