
Projector User Manual
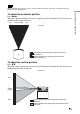
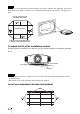
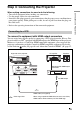
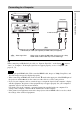
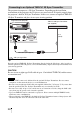
Table Of Contents
- Table of Contents
- Precautions
- Location of Controls
- Connections and Preparations
- Projecting
- Projecting the Picture on the Screen
- Using the Picture Position
- Selecting the Wide Screen Mode
- Watching 3D Video Images
- Selecting the Picture Viewing Mode
- Adjusting the Picture Quality
- Adjusting the Picture Using Real Color Processing
- Using the Supplied Software to Adjust the Picture Quality (ImageDirector3)
- Using the Menus
- Others
- About the Control for HDMI
- About the x.v.Color
- About the simulated 3D feature
- Troubleshooting
- Replacing the Lamp and the Air Filter and Cleaning the Ventilation Holes (intake)
- Cleaning the Air Filter
- Cleaning and the Screen of the Projector
- How to Use the USB Charging AC Power Adaptor
- Specifications
- Ceiling Installation
- Index

24
The range to move the picture projected on the screen can be adjusted only within the octagon area
illustrated below. In this connection, see “Positioning the Projector and a Screen” (1 page 16) as
well.
To adjust the tilt of the installation surface
If the projector is installed on an uneven surface, use the adjusters to keep the projector
level.
• Pointing the projector at too high or too low of a tilt will result in trapezoidal distortion in the
projected image.
• Be careful not to catch your finger when turning the adjusters.
Lens Focus adjustment window (test pattern)
Note
Notes
Range of movement of
the projected picture
Projected Picture
H: Width of the projected picture
V: Height of the projected picture
Adjusters
Turn to adjust.