
Projector User Manual


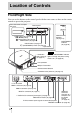
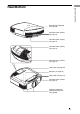
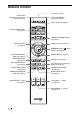
Table Of Contents
- Table of Contents
- Precautions
- Location of Controls
- Connections and Preparations
- Projecting
- Projecting the Picture on the Screen
- Using the Picture Position
- Selecting the Wide Screen Mode
- Watching 3D Video Images
- Selecting the Picture Viewing Mode
- Adjusting the Picture Quality
- Adjusting the Picture Using Real Color Processing
- Using the Supplied Software to Adjust the Picture Quality (ImageDirector3)
- Using the Menus
- Others
- About the Control for HDMI
- About the x.v.Color
- About the simulated 3D feature
- Troubleshooting
- Replacing the Lamp and the Air Filter and Cleaning the Ventilation Holes (intake)
- Cleaning the Air Filter
- Cleaning and the Screen of the Projector
- How to Use the USB Charging AC Power Adaptor
- Specifications
- Ceiling Installation
- Index

8
Front/Right Side
You can use the buttons on the control panel with the same names as those on the remote
control to operate the projector.
Location of Controls
INPUT button (1 page 31)
MENU button (1 page 45)
ON/STANDBY
indicator
(1 page 20)
Remote control detector
Ventilation
holes (exhaust)
(1 page 14)
?/1 (ON/STANDBY) switch (1 page 21)
LAMP/COVER
indicator
(1 page 72)
M/m/</, (arrow)/
(enter) button (1 page 45)
Ventilation holes (exhaust) (1 page 14)
- AC IN socket
Y P
B/CB PR/CR connector (phono type) (1 page 25)
INPUT A connector (1 page 27)
HDMI 1 connector (1 page 25)
REMOTE
connector
Connects to a
computer, etc.
for remote
control.
(1 page 44)
HDMI 2 connector (1 page 25)
While the ON/STANDBY indicator
lights in orange, the power saving
mode is on. (1 page 59)
Note
Control panel
LENS button (1 page 20)
Open button
IR IN connector Inputs signals to control the projector
TRIGGER connector (1 page 35)
Press the button and open
the cover.
Lens protector
3D Sync Transmitter
3D SYNC connector (1 page 28)