
Projector User Manual


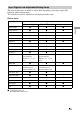
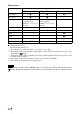
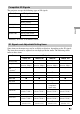
Table Of Contents
- Table of Contents
- Precautions
- Location of Controls
- Connections and Preparations
- Projecting
- Projecting the Picture on the Screen
- Using the Picture Position
- Selecting the Wide Screen Mode
- Watching 3D Video Images
- Selecting the Picture Viewing Mode
- Adjusting the Picture Quality
- Adjusting the Picture Using Real Color Processing
- Using the Supplied Software to Adjust the Picture Quality (ImageDirector3)
- Using the Menus
- Others
- About the Control for HDMI
- About the x.v.Color
- About the simulated 3D feature
- Troubleshooting
- Replacing the Lamp and the Air Filter and Cleaning the Ventilation Holes (intake)
- Cleaning the Air Filter
- Cleaning and the Screen of the Projector
- How to Use the USB Charging AC Power Adaptor
- Specifications
- Ceiling Installation
- Index

86
Screen menu
z : Adjustable/can be set
– : Not adjustable/cannot be set
*
1
: The setting can be made only when “x.v.Color” is set to “Off.”
*
2
: The setting can be made only when “Wide Mode” is set to “Full” and “Over Scan” is set to “On”
on the Screen menu.
*
3
: If the input signal is from a computer, the setting cannot be made when the aspect ratio is 16:9
or wider (fixed at “Full 1”).
*
4
: The setting can be made only when “Zoom” is selected in “Wide Mode.”
*
5
: The setting can be made only for analog signal.
When connecting a cable such as an HDMI cable, etc., check the type of the signal in the Information
menu (1 page 66) and Digital signal (1 page 84), and check items that are adjustable/can be
set.
Item Input signal
Component signal Video GBR signal Computer signal
Wide Mode zzz *
3
Over Scan zz –
Screen Area *
2
z
(preset memory
numbers 7, 8, 9, 12, 13,
14 only)
z
(preset memory
numbers 7, 8, 9, 12, 13,
14 only)
–
V Center *
4
zzz
Vertical Size *
4
zz –
APA – – z *
5
Phase – – z *
5
Pitch – – z *
5
Shift z *
5
z *
5
z
Note