
Projector User Manual


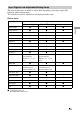
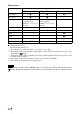
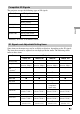
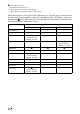
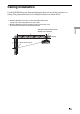
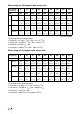
Table Of Contents
- Table of Contents
- Precautions
- Location of Controls
- Connections and Preparations
- Projecting
- Projecting the Picture on the Screen
- Using the Picture Position
- Selecting the Wide Screen Mode
- Watching 3D Video Images
- Selecting the Picture Viewing Mode
- Adjusting the Picture Quality
- Adjusting the Picture Using Real Color Processing
- Using the Supplied Software to Adjust the Picture Quality (ImageDirector3)
- Using the Menus
- Others
- About the Control for HDMI
- About the x.v.Color
- About the simulated 3D feature
- Troubleshooting
- Replacing the Lamp and the Air Filter and Cleaning the Ventilation Holes (intake)
- Cleaning the Air Filter
- Cleaning and the Screen of the Projector
- How to Use the USB Charging AC Power Adaptor
- Specifications
- Ceiling Installation
- Index

89
Others
Ceiling Installation
Use the PSS-H10 Projector Suspension Support when you install the projector on a
ceiling. The projection distances for ceiling installation are shown below.
L’:Distance between the screen and the installation hole at the
ceiling side of the ceiling mount unit (front side)
y’: Distance between the ceiling and the center of the screen such
that the picture will not be truncated or blocked
PSS-H10 Projector Suspension
Support (not supplied)
Ceiling
Center of the screen