4-419-667-52(1) AV Center AV Center XAV-601BT ©2012 Sony Corporation Operating Instructions GB Manual de instrucciones ES
Be sure to install this unit in the dashboard of the car for safety. For installation and connections, refer to the supplied “Installation/Connections” guide. Warning To prevent fire or shock hazard, do not expose the unit to rain or moisture. To avoid electrical shock, do not open the cabinet. Refer servicing to qualified personnel only. CAUTION The use of optical instruments with this product will increase eye hazard.
Table of Contents Notes on safety . . . . . . . . . . . . . . . . . . . . . . . . . 6 Repeat and shuffle play. . . . . . . . . . . . . . . . . . 21 Notes on installation . . . . . . . . . . . . . . . . . . . . . 6 Direct search play . . . . . . . . . . . . . . . . . . . . . . 22 Copyrights . . . . . . . . . . . . . . . . . . . . . . . . . . . . . 6 Listing up tracks/video files — List . . . . . . . . 22 Selecting a track/video file. . . . . . . . . . . . . 22 Selecting a file type . . . . . . . . . . .
iPod Playing an iPod . . . . . . . . . . . . . . . . . . . . . . . . 30 Listing up tracks/video files — List. . . . . . . . . 31 Selecting a track/video file . . . . . . . . . . . . . 31 Selecting a file type . . . . . . . . . . . . . . . . . . . 31 Selecting the play mode . . . . . . . . . . . . . . . . . . 31 Audio streaming . . . . . . . . . . . . . . . . . . . . . . . 40 Listening to a Bluetooth device via this unit . . . . . . . . . . . . . . . . . . . . . . . . . . . .
Notes on discs . . . . . . . . . . . . . . . . . . . . . . . 56 Playback order of MP3/WMA/AAC/Xvid/ MPEG-4 files . . . . . . . . . . . . . . . . . . . . . . . 56 About iPod . . . . . . . . . . . . . . . . . . . . . . . . . 58 About Bluetooth function . . . . . . . . . . . . . . 58 Maintenance . . . . . . . . . . . . . . . . . . . . . . . . . . 59 Removing the unit . . . . . . . . . . . . . . . . . . . . . . 60 Specifications . . . . . . . . . . . . . . . . . . . . . . . . . 60 Troubleshooting. . . . . . . .
Notes on safety • Comply with your local traffic rules, laws and regulations. • While driving – Do not watch or operate the unit, as it may lead to distraction and cause an accident. Park your car in a safe place to watch or operate the unit. – Do not use the setup feature or any other function which could divert your attention from the road. – When backing up your car, be sure to look back and watch the surroundings carefully for your safety, even if the rear view camera is connected.
ZAPPIN is a trademark of Sony Corporation. 12 TONE ANALYSIS and its logo are trademarks of Sony Corporation. “WALKMAN” and “WALKMAN” logo are registered trademarks of Sony Corporation. SensMe and the SensMe logo are trademarks or registered trademarks of Sony Ericsson Mobile Communications AB. Music recognition technology and related data are provided by Gracenote®. Gracenote is the industry standard in music recognition technology and related content delivery. For more information, please visit www.
Notes on Bluetooth function Caution IN NO EVENT SHALL SONY BE LIABLE FOR ANY INCIDENTAL, INDIRECT OR CONSEQUENTIAL DAMAGES OR OTHER DAMAGES INCLUDING, WITHOUT LIMITATION, LOSS OF PROFITS, LOSS OF REVENUE, LOSS OF DATA, LOSS OF USE OF THE PRODUCT OR ANY ASSOCIATED EQUIPMENT, DOWNTIME, AND PURCHASER’S TIME RELATED TO OR ARISING OUT OF THE USE OF THIS PRODUCT, ITS HARDWARE AND/OR ITS SOFTWARE.
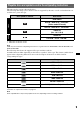
Playable discs and symbols used in these Operating Instructions This unit can play various video/audio discs. The following chart helps you to check if a disc is supported by this unit, as well as what functions are available for a given disc type. Disc symbol in manual Disc format DVD VIDEO VIDEO DVD-R*1/DVD-R DL*1/DVD-RW*1 (Video mode/VR mode) DVD+R*1/DVD+R DL*1/DVD+RW*1 AUDIO Video CD (Ver. 1.0/1.1/2.0) Audio CD CD-ROM*2/CD-R*2/CD-RW*2 *1 Audio files can also be stored.
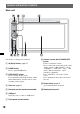
Location and function of controls Main unit For details, see the pages listed below. A Z (Eject) button page 17 B HOME button Press to open HOME menu. C DSPL/M.OFF button Press to change display items. Press and hold to turn off the monitor and the button illumination. To turn back on, touch anywhere on the display. D Disc slot page 17 I Reset button page 13 (located behind the front panel) E Receptor for the remote commander J Display/touch panel F USB port Open the cover to connect a USB device.
Screen displays Indication list: A ATT (Attenuate) B ZONE × ZONE C Bluetooth status indications page 35 D Clock page 14 E “ZONE × ZONE” key Touch to activate Zone × Zone. F Option key Touch to open HOME Option menu. The items in the Home Option menu are as follows: Home Screen: “Icon Priority” Displays the icon depending on the frequency of use: “Default,” “Frequency Used.” “Background Theme” Changes the Background Theme: “Default,” “User.” “Icon View” Changes the display of icons: “2D Mode,” “3D Mode.
RM-X271 Remote Commander • The remote commander can be used to operate the audio controls. For menu operations, use the touch panel. • For details, see the pages listed below. • Remove the insulation film before use (page 14). F EQ (Equalizer) button Press to select an equalizer curve from 7 music types (“Xplod”/“Vocal”/“Edge”/ “Cruise”/“Space”/“Gravity”/“Custom”/ “OFF”). G Number buttons page 22 Radio: Press to receive stored stations. Press and hold to store stations.
O
• For details on setting the character encoding, see page 47. • For details on setting the display language, see page 47. Note Some characters may not be displayed correctly, depending on the language/country/region. Setting the clock The clock uses a 12-hour indication. 1 2 Press (HOME), then touch “Settings.” 3 Set the hour and minute. For example, to set to 8:30, touch “0830.” 4 5 Touch “AM” or “PM.” Touch , then touch “Clock Adjust.” The setting display appears.
Radio Reception controls 1 2 3 Listening to the radio 1 Press (HOME), then touch “Tuner.” The radio reception display appears. 4 1 2 Touch the current band. The band list appears. 3 Touch the desired band (“FM1,” “FM2,” “FM3,” “AM1,” or “AM2”). 4 Perform tuning. To tune automatically Touch / . Scanning stops when the unit receives a station. Repeat this procedure until the desired station is received. To tune manually Touch / repeatedly until the desired frequency is received.
RDS Reception indications A B Overview C FM stations with Radio Data System (RDS) service send inaudible digital information along with the regular radio program signal. Display items A B D A Current source icon B Band name C Frequency/status D Preset number Storing and receiving stations Caution When tuning to stations while driving, use Best Tuning Memory (BTM) to prevent an accident. C A Band name, RDS* B Program service name, frequency C Preset number * During RDS reception.
Selecting PTY Discs 1 During FM reception, touch “PTY.” To scroll the list, move the scrollbar up and down. Playing discs 2 Touch the desired program type. The unit searches for a station broadcasting the selected program type. To close the PTY list, touch . Depending on the disc, some operations may be different or restricted. Refer to the operating instructions supplied with your disc. 1 Insert the disc (label side up). Playback starts automatically.
Playback controls Touch the display if the playback controls are not displayed. 1 Touch to list up tracks/video files. (page 22) 2 1 2 4 5 Touch to change Visualizer, which contains the following items: Gate/Balloon/Glow/Animal/Graffiti/Ink/ Random/OFF 3 3 “Repeat” 4 ./> Touch to skip a chapter/track/scene file. (page 21) Touch and hold momentarily to reverse/ fast-forward the video; and then repeatedly to switch the speed (× 2 t × 12 t × 120 t × 2 …)*1. To cancel, touch u.
Note If the disc contains multiple file types, only the selected file type (audio/video) can be played. For details on how to select the file type, see “Selecting a file type” on page 22. Playback indications Touch the display if the indications are not displayed. For audio discs, some indications are always displayed during playback. *1 Indications differ depending on the content. *2 When playing a VCD with PBC functions (page 19), “PBC” appears. *3 DVD only.
Configuring audio settings Note Discs in DTS format are not supported. The sound is not output if the DTS format is selected. Changing the audio language/ format The audio language can be changed if the disc is recorded with multilingual tracks. You can also change the audio format when playing a disc recorded in multiple audio formats (e.g., Dolby Digital). 1 2 During playback, touch the screen. 3 Touch repeatedly until the desired audio language/format appears. Touch .
Repeat and shuffle play The shuffle options and switching order of each disc/format are indicated below. Disc/format MPEG-4 1 *2 During playback, touch “Repeat” or “Shuffle” repeatedly until the desired option appears. Repeat or shuffle play starts. *1 The repeat options and switching order of each disc/format are indicated below. Disc/format Options “OFF”: Returns to normal play mode. “Chapter”: Repeats the current chapter. “Title”: Repeats the current title.
Direct search play Listing up tracks/video files — List MPEG-4 You can directly locate a desired point by specifying the title number, chapter number, etc. 1 During playback, press the number buttons on the remote commander to enter an item (track, title, etc.) number, then press (ENTER). Playback starts from the beginning of the selected point.
USB Music Options Playing music To change the setting menu (Normal playback screen only) 1 Connect the USB device to the USB port. 2 Press (HOME), then touch “USB Music.” Playback starts. Touch . The menu list appears. 2 Touch . The options are indicated below. “ZAPPIN Time” Selects the playback on time for the ZAPPIN function: “6 sec.,” “15 sec.,” “30 sec..” Playback controls 1 1 2 3 4 5 “Update database” Searches for music files and adds them to the database.
Selecting music files 1 2 During playback (Normal playback screen only), touch . The list of categories or files from the currently played item appears. To scroll the list, move the scrollbar up and down. To enable the SensMe™ function on this unit, tracks need to be analyzed and transferred to the registered USB device using “Media Go.” 1 Connect the registered USB device to your computer. For “WALKMAN,” connect via MTP mode. For USB devices other than “WALKMAN,” connect via MSC mode.
4 Flick the channel list left or right. Playback of the first track in the current channel starts from the track’s most melodic or rhythmical section*. “SensMe™ channels” playback controls and indications A B C * May not be detected correctly. 5 Touch the desired channel. Playback of tracks in the selected channel starts. Notes • Depending on the track, it may not be detected correctly or may be grouped in a channel not suited to the track’s mood.
To change the album display format (while selecting “Albums” from Library) USB Video 1 Touch . The menu list appears. Playing video 2 Touch , then select “List view” or “Grid view.” To change the cover art sort order (Cover art view only) 1 Touch . The menu list appears. 2 Touch , then select “Sort by album,” or “Sort by artist.” To return to the playback screen, touch “Cancel.” 1 Connect the USB device to the USB port. 2 Press (HOME), then touch “USB Video.” Playback starts.
5 Selecting video files Touch to play a track file. 1 During playback, touch . The list of categories or files from the currently played item appears. To scroll the list, move the scrollbar up and down. 2 Touch the desired item. Playback starts. Touch to pause playback. * The speed depends on the format or the recording method. Tip You can change the playing speed dynamically by dragging the screen of the video file left or right. To return to the Playback screen, touch Options .
USB Photo Options Viewing Photos To play slideshow 1 Connect the USB device to the USB port. 1 During playback, touch The menu list appears. 2 Press (HOME), then touch “USB Photo.” 2 Touch . The slideshow starts. 3 Touch “All pictures,” or “Folders,” then select the picture or folders. Playback controls Touch the display if the playback controls are not displayed. 1 2 . To set as wallpaper 1 During playback, touch The menu list appears. 2 3 Touch . . Touch “OK.
To change the settings Selecting photo files 1 2 During playback, touch . The list of categories or files from the currently played item appears. To move to the upper level, touch . To scroll the list, move the scrollbar up and down. Touch the desired item. Playback starts. Touch . The slideshow starts. 2 Touch . The options are indicated below. “Slideshow interval settings” Adjusts the time interval: “0.5 sec.” “20.0 sec..” “Update database” Searches for picture files and adds them to the database.
Notes on USB playback • MSC (Mass Storage Class) can be used. • Compatible codecs are MP3 (.mp3), WMA (.wma), AAC/HE-AAC (.m4a), JPEG (.jpg), Xvid (.avi/.xvid), and MPEG-4 (.mp4). • Backup of data in a USB device is recommended. Notes • During USB Video playback, if the playback is intermittent: – Press (HOME) or launch the System settings. – During the USB Photo, etc. • Connect the USB device after starting the engine.
About resuming mode When the iPod currently playing is connected to the dock connector, the mode of this unit changes to resuming mode and playback starts in the mode set by the iPod. In resuming mode, repeat/shuffle play are not available. Caution for iPhone When you connect an iPhone via USB, telephone volume is controlled by the iPhone itself. In order to avoid emitting sudden loud sound after a call, do not increase the volume on the unit during a call.
For video playback Useful Functions “All”: Repeats all video files in the iPod. “Track”: Repeats the current video. “Group”*: Repeats the current item of the selected play mode. Searching for a track by listening to track passages — ZAPPIN™ The shuffle options are as follows: For audio playback “OFF”: Returns to normal play mode. “Album”/“Podcast”/“Artist”/“Playlist”/ “Genre”*: Plays tracks of the selected play mode in random order. “Device”: Plays all tracks in an iPod in random order.
Controlling applications on your smartphone — MirrorLink™ This function duplicates the smartphone’s display on the in-car display, so you can control applications on your smartphone with the bigger screen. Only a smartphone compatible with the MirrorLink™ function can be used. 1 Connect your smartphone and the unit via USB cable. 2 Press (HOME), then touch “MirrorLink™.” The smartphone’s display appears on the incar display. Touch and control applications in the same way as you do on your smartphone.
Using Gesture Command You can perform frequently-used operations by drawing the following command stroke on the reception/playback display. Do this To Radio reception: seek forward stations. (The same as >.) Draw a horizontal line DVD/VCD playback: (left to right) skip forward a chapter/track. (The same as >.) Xvid/MPEG-4/audio playback: skip forward a file/track. (The same as >.
Bluetooth status indications Pairing None: Bluetooth signal is off. Lit: Bluetooth signal is on. Pairing is required only the first time you connect to a Bluetooth device (cellular phone, etc.).* None: No device is connected for audio streaming. Flashing: Connection is in progress. Lit: A device is connected. For details, refer to the manual of the Bluetooth device. None: No cellular phone is connected for handsfree calling. Flashing: Connection is in progress. Lit: A cellular phone is connected.
7 Operate the Bluetooth device to connect to this unit. Bluetooth device name appears and connection is complete. “ ” or “ ” appears when the connection is made. * Passkey may be called “passcode,” “PIN code,” “PIN number,” “password,” etc., depending on the Bluetooth device. Notes • While connecting to a Bluetooth device, this unit cannot be detected from another device. To enable detection, disconnect the current connection. • It may take time to search or connect.
By the call history The unit stores the last 20 calls, allowing you to select one quickly from the list. 1 Press (HOME), then touch “Phone.” The Bluetooth Phone display appears. 2 Touch . The call history list appears. To scroll the list, move the scrollbar up and down. 3 Touch the desired item in the list. The contact confirmation display appears. 4 Touch . The call is made and the calling display appears until the other party answers.
Operations during a call To adjust the talker’s voice volume Press (VOL) +/– during a call. The level of the talker’s voice volume will be stored into memory, independently from the regular volume level. To send DTMF (Dual Tone Multiple Frequency) tones Touch , then the required number keys. To transfer the current call to the cellular phone Touch . To transfer back to the handsfree call, touch again. You can store up to 500 contacts in the phonebook.
Browsing a phonebook Call data management You can browse its phonebook data. You can also make a call to a contact. Deleting call history 1 Press (HOME), then touch “Phone.” The Bluetooth Phone display appears. You can delete the items in the call history. 2 Touch . The phonebook appears. To delete all items in the call history 3 Select the desired contact. 1 Press (HOME), then touch “Phone.” The Bluetooth Phone display appears. 1 In the name list, touch the name of the contact. 2 Touch .
Phone option menu The Phone option menu can be configured in “Phone.” 1 2 Press (HOME), then touch “Phone.” 3 Touch the desired item in the list and configure the setting. The items in the Phone option menu are as follows: Touch . The Phone option menu appears. “Ringtone”* * Uses the ringtone of this unit or the connected cellular phone: “Internal,” “Cellular.” 1 2 “Auto Answer”*1 Answers an incoming call automatically. – “OFF”: to not answer automatically.
General Settings about Bluetooth The Bluetooth settings can be configured in “General Settings.” Sound Adjustment Selecting the sound quality — EQ7 1 Touch , and move the scrollbar up and down. The Bluetooth setting menu appears. You can select an equalizer curve from 7 music types (“Xplod,” “Vocal,” “Edge,” “Cruise,” “Space,” “Gravity,” “Custom,” or “OFF”). 2 Touch the desired item in the list and configure the setting. 1 During reception/playback, press (HOME), then touch “Settings.” 2 Touch .
5 Touch “OK.” The setting is complete. Optimizing sound for the listening position — Intelligent Time Alignment Tip Other equalizer types are also adjustable. Adjusting the sound characteristics The sound balance between left and right speakers (“Balance”) and front and rear speakers (“Fader”) can be adjusted to your preference. You can also adjust the volume level of the subwoofer if it is connected. 1 During reception/playback, press (HOME), then touch “Settings.” 2 Touch .
Calibrating the listening position — Intelligent Time Alignment Tune You can precisely calibrate your listening position from each speaker so that the sound delay reaches the listener more correctly. Before starting, measure the distance between your listening position and each speaker. 1 During reception/playback, press (HOME) then touch “Settings.” 2 3 Touch 4 5 , then “Listening Position.” Touch “Custom >.” The setting display appears.
Adjusting the speaker volume Monitor Adjustment You can adjust the volume level of each connected speaker. The adjustable speakers are “Front R” (Front Right), “Front L” (Front Left), “Surround L” (Rear Left), “Surround R” (Rear Right) and “Subwoofer*.” Touch panel calibration * Adjustable only when a subwoofer is connected and “Subwoofer” is set to “ON” (page 50). 1 While no source is selected, press (HOME), then touch “Settings.” 2 Touch . The sound setting menu appears.
Selecting the aspect ratio Customizing the picture The options “Custom 1” and “Custom 2” of Picture EQ allow you to make your own picture setting by adjusting the picture tones. You can change the screen aspect ratio. The options are indicated below. 1 During video playback, press (HOME), then touch “Settings.” “Normal”: Picture with 4:3 aspect ratio (regular picture). 2 3 Touch , then “Picture EQ.” Touch “Custom 1 >” or “Custom 2 >.” The setting display appears.
Settings The setting menu includes the following categories. • • • • : General Settings (page 47) : Sound Settings (page 49) : Visual Settings (page 51) : Source Settings (page 52) Basic setting operation You can set items in the menu via the following procedure. For example, when setting the Key Illumination: 1 Press (HOME), then touch “Settings.” The setting menu appears. 2 Touch , and move the scrollbar up and down, then touch “Key Illumination.” The general setting display appears.
General Settings Touch “Settings” c c the desired item c the desired option. For details on this procedure, see “Basic setting operation” on page 46. For details, see the pages listed below. “z” indicates the default setting. Item Option Purpose Unit status Clock Adjust (page 14, 16) – – Any status Language English, Français, Español (z), Português, Русский, Nederlands, Deutsch, Italiano To select the display language.
Item Key Illumination (page 33) Touch Panel Adjust (page 44) Option Purpose Rainbow (z) (12 preset colors, customized color and 5 preset patterns) To change the color of the buttons. – – OFF Camera Input Activates the video input from Normal (z) the connected rear view camera. Reverse Rear View Camera Setting – (page 54) Unit status Any status Any status To deactivate the input. To display the picture from the rear view camera when the back lamp lights up.
Sound Settings Touch “Settings” c c the desired item c the desired option. For details on this procedure, see “Basic setting operation” on page 46. For details, see the pages listed below. “z” indicates the default setting. Item EQ7 (page 41) Balance/Fader/Subwoofer (page 42) Option Purpose OFF (z) To cancel the equalizer curve. Xplod, Vocal, Edge, Cruise, Space, Gravity, Custom To select the equalizer curve; customize the equalizer curve.
Item Crossover Filter Selects the cut-off frequency of the front/rear speakers (HPF) and subwoofer (LPF). Option Purpose LPF: 50 Hz, 60 Hz, 80 Hz, 100 Hz (z), 120 Hz To select the cut-off frequency. (Available only when “Subwoofer” is set to “ON.”) HPF: OFF (z) To not cut out the frequencies. HPF: 50 Hz, To select the cut-off 60 Hz, 80 Hz, frequency. 100 Hz, 120 Hz Subwoofer Phase: Normal (z), Reverse 50 Unit status During reception/ playback To select the subwoofer phase.
Visual Settings Touch “Settings” c c the desired item c the desired option. For details on this procedure, see “Basic setting operation” on page 46. For details, see the pages listed below. “z” indicates the default setting. Item Dimmer Changes the display brightness. Option Purpose OFF To deactivate the dimmer. Auto (z) To dim the display automatically when you turn lights on. (Available only when the illumination control lead is connected.
Source Settings Touch “Settings” c c the desired item c the desired option. For details on this procedure, see “Basic setting operation” on page 46. For details, see the pages listed below. “z” indicates the default setting. Item Option Purpose DVD Direct Search (page 22) Sets the search item for DVD direct search play. Chapter (z) To search for a chapter. Title To search for a title. DVD Menu Language English (z), To change the disc’s menu Chinese, language.
Item Option 16:9 (z) Monitor Type Selects an aspect ratio suitable for the connected monitor. (The screen aspect ratio of this unit also changes.) Depending on the disc, “4:3 Letter Box” may be selected automatically instead of “4:3 Pan Scan,” and vice versa. 4:3 Letter Box Purpose To display a wide picture. Suitable when connecting to a wide-screen monitor or a monitor with a wide mode function. To display a wide picture with bands on the upper and lower positions of the screen.
Rear view camera Using Optional Equipment By connecting the optional rear view camera to the CAMERA terminal, you can display the picture from the rear view camera. Auxiliary audio/video equipment You can connect up to 2 optional devices, such as a portable media player, game console, etc., to the AUX1 IN and AUX2 IN terminals on the unit. Selecting an auxiliary device The picture from the rear view camera appears when: – the back lamp lights up (or the shift lever is set to the R (reverse) position).
Editing lines 1 Touch Additional Information . Precautions • Cool off the unit beforehand if your car has been parked in direct sunlight. • Do not leave the front panel or audio devices brought in inside the car, or it may cause damage or malfunction due to high temperature in direct sunlight. • Power antenna (aerial) extends automatically. 2 Select the line to edit. Touch , or corresponding to the line to edit. 3 Edit the line. To increase the length, touch B b. To reduce the length, touch bB.
Notes on discs • Do not expose discs to direct sunlight or heat sources such as hot air ducts, nor leave it in a car parked in direct sunlight. • Before playing, wipe the discs with a cleaning cloth from the center out. Do not use solvents such as benzine, thinner, commercially available cleaners. • This unit is designed to play discs that conform to the Compact Disc (CD) standard.
About WMA files About Linear PCM files WMA*1 files meeting the following requirements can be played. Playback is not be guaranteed for all WMA files meeting the requirements. Linear PCM files meeting the following requirements can be played. Playback is not be guaranteed for all Linear PCM files meeting the requirements. Codec for Disc Codec for MSC • Media File format: ASF file format • File extension: .wma • Bit rate: 64 to 192 kbps (Supports variable bit rate (VBR)) • Sampling frequency *2: 44.
Codec for MSC • • • • • • • • • • • • • • • • • • Media File format: MP4 file format File extension: .mp4, .m4v Profile: Simple Profile Bit rate: Max. 12 Mbps Frame rate: Max. 30 fps (30p/60i) Resolution: Max. 1,280 x 720 *5 Media File format: MP4 file format File extension: .mp4, .m4v Profile: Advanced Simple Profile Bit rate: Max. 8 Mbps Frame rate: Max. 30 fps (30p/60i) Resolution: Max. 720 x 576 *5 Media File format: Xvid file format File extension: .avi, .
On Bluetooth communication • Bluetooth wireless technology operates within a range of about 10 m. Maximum communication range may vary depending on obstacles (person, metal, wall, etc.) or electromagnetic environment. • The following conditions may affect the sensitivity of Bluetooth communication. – There is an obstacle such as a person, metal, or wall between this unit and Bluetooth device. – A device using 2.
Cleaning the connectors The unit may not function properly if the connectors between the unit and the front panel are not clean. In order to prevent this, detach the front panel (page 14) and clean the connectors with a cotton swab. Do not apply too much force. Otherwise, the connectors may be damaged. Specifications Monitor section Display type: Wide LCD color monitor Dimensions: 6.
*1 The actual range will vary depending on factors such as obstacles between devices, magnetic fields around a microwave oven, static electricity, reception sensitivity, antenna’s performance, operating system, software application, etc. *2 Bluetooth standard profiles indicate the purpose of Bluetooth communication between devices.
The Auto Off function does not operate. The unit is turned on. The Auto Off function activates after turning off the unit. t Exit the source. The menu items cannot be selected. Unavailable menu items are displayed in gray. USB Music, USB Video, AUX and BT Audio cannot be selected as the source. Some sources are not displayed on the Source select screen. t Remove the check mark from the source item you cannot select (page 53). The monitor angle cannot be adjusted.
MP3/WMA/AAC/Xvid/MPEG-4 files do not play. • Recording was not performed according to the ISO 9660 level 1 or level 2 format or the Joliet or Romeo expansion format ( DATA CD), or the UDF Bridge format (DATA DVD) (page 56). • The file extension is incorrect (page 57). • Files are not stored in MP3/WMA/AAC/Xvid/ MPEG-4 format. • If the disc contains multiple file types, only the selected file type (audio/video) can be played. t Select the appropriate file type using the list (page 22).
The sound skips during audio streaming. • Reduce the distance between the unit and the Bluetooth device. • If the Bluetooth device is stored in a case which interrupts the signal, remove the case while using the device. • Several Bluetooth devices or other devices which emit radio waves are used nearby. t Turn off the other devices. t Increase the distance from the other devices. • The playback sound stops momentarily when this unit is connecting to a cellular phone. This is not a malfunction.
Handsfree device is not available. A cellular phone is not connected. t Connect a cellular phone (page 36). High Temperature Error An error has occurred due to a high temperature. t Lower the temperature. iPod video cable reconnected. Reconnect the USB cable. The iPod video cable is unplugged and plugged. t Unplug the USB cable, then plug it in again. New firmware not found. • There is no firmware update available in the USB memory. t Try to update to the latest version of firmware.
Language code list Language code list The language spellings conform to the ISO 639: 1988 (E/F) standard.
Asegúrese de instalar esta unidad en el tablero del automóvil para mayor seguridad. Para obtener más información acerca de la instalación y conexiones, consulte el manual de “Instalación/Conexiones” suministrado. Advertencia Para evitar el riesgo de incendio o electrocución, no exponga la unidad a la lluvia ni a la humedad. Para evitar recibir descargas eléctricas, no abra el aparato. Solicite asistencia técnica únicamente a personal especializado.
Tabla de contenido Notas sobre seguridad . . . . . . . . . . . . . . . . . . . . 6 Notas sobre la instalación . . . . . . . . . . . . . . . . . 6 Derechos de autor . . . . . . . . . . . . . . . . . . . . . . . 6 Notas sobre la función de Bluetooth . . . . . . . . . 7 Nota sobre la licencia . . . . . . . . . . . . . . . . . . . . 8 Discos que se pueden reproducir y símbolos usados en este Manual de instrucciones . . . . . . 9 Ajuste del nivel de salida de audio — Nivel de Dolby D . . . . . . . . . . . . . .
Notas sobre la reproducción de USB iPod Reproducción de un iPod . . . . . . . . . . . . . . . . .32 Lista de pistas/archivos de video — Lista . . . . 32 Seleccionar una pista/archivo de video . . . . 32 Seleccionar de un tipo de archivo . . . . . . . .33 Seleccionar del modo de reproducción . . . . . . 33 Reproducción repetida y aleatoria . . . . . . . . . . 33 Manejar un iPod directamente — Modo de control de App para pasajeros . . .
Ajustes de fuente . . . . . . . . . . . . . . . . . . . . . . . 55 Uso de equipo opcional Equipo auxiliar de audio/video . . . . . . . . . . . . 58 Vista cámara posterior . . . . . . . . . . . . . . . . . . . 58 Ajuste de la vista cámara posterior . . . . . . . 58 Información complementaria Precauciones . . . . . . . . . . . . . . . . . . . . . . . . . . 59 Notas sobre el panel LCD . . . . . . . . . . . . . . 59 Notas sobre los discos. . . . . . . . . . . . . . . . .
Notas sobre seguridad • Respete las reglas, leyes y regulaciones locales de tráfico. • Mientras maneja – No mire ni haga funcionar la unidad, puesto que podría distraerse y causar un accidente. Estacione el automóvil en un lugar seguro para mirar o hacer funcionar la unidad. – No use la característica de configuración ni ninguna otra función que pudiera desviar su atención del camino.
La marca de la palabra y los logotipos de Bluetooth son propiedad de Bluetooth SIG, Inc. y Sony Corporation posee licencia para utilizar cualquiera de dichas marcas. Otras marcas registradas y nombres comerciales pertenecen a sus respectivos propietarios. ZAPPIN es una marca registrada de Sony Corporation. 12 TONE ANALYSIS y su logotipo son marcas registradas de Sony Corporation. “WALKMAN” y el logotipo de “WALKMAN” son marcas comerciales registradas de Sony Corporation.
Conducción Verifique las leyes y regulaciones sobre el uso de teléfonos celulares y equipos de manos libres en las áreas donde maneje. Siempre preste toda su atención cuando maneje, salga del camino y estaciónese antes de realizar o contestar una llamada si las condiciones de manejo así lo requieren. Conexión a otros dispositivos Cuando se conecte a cualquier otro dispositivo, lea la guía del usuario para obtener instrucciones detalladas sobre seguridad.
Discos que se pueden reproducir y símbolos usados en este Manual de instrucciones Esta unidad puede reproducir distintos tipos de discos de video y audio. En la tabla a continuación puede comprobar qué discos son compatibles con esta unidad, además de conocer las funciones disponibles para cada tipo de disco. Símbolo del disco en el manual Formato del disco DVD VIDEO VIDEO DVD-R*1/DVD-R DL*1/DVD-RW*1 (Modo video/modo VR) DVD+R*1/DVD+R DL*1/DVD+RW*1 AUDIO Video CD (Ver. 1.0/1.1/2.
Ubicación y funcionamiento de los controles Unidad principal Para obtener más información, consulte las páginas que se indican a continuación. A Botón Z (expulsar) página 18 B Botón HOME Presione para abrir el menú HOME. C Botón DSPL/M.OFF Presione para cambiar los elementos visualizados. Manténgalo presionado para apagar el monitor y la iluminación de los botones. Para volver a encender, toque en cualquier parte de la pantalla.
La pantalla muestra Lista de indicaciones: A ATT (Atenuar) B ZONE × ZONE C Indicaciones de estado de Bluetooth página 37 D Reloj página 14 E Tecla “ZONE × ZONE” Toque para activar Zone × Zone. F Tecla Opción Toque para abrir el menú Opción de HOME. Los elementos en el menú Opciones de inicio son los siguientes: Pantalla de inicio: “Iconos de Prioridad” Se visualizan los elementos según su frecuencia de uso: “Predeterminado”, “Frecuencia utilizada”.
RM-X271 Control remoto • El control remoto puede utilizarse para operar los controles de audio. Para operaciones de menú, use el panel táctil. • Para obtener más información, consulte las páginas que se indican a continuación. • Retire la envoltura aislante antes de usarlo (página 14). F Botón EQ (Ecualizador) Presione para seleccionar la curva del ecualizador entre 7 tipos de música (“Xplod”/“Vocal”/“Vanguar”/“Vuelo”/ “Espacial”/“Gravedad”/“Personal”/ “DESACTIVAR”).
(ANGLE): Presione para cambiar el ángulo de visualización. (TOP MENU): Presione para abrir el menú principal de un DVD. (MENU): Presione para abrir el menú de un disco. N Botón ZAP Presione para ingresar en el modo ZAPPIN™. O Botones
• Para obtener más información sobre el ajuste del estado de conexión del altavoz subgraves, consulte la página 53. • Para más información sobre el ajuste de la posición para escuchar, consulte “Optimizar el sonido para la posición para escuchar — Alineación de tiempo inteligente” en la página 45. • Para más detalles sobre ajustes a la codificación de caracteres, consulte página 50. • Para obtener más información sobre el ajuste del idioma de la pantalla, consulte la página 50.
Nota No coloque nada dentro de la superficie interna del panel frontal. Radio Escuchar la radio 1 Presione (HOME), luego, toque “Sintonizador”. Aparece la pantalla de recepción de radio. 2 Toque la banda actual. Aparece la lista de bandas. 3 Toque la banda deseada (“FM1”, “FM2”, “FM3”, “AM1” o “AM2”). 4 Procedimiento para sintonizar una emisora. Sintonización automática Toque / . La búsqueda se detiene cuando la unidad recibe una emisora. Repita este procedimiento hasta recibir la emisora deseada.
Controles de recepción Indicaciones durante la recepción 1 2 3 A 4 7 5 6 5 B C 4 D 1 “PTY” (FM únicamente) Toque para abrir la lista PTY (página 17). 2 Toque para registrar el elemento predeterminado.
Recepción de emisoras almacenadas 1 2 Selección de PTY 1 Durante la recepción de FM, toque “PTY”. Para retroceder o avanzar en la lista, mueva la barra de desplazamiento hacia arriba y hacia abajo. 2 Toque el tipo de programa deseado. La unidad busca una emisora que transmita el tipo de programa seleccionado. Seleccione la banda. Toque el número deseado (“1” a “6”).
Discos Controles de reproducción Reproducción de discos Toque la pantalla si no aparecen los controles de reproducción. Dependiendo del disco, es posible que algunas operaciones sean diferentes o estén prohibidas. Consulte el manual de instrucciones suministrado con el disco. 1 1 2 3 Inserte el disco (con la etiqueta hacia arriba). La reproducción se inicia automáticamente. Si aparece el menú DVD Toque el elemento en el menú DVD.
1 Toque para listar pistas/archivos de videos. (página 22) 2 Toque para cambiar el Visualizador, el cual contiene los siguientes elementos: Puerta/Globo/Resplandor/Animal/ Graffiti/Tinta/Aleatorio/DESACTIVAR 3 “Repetir” (página 21) /“Mezclar” 4 ./> Toque para omitir un capítulo/pista/ archivo de escena. Mantenga pulsado momentáneamente para retroceder/avanzar rápidamente el video y luego en forma repetida para cambiar la velocidad (× 2 t × 12 t × 120 t × 2 …)*1. Para cancelar, toque u.
A Icono de fuente actual, formato, número de capítulo/título*1, formato de audio*3 B Estado de reproducción, tiempo de reproducción transcurrido C Nombre de pista/artista/álbum*1*5 Nombre de archivo/carpeta*6 D Icono de fuente actual, formato, número de pista (archivo)*2, estado de la reproducción, tiempo de reproducción transcurrido*4 *1 Las indicaciones pueden variar en función del contenido. *2 Durante la reproducción de un VCD con las funciones PBC (página 20), aparece “PBC”. *3 DVD únicamente.
* El nombre del formato y el número de canales aparecen de la siguiente forma: Ejemplo: Dolby Digital 5.1 ch Reproducción repetida y aleatoria Canal posterior × 2 Dolby D 3 / 2 . 1 Canal frontal × 2 + Canal central × 1 MPEG-4 1 Canal LFE × 1 Cambio del canal de audio Al reproducir un VCD, puede escuchar el canal izquierdo y derecho, sólo el canal derecho o sólo el canal izquierdo a través de los altavoces derechos e izquierdos. Las opciones disponibles se muestran debajo.
Las opciones de reproducción aleatoria o de modificación del orden de reproducción de cada disco o formato se indican a continuación. Disco/ formato Opciones *2 *1 “DESACTIVAR”: vuelve al modo de reproducción normal. “Título”: reproduce los capítulos del título actual en orden aleatorio. “DESACTIVAR”: vuelve al modo de reproducción normal. “Disco”: reproduce las pistas del disco actual en orden aleatorio. “DESACTIVAR”: vuelve al modo de reproducción normal.
Selección de un tipo de archivo Música USB MPEG-4 Si el disco contiene diferentes tipos de archivos, solamente puede reproducirse el tipo de archivo seleccionado (audio/video). El orden de prioridad de reproducción de los tipos de archivo se ajusta inicialmente en audio, video (es decir, si el disco contiene archivos de video y de audio, solamente se reproducirán los archivos de audio).
Opciones Para cambiar el menú de ajustes (Pantalla de reproducción normal únicamente) 1 Toque . Aparece la lista del menú. 2 Toque . Las opciones disponibles se muestran debajo. “Tiempo para ZAPPIN” Selecciona la reproducción a tiempo para la función ZAPPIN: “6 s”, “15 s”, “30 s”. “Actualizar base de datos” Busca archivos de música y los añade a la base de datos. “Acerca de Reproductor de música” Visualiza la versión de la aplicación. Para cambiar los ajustes del Visualizador 1 Toque .
Cómo disfrutar la música de acuerdo con su estado de ánimo — SensMe™ La característica única de Sony “Canales SensMe™” agrupa pistas de forma automática según su canal o ánimo, lo que le permite disfrutar de la música intuitivamente. Instalar “Media Go” en su computadora Se requiere el software (“Media Go”) para habilitar la función SensMe™ en esta unidad. 1 Descargue el software “Media Go” desde el sitio de soporte técnico que se encuentra en la contratapa.
“Relajante”: reproduce música tranquila y relajante. Seleccionar un álbum por la imagen de portada “Suave”: reproduce música suave y lenta. 1 Mientras aparece la lista en la pantalla, toque . 2 Toque la ilustración de la portada del álbum que desea reproducir. Se inicia la reproducción. x Recomendado “Mañana”, “Día”, “Tarde”, “Noche”, “Medianoche” x Mezclar todo Reproduce todas las pistas analizadas en orden aleatorio.
5 Video USB Toque para reproducir una pista. Reproducir video Toque para pausar la reproducción. 1 Conecte el dispositivo USB al puerto USB. 2 Presione (HOME), luego, toque “Video USB”. Se inicia la reproducción. * La velocidad depende del formato o del método de grabación. Sugerencia Puede cambiar la velocidad de reproducción en forma dinámica arrastrando la pantalla del archivo de video a izquierda o derecha.
Para volver a la pantalla de reproducción, toque o “Cancelar”. Seleccionar archivos de video 1 2 Durante la reproducción, toque . Aparece la lista de categorías o archivos en el elemento actualmente reproducido. Para retroceder o avanzar en la lista, mueva la barra de desplazamiento hacia arriba y hacia abajo. Toque el elemento deseado. Se inicia la reproducción. Para volver a la pantalla de reproducción, presione .
Foto USB Opciones Visualizar fotos Para reproducir presentación de diapositivas 1 Conecte el dispositivo USB al puerto USB. 2 Presione (HOME), luego, toque “Foto USB”. 3 Toque “Todas las fotos”, o “Carpetas”; luego seleccione la imagen o la carpeta. Durante la reproducción, toque Aparece la lista del menú. 2 Toque . Comienza la presentación de diapositivas. . Para configurar como fondo de pantalla Controles de reproducción Toque la pantalla si no aparecen los controles de reproducción.
Para cambiar el tipo de orden de la lista de Fotos Seleccionar archivos de foto 1 2 Durante la reproducción, toque . Aparece la lista de categorías o archivos en el elemento actualmente reproducido. Para moverse al nivel superior, toque . Para retroceder o avanzar en la lista, mueva la barra de desplazamiento hacia arriba y hacia abajo. Toque el elemento deseado. Se inicia la reproducción. Para reproducir presentación de diapositivas 1 Toque . Comienza la presentación de diapositivas.
Notas sobre la reproducción de USB • No se admite la reproducción de un archivo de compresión sin pérdida. • Se puede utilizar MSC (Clase de almacenamiento masivo). • Los códecs compatibles son MP3 (.mp3), WMA (.wma), AAC/HE-AAC (.m4a), JPEG (.jpg), Xvid (.avi/.xvid), y MPEG-4 (.mp4). • Se recomienda respaldar los datos en un dispositivo USB. Notas • Durante la reproducción de Video USB, la reproducción es intermitente: – Presione (HOME) o inicie los ajustes de Sistema. – Durante la Foto USB, etc.
iPod Para obtener más información sobre la compatibilidad del iPod, consulte “Acerca de iPod” en la página 63 o visite el sitio de soporte técnico que se encuentra en la contratapa. En este Manual de instrucciones, “iPod” se usa como una referencia general para las funciones del iPod en el iPod e iPhone, a menos que se especifique de otro modo en el texto o en las ilustraciones. Nota Esta unidad no reconoce iPod múltiples. Reproducción de un iPod 1 Reduzca el volumen en esta unidad.
Para volver a la pantalla principal, presione . 2 Toque el elemento deseado. Se inicia la reproducción. Reproducción repetida y aleatoria 1 Seleccionar de un tipo de archivo Puede seleccionar el tipo de archivo con el que desea confeccionar la lista y, a continuación, seleccionar el archivo que desea reproducir. 1 2 3 Durante la reproducción, toque Toque o de archivo. . para seleccionar el tipo Toque el archivo deseado. Se inicia la reproducción del archivo seleccionado.
Manejar un iPod directamente — Modo de control de App para pasajeros Puede operar directamente un iPod conectado a esta unidad. 1 Durante la reproducción, toque . Desactivar el Modo de control de App para pasajeros Mientras el “Modo de control de App para pasajeros” esta activado, toque la pantalla y luego el botón “Cancelar”. El modo de reproducción cambia al modo de reanudación. Notas • Solo se visualizará la imagen y el video de esta aplicación si está puesto el freno de mano.
Controlar aplicaciones en su smartphone — MirrorLink™ Esta función reproduce la pantalla del smartphone en la pantalla del automóvil, de manera que usted pueda controlar las aplicaciones de su smartphone en una pantalla más grande. Solo puede utilizarse un smartphone compatible con la función de MirrorLink™. 1 Conecte su smartphone y la unidad con el cable USB. 2 Presione (HOME), luego, toque “MirrorLink™ ”. Lo que se visualiza en la pantalla del smartphone aparece en la pantalla del automóvil.
3 4 Mueva la barra de desplazamiento hacia arriba y hacia abajo para seleccionar “Personal”; luego presione “Entonar >”. Mueva la barra de desplazamiento a la derecha y a la izquierda o presione +/– para ajustar el rango de colores de “R” (rojo), “G” (verde) o “B” (azul). Rango de color ajustable: “0” – “63”. Puede ajustar el color mientras observa la iluminación del botón.
Llamada de manos libres y transmisión de audio — Función Bluetooth Antes de utilizar la función Bluetooth Procedimiento básico de la función Bluetooth 1 Asociación Al conectar dispositivos Bluetooth por primera vez, se requiere registro mutuo. Esto se llama “asociación”. Este registro (asociación) se requiere solamente la primera vez, puesto que en una próxima ocasión esta unidad y los otros dispositivos se reconocerán automáticamente.
Esta unidad y el dispositivo Bluetooth memorizan la información del otro, y una vez hecho el emparejamiento, la unidad está lista para conectarse con el dispositivo. Asociación La asociación solamente se requiere la primera vez que se conecta a un dispositivo Bluetooth (teléfono celular, etc.).* Para obtener más información, consulte el manual del dispositivo Bluetooth. * Si elimina el registro del dispositivo de esta unidad, necesitará realizar nuevamente la asociación.
Llamada de manos libres Una vez que la unidad se conecta al teléfono celular, cuando la hace funcionar, puede realizar/ recibir llamadas de manos libres. Realización de llamadas 4 Toque . La llamada se realiza y la pantalla de llamada aparece hasta que la otra persona conteste. Sugerencia También puede explorar la agenda telefónica del teléfono celular conectado en esta unidad y realizar una llamada (página 41).
3 Diga la etiqueta de voz almacenada en el teléfono celular. La voz se reconoce, luego se realiza la llamada. La pantalla de llamada aparece hasta que la otra persona contesta. Mediante la función de rellamada 1 Presione (HOME), luego, toque “Teléfono”. Aparece la pantalla de Teléfono Bluetooth. 2 Toque . La llamada se realiza y la pantalla de llamada aparece hasta que la otra persona conteste. Notas • Diga la etiqueta de voz de la misma forma que la almacenó en el teléfono celular.
3 Administración de la agenda telefónica Puede almacenar hasta 500 contactos en la agenda telefónica. Notas • Antes de disponer del automóvil en el que está instalada la unidad o cambiar su titularidad, asegúrese de eliminar, de alguna de las siguientes maneras, todos los datos de la agenda telefónica a fin de evitar posibles accesos no autorizados: – Elimine los datos de la agenda telefónica mediante inicialización (página 44). – Presione el botón de reinicio.
Para eliminar un contacto individual de la agenda telefónica 1 2 Siga los pasos 1 a 2 arriba. 3 Toque . Se muestra la pantalla de confirmación. 4 Toque “OK”. El contacto se elimina de la agenda telefónica. Eliminar el historial de llamadas Puede eliminar los elementos en el historial de llamadas. Para eliminar todos los elementos en el historial de llamadas 1 Presione (HOME), luego, toque “Teléfono”. Aparece la pantalla de Teléfono Bluetooth. 2 Toque . Aparece la lista del historial de llamadas.
“Recibir agenda telefónica” Envía información de la agenda telefónica desde el teléfono celular conectado. Al completar la recepción, aparece el nombre del dispositivo Bluetooth. “Visualizador de fondo” Ajusta el Visualizador de fondo: “ACTIVAR”, “DESACTIVAR”. *1 No se puede configurar durante una llamada de manos libres. *2 Dependiendo del teléfono celular, el tono de llamada de esta unidad podría mantenerse incluso si se ajusta en “Celular”.
Ajustes generales de Bluetooth El ajuste de Bluetooth se puede configurar en “Ajustes generales”. 1 2 Toque y mueva la barra de deslizamiento hacia arriba y hacia abajo. Aparece el menú de ajuste de Bluetooth. Toque el elemento deseado en la lista y configure el ajuste. Ajuste del sonido Selección de la calidad de sonido — EQ7 Usted puede seleccionar la curva del ecualizador entre 7 tipos de música (“Xplod”, “Vocal”, “Vanguar”, “Vuelo”, “Espacial”, “Gravedad”, “Personal”, o “DESACTIVAR”).
4 Toque +/– de cada frecuencia para ajustar sus niveles. El nivel se puede ajustar en pasos individuales entre –8 y +8. Para restaurar la curva de un ecualizador ajustada de fábrica, toque “Restablecer”. 5 Toque “OK”. Se completó la configuración. Sugerencia También es posible ajustar otros tipos de ecualizador.
Para personalizar la posición para escuchar, toque “Personal >”. Si quiere restablecer los ajustes predeterminados, toque “Restablecer”. Para cancelar la Alineación de tiempo inteligente, seleccione “DESACTIVAR”. Para volver a la pantalla anterior, toque . Calibrar la posición para escuchar — Sintonización de alineación de tiempo inteligente Puede calibrar con precisión su posición de escucha desde cada altavoz para que la demora de sonido alcance al oyente más correctamente.
3 4 Mueva la barra de desplazamiento hacia arriba y hacia abajo; luego toque “RBE (Potenciador de graves posterior)”. Se muestran las opciones. Toque “RBE1”, “RBE2” o “RBE3”. Se completó la configuración. Para cancelar RBE, toque “DESACTIVAR” en el paso 4. Para volver a la pantalla anterior, toque . Ajuste de volumen de los altavoces Puede ajustar el nivel de volumen de cada altavoz conectado. Los altavoces ajustables son “Delantero D” (delantero derecho), “Delantero I” (delantero izquierdo), “Post.izq.
Personalización de la imagen Las opciones “Personal 1” y “Personal 2” de la Imagen EQ permiten realizar su propio ajuste de la imagen, mediante la definición de los tonos de la misma. 1 2 3 Durante la reproducción del video, presione (HOME), luego toque “Ajustes”. Toque , luego “Picture EQ”. Toque “Personal 1 >” o “Personal 2 >”. Aparece la pantalla de ajuste. Selección de la relación de aspecto Puede cambiar la relación de aspecto de la pantalla. Las opciones disponibles se muestran debajo.
Ajustes El menú de ajustes incluye las siguientes categorías. • • • • : Ajustes generales (página 50) : Ajustes de sonido (página 52) : Ajustes visuales (página 54) : Ajustes de fuente (página 55) Operación básica de ajustes Los elementos del menú se pueden ajustar mediante el procedimiento siguiente. Por ejemplo, si desea configurar la Iluminación de teclas: 1 Presione (HOME), luego, toque “Ajustes”. Aparece el menú de ajuste.
Ajustes generales Toque “Ajustes” c c el elemento deseado c la opción deseada. Para obtener más información sobre este procedimiento, consulte “Operación básica de ajustes” en la página 49. Para obtener más información, consulte las páginas que se indican a continuación. “z” indica la configuración predeterminada.
Elemento Opción Utilidad Arco iris (z) (12 colores predefinidos, color personalizado y 5 diseños predefinidos) Para cambiar el color de los botones. Ajuste del panel táctil (página 47) – – Entrada de la cámara Activa la entrada de video de la vista cámara posterior conectada. DESACTIVAR Permite desactivar la entrada. Normal (z) Permite visualizar la imagen de la vista de cámara posterior cuando se enciende la luz de retroceso.
Ajustes de sonido Toque “Ajustes” c c el elemento deseado c la opción deseada. Para obtener más información sobre este procedimiento, consulte “Operación básica de ajustes” en la página 49. Para obtener más información, consulte las páginas que se indican a continuación. “z” indica la configuración predeterminada. Elemento EQ7 (página 44) Opción Utilidad DESACTIVAR (z) Permite cancelar la curva de un ecualizador.
Elemento Opción Utilidad RBE (Potenciador de graves posterior) (página 46) Utiliza altavoces posteriores como un altavoz subgraves. DESACTIVAR (z), RBE1, RBE2, RBE3 Permite seleccionar el modo. Filtro de cruce Permite seleccionar la frecuencia de corte de los altavoces frontal/posterior (HPF) y del altavoz subgraves (LPF). LPF: 50 Hz, 60 Hz, 80 Hz, 100 Hz (z), 120 Hz Permite seleccionar la frecuencia de corte. (Disponible solamente cuando “Altavoz subgraves” está ajustado en “ACTIVAR”.
Ajustes visuales Toque “Ajustes” c c el elemento deseado c la opción deseada. Para obtener más información sobre este procedimiento, consulte “Operación básica de ajustes” en la página 49. Para obtener más información, consulte las páginas que se indican a continuación. “z” indica la configuración predeterminada. Elemento Atenuador Esta opción cambia la intensidad del brillo de la pantalla. Opción Utilidad DESACTIVAR Permite desactivar el atenuador.
Ajustes de fuente Toque “Ajustes” c c el elemento deseado c la opción deseada. Para obtener más información sobre este procedimiento, consulte “Operación básica de ajustes” en la página 49. Para obtener más información, consulte las páginas que se indican a continuación. “z” indica la configuración predeterminada. Elemento Estado de la unidad Opción Utilidad Búsqueda directa DVD (página 22) Ajusta el elemento de búsqueda de reproducción de búsqueda directa de DVD.
Elemento Opción Utilidad Multi (z) Salida múltiples canales Cambia el método de salida de las fuentes de múltiples Estéreo canales. Permite emitir en 4.1 canales. 16:9 (z) Tipo de monitor Permite seleccionar la relación de aspecto adecuada para el monitor conectado. (La relación de aspecto de la pantalla de esta unidad también cambia.) Permite mostrar una imagen panorámica. Se utiliza en monitores de pantalla panorámica o en monitores con función de modo panorámico.
Elemento Intervalo de sintonía FM Opción Utilidad 100 kHz Permite cambiar la unidad de frecuencia FM. Estado de la unidad Ninguna fuente seleccionada 200 kHz (z) Saltar fuente – Para reducir la cantidad de veces que se debe presionar para cambiar las fuentes. Verifique las fuentes sin utilizar en la pantalla de Saltar fuente.
Vista cámara posterior Uso de equipo opcional Equipo auxiliar de audio/video Puede conectar hasta 2 dispositivos opcionales, como un reproductor de medios portátil, una consola de juegos, etc., en los terminales AUX1 IN y AUX2 IN de la unidad. Selección del dispositivo auxiliar 1 Presione (HOME), luego, toque “AUX”. Aparecerá la pantalla de reproducción de AUX. 2 Toque “AUX1” o “AUX2” para seleccionar el dispositivo. Funciona mediante el dispositivo portátil.
Edición de líneas 1 Toque Información complementaria . Precauciones 2 Seleccione la línea que se editará. Toque , o correspondiente a la línea a editar. 3 Edite la línea. Para aumentar la longitud, toque B b. Para reducir la longitud, toque bB. Para ajustar la posición, toque V o v. Para restaurar el ajuste predeterminado, toque “Restabl.”. Para volver a la pantalla anterior, toque . • Primero deje que la unidad se enfríe si el automóvil ha estado estacionado directamente bajo el sol.
• Podrían aparecer algunos puntos azules, rojos o verdes estacionarios en el monitor. Estos se denominan “puntos brillantes” y pueden producirse con cualquier LCD. El LCD está fabricado con precisión, con más de 99,99% de sus segmentos funcionales. Sin embargo, es posible que un pequeño porcentaje (normalmente 0,01%) de los segmentos no se encienda correctamente. Esto, sin embargo, no interferirá con la visión.
Orden de reproducción de los archivos MP3/WMA/AAC/Xvid/ MPEG-4 MP3/WMA/AAC/ Xvid/MPEG-4 Carpeta (álbum) Archivo MP3/ WMA/AAC/Xvid/ MPEG-4 (pista/ archivo de video) • Velocidad de bits: 32 a 320 kbps (soporta velocidad de bits variable (VBR)) *4 • Frecuencia de muestreo *2: 32, 44,1, 48 kHz Acerca de los archivos AAC Se pueden reproducir los archivos AAC*3 que cumplen con los siguientes requisitos. La reproducción no se garantiza para todos los archivos AAC que cumplen los requisitos.
Acerca de los archivos AVC (H.264/ AVC) Se pueden reproducir los archivos AVC (H.264/ AVC) que cumplan los siguientes requisitos. La reproducción no se garantiza para todos los archivos AVC (H.264/AVC) que cumplen los requisitos. • Resolución: máx. 720 × 576 *5 • Formato de archivo multimedia: formato de archivo Xvid • Extensión de archivo: .avi, .xvid • Perfil: Perfil simple avanzado • Velocidad de bits: máx. 8 Mbps • Velocidad de transmisión de tramas: máx.
Acerca de iPod • Puede conectarse a los siguientes modelos de iPod. Actualice sus dispositivos iPod a la última versión de software antes de utilizarlos.
– Al hablar por teléfono con manos libres, podría producirse ruido, dependiendo del dispositivo o entorno de comunicación. • Dependiendo del dispositivo conectado, podría requerirse un tiempo para comenzar la comunicación. Otros • El uso del dispositivo Bluetooth podría no funcionar en teléfonos celulares, dependiendo de las condiciones de las ondas de radio y de la ubicación donde se utiliza el equipo. • Si siente molestias después de usar el dispositivo Bluetooth, detenga de inmediato el uso de éste.
2 3 Tire de las llaves para desmontar la unidad. Deslice la unidad hacia afuera. Especificaciones Sección de monitor Tipo de pantalla: monitor color LCD ancho Dimensiones: 6,1 pulg.
Accesorios/equipos opcionales: Cable de conexión USB y de video para iPod: RC-202IPV Vista cámara posterior: XA-R800C Es posible que su distribuidor no comercialice algunos de los accesorios que figuran en la lista anterior. Consulte al distribuidor para obtener información detallada. Patentes de los EE.UU. y otros países usados con licencia de Dolby Laboratories. Tecnología de codificación de audio MPEG Layer-3 y patentes bajo licencia de Fraunhofer IIS y Thomson.
Recepción de radio No es posible recibir las emisoras. Hay ruidos que obstaculizan el sonido. La conexión no es correcta. t Conecte un cable REM OUT (azul/blanco a rayas) o un cable de fuente de alimentación auxiliar (rojo) al cable de la fuente de alimentación del amplificador de señal de la antena del automóvil (solamente cuando el vehículo disponga de una antena motorizada en el cristal posterior o lateral). t Compruebe la conexión de la antena del automóvil.
Los archivos MP3/WMA/AAC/Xvid/MPEG-4 no se reproducen. • La grabación del disco no se corresponde con los niveles 1 o 2 de ISO 9660, con el formato de expansión de Joliet/Romeo (DATA CD) ni con el formato UDF Bridge (DATA DVD) (página 60). • La extensión del archivo es incorrecta (página 61). • Los archivos no están almacenados en formato MP3/ WMA/AAC/Xvid/MPEG-4. • Si el disco contiene diferentes tipos de archivos, solamente puede reproducirse el tipo de archivo seleccionado (audio/video).
El volumen del dispositivo Bluetooth conectado es bajo o alto. El nivel de volumen diferirá según el dispositivo Bluetooth. t Reduzca las diferencias en el nivel de volumen entre esta unidad y el dispositivo Bluetooth (página 43). No se emite sonido durante la transmisión de audio. El dispositivo Bluetooth conectado está en pausa. t Cancele la pausa del dispositivo Bluetooth. El sonido salta durante la transmisión de audio. • Reduzca la distancia entre la unidad y el dispositivo Bluetooth.
Error de listado de datos Ha ocurrido un error al mostrar los datos de la agenda telefónica a través de PBAP o del historial de llamadas desde el teléfono BT. t Conect. de nuev. el teléfono BT. Error de eliminación. Los contenidos del video no pudieron eliminarse debido a un problema. t Intente eliminarlos nuevamente. De lo contrario, elimínelos usando una PC, etc. Error del disco • El disco está sucio o se insertó al revés. t Límpielo o insértelo en forma correcta. • Se insertó un disco vacío.
La lista de reproducción está vacía. La lista de reproducción contiene archivos no reproducibles. t Verifique si hay contenidos en la aplicación USB que puedan reproducirse. El sonido en formato DTS no es audible. No se admiten discos en el formato DTS. El sonido no se reproduce si está seleccionado el formato DTS. t Los discos formateados DTS no pueden reproducirse en esta unidad. Use un formato de disco compatible (página 9).
Lista de códigos de idiomas Lista de códigos de idiomas La ortografía de los idiomas cumple con el estándar ISO 639: 1988 (E/F).
http://esupport.sony.com/ES/LA/ http://www.sony.