4-291-715-12(1) Digital Link Sound System Owner’s Record The model and serial numbers are located on the bottoms of the DSP master unit and amplifier. Record these numbers in the spaces provided below. Refer to these numbers whenever you call upon your Sony dealer regarding this product. Model No. Serial No.
Warning This equipment has been tested and found to comply with the limits for a Class B digital device, pursuant to Part 15 of the FCC Rules. These limits are designed to provide reasonable protection against harmful interference in a residential installation. This equipment generates, uses, and can radiate radio frequency energy and, if not installed and used in accordance with the instructions, may cause harmful interference to radio communications.
Table of contents Introduction . . . . . . . . . . . . . . . . . . . . . . . . . . . . . . . . . . . . . . . . . . . . . . . . . . . . . . . 4 Getting Started . . . . . . . . . . . . . . . . . . . . . . . . . . . . . . . . . . . . . . . . . . . . . . . . . . . . . 4 Resetting the unit . . . . . . . . . . . . . . . . . . . . . . . . . . . . . . . . . . . . . . . . . . . . . . . . . . . . . . . . . 4 The System Components. . . . . . . . . . . . . . . . . . . . . . . . . . . . . . . . . . . . . . . . . . . .
Introduction Thank you for purchasing the Digital Link Sound System (XDP-PK1000). This system allows you to digitally integrate an iPod/iPhone into your existing car audio unit. You can enjoy exciting sound from your car audio unit and iPod/iPhone via this system, which features sound settings optimized for your vehicle type by using Sony’s original digital sound technology, and powerful bass delivered by the supplied subwoofer and amplifier.
The System Components This section contains explanations on the location of controls and their basic operations. DSP master unit 1 Sound setting switches page 10 Set each switch according to your car type/interior. 2 3 4 Note • Avoid touching the top of the DSP master unit during use, as it becomes hot over time. SOURCE indicator You can check the status of the DSP master unit. Indicator Status Turns blue. A car audio unit is selected as the source. Turns red.
Cradle Suction cup VOLUME (VOL) +/–*2 SEEK / buttons*1*2 Press to skip tracks. SOURCE/OFF button Press to turn on the power/change the source between a car audio unit and an iPod/iPhone. Press and hold more than two seconds to turn off the system. The indicator () turns off. Remote sensor Indicator You can check the status of the DSP master unit. Indicator Status Turns blue. A car audio unit is selected as the source. Turns red. An iPod/iPhone is selected as the source.
RM-X251 Card remote commander LEFT/RIGHT buttons page 11 Press to adjust the speaker balance. Press and hold the CNT button () to return to the default setting. BASS (–/CNT/+) buttons page 11 Press to adjust the bass level. ALO (Automatic Level Optimizer) button*1 page 11 Adjust the playback volume level of an iPod/iPhone to the optimum level: “ON,” “OFF.” / buttons*1 Press to skip tracks. TREBLE (–/CNT/+) buttons page 11 Press these buttons to adjust the treble level.
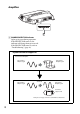
Amplifier POWER/PROTECTOR indicator Lights up in green during operation. If the PROTECTOR turns on, the indicator will change from green to red. If the PROTECTOR turns on, refer to “Troubleshooting” (page 22). Dynamic Distortion Suppressor Conventional Amplifier Rated Power Output Signal Rated Power Output Signal Max. Power Output Signal Activated Max. Power Output Signal Distortion Suppressed! Now you can enjoy clear bass sound with less distortion.
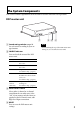
Subwoofer 9
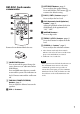
Compact hatchback Sound Settings Optimized sound setting based on your vehicle This system provides clear treble and powerful bass optimized for the vehicle type by setting the DSP master unit. 18 different settings are available. Warning SW LOCATION: MID TRUNK: N VEHICLE SIZE: S Middle sized sedan • Avoid touching the top of the DSP master unit when setting the switches, as it becomes hot during use. Notes • Set the sound of the car audio unit (BASS/ TREB/Loudness, etc.) to the flat position.
Tip for setting the SW LOCATION switch If you are not sure about these sound settings, set the VEHICLE SIZE switch first, and then set the SW LOCATION switch to where bass sound appears to come from in front of the driver’s seat. FAR Adjusting the treble level Press the TREBLE (–/CNT/+) button. Available settings are -7 to +7, in 1-step increments. Press and hold the CNT button to return to the default setting. The default setting is 0.
Mounting sheet Setting up the Cradle Precautions • Install the cradle on a dashboard properly so that the unit will not interfere with normal driving. • Follow the instructions on this manual about dealing with the suction cup to secure the cradle on a dashboard. If you fail to do so, the adhesive strength of the suction cup may decrease, and the cradle may fall down. • If the cradle becomes detached, a traffic accident may result. To prevent this, use the supplied strap.
Notes Notes • Choose the mounting location carefully. Practice installation before you actually mount the sheet, if necessary. • Removing the mounting sheet from the dashboard decreases the adhesive strength of the mounting sheet. It should not be reused after removal. 1 Peel the paper from the mounting sheet, and then stick the mounting sheet to the dashboard. • After you attach the strap to the cradle, pull the strap gently to make sure that the strap is securely attached to the cradle.
Tip 7 • The suction cup may contain tiny holes. This can occasionally occur in the production process, and should not cause a malfunction. 5 Turn the LOCK/RELEASE lever counterclockwise 90 degrees to secure the cradle on the dashboard. Adjust the strap. Adjust the strap by using the adjuster. Adjuster Insert the cord To remove the cradle 1 Press the ridges to remove the cradle cable from the cradle. 2 3 Loosen the strap from the adjuster. 4 Turn the LOCK/RELEASE lever clockwise by 90 degrees.
5 Pull the tab of the cradle for a few seconds in the direction of the arrow marked in the illustration below (), and then slowly (over 3 to 5 seconds) remove the suction cup (). 6 Replace the cover on the suction cup. Cover Note Tab Tab • Put the cover on the suction cup when you take the cradle off the dashboard. If the suction cup becomes dirty or scratched, its adhesive strength will be reduced. Arranging the cradle cable Use the cord clamp to secure the cradle cable.
To secure the cradle cable Attaching an iPod/iPhone Compatible iPod/iPhone models See “About iPod/iPhone” (page 20) or visit the support page: http://esupport.sony.com http://www.sony.com/mobileAV Notes To release the cradle cable • Start the car’s engine before connecting the iPod/iPhone. Depending on the device, malfunction or damage may occur if it is connected before starting the engine. • Remove the case or cover from the iPod/iPhone before setting it in the cradle to ensure a stable installation.
2 Press the arm down gently and set your iPod/iPhone in the cradle. Press the iPod/iPhone backward until it touches to the cushion in the center of the cradle (), and hold the iPod/ iPhone securely while pressing the arm down (). To adjust the angle of the cradle You can adjust the angle of the cradle as shown in the illustration below. Do not use force to adjust the angle, as a malfunction may result.
• When removing the iPod/iPhone, do not twist or bend the iPod/iPhone as it may result in connector damage. Playback Precautions • When removing the iPod/iPhone, hold the cradle securely. Tip • For safety reasons, keep your car audio unit and iPod/iPhone volume moderate so that you can still hear sounds outside your car. • Do not watch an iPod/iPhone while driving. It is dangerous and may cause a traffic accident.
1 Press the SOURCE/OFF button on the cradle or the remote commander repeatedly until the LED indicator on the cradle turns red (page 6). Tip • If you set an iPod/iPhone on the cradle when the system is on, the iPod/iPhone is selected as the source. If the iPod/iPhone is in play mode when you set it on the cradle, the music/video on the iPod/iPhone will automatically play back. 2 3 Play back music on the iPod/iPhone. 4 Adjust the sound characteristics by pressing the buttons on the remote commander.
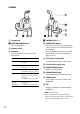
Amplifier Maintenance Replacing the lithium battery of the remote commander When the battery becomes weak, the range of the remote commander becomes shorter. Replace the battery with a new CR2025 lithium battery. Use of any other battery may present a risk of fire or explosion. DSP master unit RM-X251 + side up 2 c 1 About iPod/iPhone • You can connect to the following iPod/ iPhone models. Update your iPod/iPhone devices to the latest software before use.
Specifications DSP Master Unit AUDIO POWER SPECIFICATIONS CEA2006 Standard Power Output: 17 Watts RMS 4 at 4 Ohms < 1% THD+N SN Ratio: 80 dBA (reference: 1 Watt into 4 Ohms) Power-AMP Output: Speaker outputs 4 CH (Front L/R, Rear L/R) Speaker impedance: 4 Ω – 8 Ω Maximum power output: 45 W × 4 (at 4 Ω) General Outputs: Audio output terminals: (Front/Rear) Subwoofer output terminal (mono) Power amplifier control terminal Inputs: iPod signal input terminal (dock connector) Hi-level input terminal Sound contr
In-car output sound pressure level: 94 dB (1 W, @driver’s seat)*3 Effective frequency range: 32 Hz – 1,000 Hz*2 Mass: Approx. 12.5 kg (27 lb 9 oz) Supplied accessories: Parts for installation *1 “Short-term Maximum power” may also be referred to as “Peak Power.” *2 Testing Condition : IEC 60268-5 (2003-05) *3 Testing Condition : Inside the car Your dealer may not handle some of the above listed accessories. Please ask the dealer for detailed information.
The indicator on the cradle flashes red. The power supply from the cradle to the iPod/ iPhone is overloaded. – Remove the iPod/iPhone from the cradle, and change the source by pressing the SOURCE/OFF button on the cradle. After checking the iPod/iPhone is working correctly, set it on the cradle again. The indicator on the cradle flashes blue and red alternately. Temperature detection is activated. – Be sure to place the system in a well ventilated location. – Reduce the volume. The cradle is dirty.
• Remove any case or cover from the iPod/ iPhone. • Operate playback on the iPod/iPhone directly. Sound reduces suddenly. Temperature detection could be activated. – Be sure to place the system in a well ventilated location. – Reduce the volume. Suddenly there is no sound. Temperature detection could be activated. – Be sure to place the system in a well ventilated location. – Reduce the volume. Volume range is limited. Temperature detection could be activated.
iPhone, iPod, iPod classic, iPod nano, y iPod touch son marcas comerciales de Apple Inc., registradas en los Estados Unidos y otros países. Nota sobre la pila de litio No exponga la pila a fuentes de calor excesivo como luz solar directa, fuego o similar. Advertencia: si el encendido del automóvil no dispone de una posición ACC Para evitar el desgaste de la batería, apague el sistema después de su uso manteniendo presionado el botón SOURCE/OFF por más de dos segundos en el soporte/control remoto.
Tabla de contenido Introducción . . . . . . . . . . . . . . . . . . . . . . . . . . . . . . . . . . . . . . . . . . . . . . . . . . . . . . . 4 Procedimientos iniciales . . . . . . . . . . . . . . . . . . . . . . . . . . . . . . . . . . . . . . . . . . . . . 4 Reinicio de la unidad . . . . . . . . . . . . . . . . . . . . . . . . . . . . . . . . . . . . . . . . . . . . . . . . . . . . . . 4 Componentes del sistema . . . . . . . . . . . . . . . . . . . . . . . . . . . . . . . . . . . . . . . . . . . .
Introducción Gracias por comprar el Digital Link Sound System (XDP-PK1000). Este sistema permite integrar de manera digital un iPod o iPhone al sistema de audio de su vehículo. Este sistema le permite disfrutar de un sonido de alta calidad desde el sistema de audio de su automóvil y desde un iPod o iPhone.
Componentes del sistema Esta sección describe la ubicación de los controles y sus operaciones básicas. Unidad maestra del DSP 1 Interruptores de configuración de sonido página 10 Ajuste cada interruptor según el interior y el tipo de automóvil. Indicador SOURCE Le permite verificar el estado de la unidad maestra del DSP. Indicador Estado Se vuelve azul. Se ha seleccionado el sistema de audio del automóvil como fuente. Se vuelve rojo. Se ha seleccionado un iPod o iPhone como fuente.
Soporte Ventosa VOLUME (VOL) +/–*2 Botones SEEK /*1*2 Presione estos botones para omitir pistas. Botón SOURCE/OFF Presione este botón para encender la alimentación o cambiar la fuente entre el sistema de audio del automóvil y el iPod o iPhone. Manténgalo presionado más de dos segundos para apagar el sistema. El indicador () se apaga. Sensor remoto Indicador Le permite verificar el estado de la unidad maestra del DSP. Indicador Estado Se vuelve azul.
Control remoto de tarjeta RM-X251 Botones LEFT/RIGHT página 11 Presione estos botones para ajustar el balance de los altavoces. Mantenga presionado el botón CNT () para restaurar la configuración predeterminada. Botones BASS (–/CNT/+) página 11 Presione estos botones para ajustar el nivel de los sonidos graves. Botón ALO (Optimizador de nivel automático)*1 página 11 Ajuste el volumen de reproducción de un iPod o iPhone al nivel óptimo: “ON” u “OFF”.
Amplificador Indicador POWER/PROTECTOR Se ilumina de color verde durante su uso. Si se enciende PROTECTOR, el indicador cambiará de verde a rojo. Si se enciende PROTECTOR, consulte “Solución de problemas” (página 23).
Altavoz potenciador de graves 9
Configuración del sonido Ajustes de sonido optimizados según el tipo de vehículo Interruptor VEHICLE SIZE Seleccione uno de los tres tamaños (L/M/S) según el volumen de aire del automóvil. A continuación, se muestran algunos ejemplos. Auto compacto Al configurar la unidad maestra del DSP, este sistema ofrece agudos nítidos y graves potentes optimizados para el tipo de automóvil. Hay disponibles 18 tipos de configuración diferentes.
SUV de tamaño grande Configuración del balance de sonido según sus preferencias de escucha SW LOCATION: FAR TRUNK: N VEHICLE SIZE: L Sugerencia para ajustar el interruptor SW LOCATION Si no está seguro de cómo utilizar estas configuraciones de sonido, ajuste primero el interruptor VEHICLE SIZE y, a continuación, el interruptor SW LOCATION en la posición en la que parece que los sonidos graves provienen del frente del asiento del conductor.
Ajuste del nivel de graves Presione el botón BASS (–/CNT/+). Se pueden realizar incrementos de un intervalo de -7 a +7. Mantenga presionado el botón CNT para restaurar la configuración predeterminada. El valor predeterminado es 0. Ajuste del nivel del altavoz potenciador de graves Presione el botón SUB VOL +/–. La configuración disponible permite incrementos de 1 intervalo desde -7 (silencio) a +6. El valor predeterminado es 0. Ajuste del volumen de entrada del iPod y iPhone Presione el botón ALO.
Lista de componentes Soporte Lámina de montaje Correa Antes de la instalación • Ubique el soporte en una parte del tablero que sea lisa y horizontal. • Asegúrese de que la superficie del tablero donde se ubicará el soporte esté limpia. Una superficie sucia reducirá la fuerza adhesiva de la ventosa, lo cual puede causar que el soporte quede instalado de manera inestable. • Según el material de la superficie, puede que la ventosa deje una marca. Ubique la ventosa según su criterio.
4 Instalación 1 Enganche el clip de la correa en el desempañador del automóvil. 2 Coloque el aro formado por la correa alrededor del soporte y átela como se ilustra a continuación. Presione la ventosa de manera gradual y permita que todo el aire debajo de ésta sea expulsado (); después presione el botón PUSH para adherir el soporte al tablero (). Notas • Si la ventosa contiene aire, su fuerza adhesiva se verá reducida. • Asegúrese de que la ventosa esté seca antes de colocar el soporte.
6 Conecte el cable del soporte. Gire el brazo del soporte hasta que esté en posición horizontal y conecte el cable del soporte. 3 Retire el aro de la correa del soporte. 4 Gire la palanca LOCK/RELEASE 90 grados en sentido de las agujas del reloj. 5 Tire de la lengüeta del soporte por unos segundos en la dirección que muestra la flecha marcada con el símbolo en la siguiente ilustración () y después retire lentamente (en unos 3 o 5 segundos) la ventosa ().
Notas • Tire de la lengüeta del soporte cuando retire la ventosa del tablero. • La ventosa puede dañarse si: – presiona o tira de la lengüeta del soporte en dirección horizontal. – intenta retirar la ventosa del tablero colocando un objeto duro (llave, objeto filoso, dedo, etc.) entre la ventosa y el tablero.
Para liberar el cable del soporte 1 Presione el botón PUSH RELEASE para desplegar el brazo del soporte () y, a continuación, coloque el iPod o iPhone en el soporte (). Nota • No reutilice la abrazadera de cables una vez que la haya retirado, ya que su fuerza adhesiva quedará reducida. Colocación de un iPod o iPhone Modelos de iPod y iPhone compatibles Consulte “Acerca del iPod y iPhone” (página 21) o visite la página de soporte técnico en: http://esupport.sony.com http://www.sony.
Nota • Asegúrese de que no haya un espacio entre el iPod o iPhone y el brazo al colocar el iPod o iPhone en el soporte. Espacio Sugerencias • El sistema reproduce música del iPod o iPhone cuando uno de ellos se encuentra en el modo de reproducción, según se lo haya configurado en el soporte. • Un iPod o iPhone se carga al colocarlo en el soporte y el sistema se enciende.
Reproducción Precauciones • Por cuestiones de seguridad, mantenga el volumen del sistema de audio del automóvil y del iPod o iPhone en un nivel moderado para poder escuchar los sonidos procedentes del exterior. • No fije la vista en su iPod o iPhone al conducir. Puede ser peligroso y ocasionar un accidente automovilístico. Frene el automóvil en un lugar seguro antes de utilizar el iPod, el iPhone o el soporte, o antes de atender una llamada telefónica.
Reproducción desde el sistema de audio del automóvil Puede utilizar este sistema para reproducir música y demás elementos desde el sistema de audio del automóvil. 1 Presione el botón SOURCE/OFF en el soporte o en el control remoto reiteradamente hasta que el indicador LED del soporte se ilumine en azul (página 6). 2 Encienda el sistema de audio del automóvil y seleccione la fuente que desea reproducir. 3 Ajuste el volumen desde el sistema de audio mismo.
Amplificador Mantenimiento Reemplazo de la pila de litio del control remoto El alcance del control remoto disminuye a medida que la pila pierde su carga. Reemplace la pila con una pila de litio CR2025 nueva. Existe el riesgo de incendio o explosión si se utiliza otro tipo de pila. Unidad maestra del DSP RM-X251 Lado + hacia arriba 2 c 1 Acerca del iPod y iPhone • Puede conectarse a los siguientes modelos de iPod y iPhone.
Especificaciones Unidad maestra del DSP Amplificador de potencia Salida: Salidas de altavoces de 4 canales (Frontal I/D, posterior I/D) Impedancia de altavoz: 4 Ω – 8 Ω Salida de potencia máxima: 45 W × 4 (a 4 Ω) Generales Salidas: Terminales de salida de audio: (Frontal/ Posterior) Terminal de salida de altavoz potenciador de graves (mono) Terminal de control del amplificador de potencia Entradas: Terminal de entrada de señal de iPod (conector de base) Terminal de entrada de alto nivel Controles de sonido
Es posible que su distribuidor no trabaje con algunos de los accesorios mencionados. Consulte a su distribuidor para más información. Los diseños y especificaciones están sujetos a cambios sin previo aviso. iPod o iPhone funciona correctamente, vuelva a colocarlo en el soporte. El indicador SOURCE de la unidad maestra del DSP parpadea de manera alterna en azul y rojo. Se ha activado la detección de temperatura. – Asegúrese de colocar el sistema en un lugar bien ventilado. – Reduzca el volumen.
El indicador del soporte parpadea en azul. La fuente de alimentación del soporte al iPod o iPhone se encuentra sobrecargada. – Retire el iPod o iPhone del soporte y cambie la fuente presionando el botón SOURCE/ OFF del soporte. Después de verificar que el iPod o iPhone funciona correctamente, vuelva a colocarlo en el soporte. El indicador del soporte parpadea de manera alterna en azul y rojo. Se ha activado la detección de temperatura. – Asegúrese de colocar el sistema en un lugar bien ventilado.
Otros problemas El sonido se oye únicamente de los altavoces frontales. Coloque el interruptor INPUT SELECT en “2ch” en la unidad maestra del DSP. La función de giro de pantalla del iPod o del iPhone se puede activar de repente cuando el automóvil está en marcha. El giro de pantalla puede ser producto de vibraciones, según el estado del camino. – Desactive esta función. No hay sonido cuando el sistema de audio del automóvil se selecciona como fuente.
Support site Site d’assistance If you have any questions or for the latest support information on this product, please visit the web site below: Si vous avez des questions ou si vous souhaitez consulter les toutes dernières informations techniques sur ce produit, rendez-vous sur le site Web suivant : http://esupport.sony.com http://www.sony.com/mobileAV If you have any questions/problems regarding this product, try the following: 1 Read Troubleshooting in these Operating Instructions.