© 2008 Sony Corporation Printed in Japan OLED Digital TV
GB Operating Instructions 3 GB
Owner’s Record CAUTION The model, serial numbers and the date of manufacture are written on rating label. It is located at the bottom of the TV. Record these numbers in the spaces provided below. Refer to them whenever you call upon your Sony dealer regarding this TV. Bright, stationary images, such as TV station logos or photos, displayed on your TV can become permanently imprinted onto the screen. This type of imprint is known as “Image Retention”.
Table of Contents XEL-1 Overview 6 Welcome to the World of OLED ...................................................................................................... 6 Start-up Guide Safety Information .......................................................................................................................... 15 Precautions .....................................................................................................................................
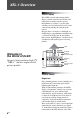
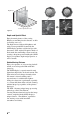
XEL-1 Overview OLED Display The OLED (organic light-emitting diode) display contains organic materials that emit light when an electric current is passed through them (see Figure 1). As the light emissions are self-generated, the level can be controlled by altering the strength of the current. Because there is no need for a backlight, an OLED display is much thinner and lighter than a conventional LCD panel.
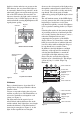
Organic layer Cathode TFT Transparent anode Bottom emission method Semitransparent cathode decreases, the colour purity of the light passing through the semitransparent cathode increases. As a result, each colour is vividly and clearly reproduced. The colour purity is further enhanced by passing the light through a colour filter.
Brightness v' u' Colour reproduction area Figure 5 Depth and Spatial Effect Enjoy dramatic pictures of the soaring Himalayas stretching into the distance or drift ice floating out to sea. The high contrast, high peak brightness and wide colour reproduction featured by the OLED display produce realistic images with the texture of the original.
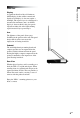
Main Unit XEL-1 Overview Display A significant benefit of the self-luminous OLED display is that, unlike conventional liquid crystal displays, it does not require a backlight. The organic layer is so thin that it is measured in nanometers (nm). An OLED display is about as thick as the glass panels aligned on either side of the light-emitting organic material layer, protecting it. Arm The lightness of the panel allows great flexibility in the position of the arm.
Start-up Guide When changing the battery Before Use To check the accessories Mains lead (Type C) (1) Unlock the battery holder by pushing a pen tip into the hole located on the rear of the remote. Slide the battery holder out. Replace the battery with CR2032 (lithium) battery with e side up in the battery holder of the remote. ~ • Except for the United Kingdom. Mains lead (Type BF) (1) ~ • Only for the United Kingdom.
1: Connecting an aerial/Set Top Box/recorder (e.g. DVD recorder) Connecting a Set Top Box/recorder (e.g. DVD recorder) with HDMI 2: Connecting the mains lead Before connecting the mains adaptor to the TV, complete all connections with the equipment. lead. 3 Connect the mains lead to the mains socket (220-240V AC, 50Hz). ~ • The type of mains lead varies depending on the region where the TV is used. See “To check the accessories” on page 10. Set Top Box/recorder (e.g.
4 Press V/v to select the country in which 3: Performing the initial setup you will operate the TV, then press . Country Select country. United Kingdom 2 Ireland Nederland België/Belgique Luxembourg France Italia 1 To mains socket If the country in which you want to use the TV does not appear in the list, select “-” instead of a country. 5 Press V/v to select the location type in which you will operate the TV, then press .
If a message appears for you to confirm the aerial connection No digital or analogue channels were found. Check all the aerial/cable connection and then press to start autotuning again. To tune the TV for cable connection 1 Press . 2 Press V/v to select “Quick Scan” or “Full Scan”, then press appears on the screen, follow the steps of “Programme Sorting” (page 36). If you do not change the order in which the analogue channels are stored on the TV, press RETURN to go to step 9.
Adjusting the Viewing Angle of the TV This TV’s display panel can be adjusted to tilt back and forth within the angles as illustrated below. Left view 55° 15° Front ~ • When adjusting, do not directly touch or bend the display panel. • When adjusting the display panel backward, take care not to catch your fingers between the panel and arm of the TV. • When adjusting the angle, hold the right side of the display panel.
Safety Information – Do not install the TV set as shown below. Air circulation is blocked. Installation/Set-up Wall Install and use the TV set in accordance with the instructions below in order to avoid any risk of fire, electrical shock or damage and/or injuries. Installation s The TV set should be installed near an easily accessible mains socket. s Place the TV set on a stable, level surface.
SCREEN AND CABINET If the following problems occur... s The screen and cabinet get warm when the TV is in use. This is not a malfunction. s Avoid spraying insect repellent with volatile material on the screen. s Avoid prolonged contact with rubber or plastic material. s Do not expose the OLED screen surface to direct sunlight, as doing so may damage it. s Do not push or scratch the OLED screen, or place objects on top of the TV. The image may become distorted, or the OLED panel may be damaged.
Precautions Viewing the TV s View the TV in moderate light, as viewing the TV in poor light or during long period of time, strains your eyes. s When using headphones, adjust the volume so as to avoid excessive levels, as hearing damage may result. OLED Screen s Although the OLED screen is made with high-precision technology and 99.99% or more of the pixels are effective, black dots may appear constantly on the OLED screen. This is a structural property of the OLED screen and is not a malfunction.
Remote and TV Controls/Indicators 1 2 3 4 Button Description 1 "/1 (TV standby) Turns the TV on and off from standby mode. 2 AUDIO In analogue mode: Press to change the “Dual Sound” mode (page 32). In digital mode: Press to select the “Audio Language” (page 38). 3 (Picture mode) Press repeatedly to cycle through the available picture modes: “Vivid”, “Standard”, “Custom”, “Photo” (in “Photo” mode only). 4 (Screen mode) Press to change the screen format (page 22).
wd ws wa w; ql qk Button Description qs % (Mute the sound) Press to mute the sound. Press again to restore the sound. ~ • In standby mode, if you want to turn on the TV without sound, press this button. qd 2 +/– (Volume) Press to adjust the volume. qf HOME Displays the TV Home menu. qg Returns to the previous screen of any displayed menu. /RETURN qj qh /GUIDE (EPG) Press to display the Digital Electronic Programme Guide (EPG) (page 23).
HOME Item 1 PROG Description (Timer indicator) Lights up in orange when the reminder is set (page 23) or the timer is set (page 34). 2 HOME Displays the TV Home menu. 3 In TV mode: Selects the input source from equipment connected to the HDMI sockets (page 27). In TV menu: Selects the menu or option, and confirms the setting. / (Input select/OK) 4 2 +/–/b/B In TV mode: Increases (+) or decreases (–) the volume. In TV menu: Moves through the options right (b) or left (B).
Watching TV 1 Press "/1 on the TV to switch on the TV. Watching TV When the TV is in standby mode (standby indicator (to the right of "/1) lights up in red), press "/1 on the remote to switch on the TV. 1 2 Press DIGITAL to switch to digital mode or ANALOG to switch to analogue mode. The channels available vary depending on the mode. 3 Press the number buttons or PROG +/– to select a TV channel. 2 2 In digital mode An information banner appears briefly.
To access Digital Text (Only for the United Kingdom) Many broadcasters provide a Digital Text service. Digital Text offers graphically rich contents, compared to Analogue Text. Select a digital channel which provides Digital Text, then press /. When a broadcaster provides a dedicated Digital Text channel, select this channel to access Digital Text. To navigate through Digital Text, follow the instructions on the screen. To exit Digital Text, press RETURN. To move around, press V/v/B/b.
Using the Digital Electronic Programme Guide (EPG) All Categories 11: 30 001 BBC ONE Homes Under the Hammer 002 BBC TWO Ready Steady Cook 003 Dancing On Ice Exclusive ITV1 12: 00 005 Five House 006 ITV2 Crime Hour: Midsomer Murders 007 BBC THREE BBC Learning Zone: Schools: World P... 010 SKY THREE The Jeremy Kyle... Law and Order: Special Victims U... ER Past Neighbours Afterlife the following table or displayed on the screen. Real Crime: The Truth About the...
Using the Digital Favourite List ** 1 In digital mode, press . 2 Perform the desired operation as shown in the following table or displayed on the screen. Homes Under the Hammer 10:30 - 11:00 Digital Favourite List **This function may not be available in some countries/regions. To Do this Create your favourite list for the first time 1 2 3 Press to select “Yes”. Press the yellow button to select the favourite list. Press V/v to select the channel you want to add, then press .
Using Optional Equipment Connecting Chart You can connect HDMI optional equipment to your TV. Connecting cables are not supplied. DC IN 16V Connect to Using Optional Equipment 1 IN 2 IN Input symbol on screen Description 1 DC IN 16V ! Connects the supplied mains adaptor. 2 To use Pay Per View services. For details, refer to the instruction manual supplied with your CAM. To use the CAM, remove the “dummy” card from the CAM slot, then turn off the TV and insert your CAM card into the slot.
Connect to Input symbol on screen 3 HDMI 1 IN HDMI 1 4 HDMI 2 IN HDMI 2 Description Digital video and audio signals are input from the connected equipment. In addition, when control for HDMI compatible equipment is connected, communication with the connected equipment is supported. Refer to page 35 to set up this communication. ~ • The HDMI sockets support the following video inputs only: 480i/p (60Hz), 576i/p (50Hz), 720p (50/60Hz), 1080i (50/ 60Hz) and 1080p (24/50/60Hz).
Viewing Pictures from Connected Equipment Playing Back Photo via USB Switch on the connected equipment, then perform one of the following operation. You can view photographs (in JPEG format) stored in a Sony digital still camera, camcorder through a USB cable or USB storage media on your TV. For a USB device 1 Connect a supported USB device to the TV. See “Playing Back Photo via USB” (page 27). For other connected equipment Press / to display a list of connected equipment.
~ • “USB Photo Viewer” supports DCF-compliant JPEG photographs only. • When you connect a Sony digital still camera, set the camera’s USB connection mode to Auto or Mass Storage. For more information about USB connection mode, refer to the instructions supplied with your digital camera. • “USB Photo Viewer” supports FAT32 file system only. • During watching a photo or playing slideshow for a long period of time, the screen may gradually fade to dark or the screen saver may appear.
Protecting the TV Screen ~ Precautions to Protect the Screen from Damage Prolonged display of still images over time may cause permanent image retention. Avoid displaying images that cause image retention and take the following measures to protect the screen. • “Auto Brightness Control” adjusts the brightness of the image automatically when highly contrasting images are displayed on the screen for a long period of time (see page 34).
Using MENU Functions Navigating through TV Home Menu (XMB™) The XMB™ (XrossMediaBar) is a menu of features and input sources displayed on the TV screen. The XMB™ is an easy way to select programming and adjust settings on your OLED TV. 1 Press HOME. The TV Home menu appears on the screen. Picture Sound Media Category Bar Settings Features Set-up Analogue Set-up Digital Set-up Category Object Bar 2 Press B/b to select the category.
Settings Picture Picture Mode “Picture Mode” includes options best suited for video and photographs, respectively. The options that can be selected differ depending on the input source. Vivid Standard For enhanced picture contrast and sharpness. For standard picture. Recommended for home entertainment. Custom Photo Allows you to store your preferred settings. Sets the optimum picture quality for photographs. ~ Reset Display Mode • “Custom” and “Photo” are available exclusively.
Advanced Settings Allows you to set “Picture” settings in more detail. These settings are not available when “Picture Mode” is set to “Vivid”. Adv. Contrast Automatically adjusts “Contrast” to the most suitable settings Enhancer judging from the brightness of the screen. This setting is especially effective for dark images scenes. It will increase the contrast distinction of the darker picture scenes. Live Colour Colour Space Makes colours more vivid. Changes the colour reproduction gamut.
Light Emission Control Adjusts the emission level of organic material of the panel to control the brightness of the images. Consequently this contributes to reduce the power consumption. ~ • The setting will be changed depending on the “Picture Mode” and/or when “Reset” is selected in “Picture” settings. Average Level Peak Level Light Sensor On Off Adjusts the overall brightness of the screen. Adjust the highest brightness parts of the image on the screen.
x.v.Colour Displays moving pictures that is more faithful to the original source by matching the colour space of source. ~ Photo Colour Space • The setting is fixed to “Normal” when the input signal is HDMI (RGB), even if “x.v.Colour” is selected. • Only available for HDMI 1/2 in format 720p, 1080i or 1080p. Selects the option (“sRGB”, “sYCC”, “Adobe RGB”) to match the output colour space within the output signal from the equipment connected to the HDMI or USB.
Screen Settings Screen Format See “To change the screen format manually” on page 22. Auto Format Automatically changes the screen format according to the input signal. To keep your setting, select “Off”. Display Area Adjusts the picture display area in 1080i/p and 720p sources when “Screen Format” is set to “Wide”. Normal Displays pictures in their recommended size. +1 Displays pictures in their original size. Horizontal Shift Vertical Shift Adjusts the horizontal position of the picture.
All Reset Resets all settings to the factory settings and then displays the “Auto Start-up” screen. z • Be sure not to turn the TV off during this period (it takes about 30 seconds) or press any buttons. • All settings, including digital favourite list, country, language, auto tuned channels, etc. will be reset. Analogue Set-up Programme List Display Auto Tuning Programme Sorting Manual Programme Preset Select “Off” to hide the list of analogue channels from the XMB™ (XrossMediaBar).
Label AFT Audio Filter Assigns a name of your choice, up to five letters or numbers, to the selected channel. This name will be displayed briefly on the screen when the channel is selected. Creates your own label. 1 Press V/v to select the desired letter or number (“_” for a blank space), then press b. If you input a wrong character Press B/b to select the wrong character. Then, press V/v to select the correct character. 2 Repeat the procedure in step 1 until the name is completed.
Programme Sorting Digital Manual Tuning Subtitle Set-up Subtitle Setting Audio Set-up Subtitle Language Audio Type Removes any unwanted digital channels stored on the TV, and changes the order of the digital channels stored on the TV. 1 Press V/v to select the channel you want to remove or move to a new position. You can also select a channel by pressing the number buttons to enter its three-digit channel number.
Parental Lock Sets an age restriction for programmes. Any programme that exceeds the age restriction can only be watched after a PIN code is entered correctly. 1 Press the number buttons to enter your existing PIN code. If you have not previously set a PIN, a PIN code entry screen appears. Follow the instructions of “PIN Code” below. 2 Press V/v to select the age restriction or “None” (for unrestricted watching), then press . 3 Press RETURN.
Additional Information Specifications Model name XEL-1 System Panel system OLED (Organic Light-Emitting Diode) Panel TV system Analogue: Depending on your country selection: B/G, D/K, L, I Digital: DVB-T/DVB-C Colour/video system Digital: MPEG-2 MP@ML/HL, H.264/MPEG-4 AVC HP@L4.0, MP@L3.0 Channel coverage Analogue: VHF: E2–E12/UHF: E21–E69/CATV: S1–S20/HYPER: S21–S41 D/K: R1–R12, R21–R69/L: F2–F10, B–Q, F21–F69/I: UHF B21–B69 Digital: VHF/UHF Sound output 1.2 W + 1.
Check whether the standby indicator (to the right of "/1) is flashing in red. When it is flashing The self-diagnosis function is activated. 1 Count how many standby indicator flashes between each two second break. For example, the indicator flashes three times, then there is a two second break, followed by another three flashes, etc. 2 Press "/1 on the TV to turn it off, disconnect the mains lead, and inform your dealer or Sony service centre of how the indicator flashes (number of flashes).
Condition Explanation/Solution Channels The desired channel cannot be • Switch between digital and analogue mode and select the desired digital/ selected analogue channel. Some channels are blank • Scrambled/Subscription only channel. Subscribe to the pay TV service. • Channel is used only for data (no picture or sound). • Contact the broadcaster for transmission details. Digital channels are not • Contact a local installer to find out if digital transmissions are provided displayed in your area.
Condition Explanation/Solution • In order to protect the screen by preventing image retention, the display position of an image is moved slightly after a predetermined time has elapsed.
4-123-944-12(1) For useful information about Sony products
© 2008 Sony Corporation Printed in Japan OLED Digital TV