3-810-309-11 (2) FM/AM Cassette Car Stereo EN Operating Instructions Owner’s Record The model and serial numbers are located on the bottom of the unit. Record the serial number in the space provided below. Refer to these numbers whenever you call upon your Sony dealer regarding this product. Model No. XR-C400 Serial No. For installation and connections, see the supplied installation/connections manual.
EN Warning Welcome! This equipment has been tested and found to comply with the limits for a Class B digital device, pursuant to Part 15 of the FCC Rules. These limits are designed to provide reasonable protection against harmful interference in a residential installation. This equipment generates, uses, and can radiate radio frequency energy and, if not installed and used in accordance with the instructions, may cause harmful interference to radio communications.
Table of contents This Unit Only Getting Started Resetting the unit ................................................ 4 Detaching the front panel .................................. 4 Setting the clock .................................................. 5 Cassette player Listening to the tape ........................................... 5 Playing the tape in various modes ................... 6 Radio Memorizing stations automatically — Best Tuning Memory (BTM) ...................
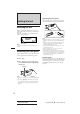
Attaching the front panel Getting Started Attach part A of the front panel to part B of the unit as illustrated and push until it clicks. Resetting the unit Before operating the unit for the first time or after replacing the car battery, you must reset the unit. Press the reset button with a pointed object, such as a ball-point pen. Reset button Note Pressing the reset button will erase all the memorized stations.
Setting the clock The clock has a 12-hour digital indication. Cassette Player For example, setting it to 10:08 1 Press (OFF) or (DSPL) during operation. 2 Press (DSPL) for two seconds. Listening to the tape Insert the cassette. 100 The hour digit blinks. 1 Set the hour digits. to go forward to go back 1000 2 Press (SEL) momentarily. The minute digit blinks. If the cassette is already inserted, press (TAPE) to start playback. FWD EN The side facing up is being played.
Locating the beginning of the tracks — Automatic Music Sensor (AMS) You can skip up to nine tracks at one time. During playback, press either side of (SEEK/AMS) momentarily. SEEK AMS To locate the previous tracks To locate the succeeding the tracks Note The AMS function may not work when : • the blanks between tracks are shorter than 4 seconds • there are noises • there are long sections of low volume or quiet sections.
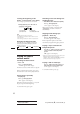
2 Press (SEEK/AMS) to search for the station which you wish to store on the preset number button. 3 Press the desired preset number button ((1) to (6)) for two seconds until a beep sounds. Radio Memorizing stations automatically — Best Tuning Memory (BTM) This function selects from the currently received band the stations with the strongest signals and memorizes them in order of their frequency.
With the Optional Equipment Other Functions Adjusting the sound characteristics 1 2 Select the item you want to adjust by pressing (SEL) repeatedly. VOL (volume) n BAS (bass) n TRE (treble) n BAL (balance) n FAD (fader) Adjust the selected item by pressing either (+) or (–). CD Changer Playing a CD Press (CD) and select the changer. CD playback starts. When a CD changer is connected, all the tracks play from the beginning.
Scanning the tracks To play the tracks in the current changer in a random order Press (3) repeatedly during CD playback until “SHUF 2” is displayed. — Intro scan The first 10 seconds of all the tracks on the currently selected disc are played in order. After the first disc is over, the next disc is played. Press (1) during playback. “INTRO” appears on the display. When you find the desired track, press again . The unit returns to the normal CD playback mode.
2 Press (SEL) after locating the desired character. The flashing cursor moves to the next space. CD1 (CD changer with custom file function) 3 Repeat steps 1 and 2 to enter the entire title. 3 Selecting the specific tracks for playback — Bank To return to the normal CD playback mode, press (LIST) for two seconds. If you label the disc, you can set the unit to skip tracks and play only the tracks you want. 1 Start playing the disc and press (LIST) for two seconds. Then press (LIST) momentarily.
Playing the specific tracks only You can select: • BANK ON to play the tracks with “PLAY” setting. • BANK INV to play the tracks with “SKIP” setting. 1 During playback, press (4). “BANK” appears on the display. BANK CD1 2 BANK ON Press (4) to select the desired mode. Each time you press (4) , the display changes as follows: z BANK ON z BANK OFF BANK INV Z Playback starts from the track following the current one. To go back to the normal playing mode, select “BANK OFF” in step 2.
Maintenance Dismounting the unit Fuse Replacement When replacement the fuse, be sure to use one with the correct amperage which is started on the fuse case. Never use a fuse whose amperage rating exceeds the one supplied to the unit as this could cause a malfunction of the unit. Warning Use a fuse with the specified amperage. Use of a fuse with higher amperage may cause serious damage.
Location of controls BTM 1 INTRO 2 REP 3 SHUF a SEEK AMS B DSPL 4 BANK MTL 5 ATA 6 BL. SKIP D LOUD MUTE REW PRESET DISC SEL FF SENS TUNER TAPE LIST CD RELEASE OFF Refer to the pages for further details. 2 During radio reception: Preset number buttons 7 During tape/CD playback: (1) INTRO button 6, 9 (2) REPEAT button 6, 9 (3) SHUF/a (Dolby B NR) button 6, 9 (4) BANK/MTL button 6, 11 (5) ATA (Automatic Tuner Activation) button 6 (6) BL.
Specifications AUDIO POWER SPECIFICATIONS POWER OUTPUT AND TOTAL HARMONIC DISTORTION 8␣ watts per channel minimum continuous average power into 4␣ ohms, 4 channels driven from 20 Hz to 20 kHz with no more than 1% total harmonic distortion. Other Specifications Cassette player section Tape track Wow and flutter Frequency response Signal-to-noise ratio EN General 4-track 2-channel stereo 0.
Troubleshooting guide The following check will assist in the correction of most problems which you may encounter with your unit. Before going through the check list below, refer to the operating procedures. General Problem Cause/Solution No sound • Adjust the volume with (+). • Set the fader control to the center position on the 2-speaker system. Indications do not appear on the display window. Remove the front panel and clean the connectors. See “Cleaning the Connectors” of “Maintenance” for details.
Error displays (with the optional CD changer(s) connected) The following indications will flash for about five seconds and an alarm sound will be heard. Display Cause Solution E-01 A disc magazine is not inserted in the CD changer. Insert a disc magazine with discs into the CD changer. E-02 No disc is inserted in the disc magazine. Take out the magazine and insert the discs. The disc is dirty. Clean the disc. The disc is inserted upside down. Insert the disc correctly.
Index A Automatic Music Sensor (AMS) 6, 8 Automatic tuning 7 Automatic Tuner Activation (ATA) 6 B Bass 8 Balance 8 Bank 10 Best Tuning Memory (BTM) 7 Blank skip 6 C R Radio 7 Repeat play 6, 9 Reset 4 Rewind 5 Rotary commander 12 S Shuffle play 9 T, U, V, W, X, Y, Z Tape playback Treble 8 5 Caution alarm 4 CD playback 8 Clock 5 D, E EN Additional Information Disc memo 9, 10 Display 5, 6, 8, 10 Dolby 6 F, G, H Fader 8 Fast-forward 5 Front panel 4 Fuse 12 I, J, K Intro scan 6, 9 L Local seek mode
Sony Corporation Printed in Japan Actual total number: Sony XR-C400 (E) 3-810-309-11 (2)