3-865-683-31(1) FM/MW/SW Cassette Car Stereo Operating Instructions GBGB Manual de instrucciones ES ィマ・ホサ。ゥ CT ム For installation and connections, see the supplied installation/connections manual. Para obtener información sobre la instalación y las conexiones, consulte el manual de instalación/conexiones suministrado.
Welcome ! Thank you for purchasing this Sony Cassette Player. This unit lets you enjoy a variety of features as well as a supplied rotary commander or an optional wireless remote. When you operate this unit or a connected optional CD unit with the CD TEXT function, the CD TEXT information will appear in the display when you play a CD TEXT disc*2. In addition to the cassette playback and radio operations, you can expand your system by connecting an optional CD/MD unit*1.
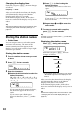
Location of controls OPEN – PRESET 6 SOUND MODE + DISC D-BASS LIST DSPL OFF 1 2 3 SOURCE g SHIFT SEEK / AMS OFF SET UP 1 2 PLAY MODE 3 ENTER 4 5 6 XR-C7300/C7300W Refer to the pages listed for details.
Optional wireless remote (RM-X47) OFF MODE SOURCE DIR SEEK AMS – REW – PRESET DISC SOUND + FF + SEL ATT DSPL The corresponding buttons of the wireless remote control the same functions as those on the unit. 1 OFF button 6 DSPL button 2 SEEK/AMS button 7 PRESET/DISC button 3 (–) (+) buttons You cannot perform manual search and manual tuning with the remote.
Attaching the front panel Getting Started Place the hole a of the front panel onto the spindle b on the unit as illustrated, then push the left side in. Resetting the unit a Before operating the unit for the first time or after replacing the car battery, you must reset the unit. Remove the front panel and press the reset button with a pointed object, such as a ballpoint pen. b Reset button µ Note Pressing the reset button will erase the clock setting and some memorized functions.
Setting the clock 2 Press (SHIFT). The clock uses a 12-hour digital indication. Example: To set the clock to 10:08 1 Press (SHIFT), then press (2) (SET UP) repeatedly until “CLOCK” appears. 1 Press (4) (n). The hour indication flashes. 2 Set the hour. to go backward to go forward 3 Press (4) (n). The minute indication flashes. 4 Set the minute. to go backward to go forward 6 The clock starts. 3 Press (SHIFT). After the clock setting is complete, the display returns to normal playback mode.
Fast-winding the tape Cassette Player During playback, push the SEEK/AMS control up or down and hold. Fast-forward Listening to a tape 1 Rewind SEEK / AMS Press (OPEN) and insert a cassette. Playback starts automatically. 6 To start playback during fast-forwarding or rewinding, press (MODE) (*). Locating a specific track — Automatic Music Sensor (AMS) 2 During playback, push the SEEK/AMS control up or down and release, for each track you want to skip. You can skip up to nine tracks at one time.
Playing a tape in various modes You can play the tape in various modes: •REP (Repeat Play) repeats the current track. •NR (Dolby NR) lets you select the Dolby* NR B system. •METAL (Metal) lets you play a metal or CrO2 tape. •BL SKP (Blank Skip) skips blanks longer than eight seconds. •ATA (Automatic Tuner Activation) turns on the tuner automatically when fast-winding the tape. * Dolby noise reduction manufactured under license from Dolby Laboratories Licensing Corporation.
Memorizing only the desired stations If you cannot tune in a preset station Push and release the SEEK/AMS control up or down to search for the station (automatic tuning). Scanning stops when the unit receives a station. Push the SEEK/AMS control up or down repeatedly until the desired station is received. You can preset up to 18 FM stations (6 each for FM1, 2, and 3), up to 6 MW stations, and up to 12 SW stations (6 each for SW1 and 2) in the order of your choice.
2 Press (4) (n) after locating the desired character. The flashing cursor moves to the next space. Changing the display item Each time you press (DSPL), the item changes as follows: Frequency ˜ Clock After you select the desired item, the display will automatically change to the Motion Display mode after a few seconds. In the Motion Display mode, all the above items are scrolled in the display one by one in order. If you press (1) (N), the flashing cursor moves to the left.
Erasing the station name 1 Tune in any station and press (LIST) for two seconds. 2 Press (DSPL) for two seconds. 3 Rotate the dial to select the name that you want to erase. 4 Press (5) (ENTER) for two seconds. The name is erased. Repeat steps 3 and 4 if you want to erase other names. 5 Press (LIST) for two seconds. The unit returns to normal radio reception mode. Other Functions You can also control the optional CD or MD units with the rotary commander.
By rotating the control (the SEEK/AMS control) Using the rotary commander The rotary commander works by pressing buttons and/or rotating controls. By pressing buttons (the SOURCE and MODE buttons) (SOURCE) (MODE) Each time you press (SOURCE), the source changes as follows: TUNER n CD* n MD* n TAPE Pressing (MODE) changes the operation in the following ways; Rotate the control and release it to: •Locate the beginnings of tracks on the tape.
Press (SOUND) to adjust the volume and sound menu. Press (LIST) to: • Display the memorized names. • Display the programme type. Changing the operative direction Adjusting the sound characteristics You can adjust the bass, treble, balance, and fader. You can store the bass and treble levels independently for each source. 1 The operative direction of controls is factoryset as shown below.
The following items can be set: •CLOCK (page 6). •BEEP – to turn the beep sound on or off. •RM (Rotary Commander) – to change the operative direction of the rotary commander. — Select “NORM” to use the rotary commander in the factory-set position. — Select “REV” when you mount the rotary commander on the right hand side of the steering column. •M.DSPL (Motion Display) – to turn the motion display on or off. •A.SCRL (Auto Scroll)* (page 15). 1 Press (SHIFT).
With Optional Equipment CD/MD Unit This unit can control a maximum of ten external CD/MD units in this configuration: CD unit – maximum of five MD unit – maximum of five Any combination up to ten will work. If you connect an optional CD unit with the CD TEXT function, the CD TEXT information will appear in the display when you play a CD TEXT disc. Playing a CD or MD After you select the desired item, the display will automatically change to the Motion Display mode after a few seconds.
Locating a specific track —AutomaticMusicSensor(AMS) During playback, push the SEEK/AMS control up or down and release for each track you want to skip. To locate succeeding tracks Playing tracks repeatedly —RepeatPlay You can select: •REP-1 – to repeat a track. •REP-2 – to repeat a disc. 1 During playback, press (SHIFT), then press (3) (PLAY MODE) repeatedly until “REP” appears. 2 Press (4) (n) repeatedly until the desired setting appears.
Labelling a CD — Disc Memo (ForaCDunitwiththecustomfilefunction) You can label each disc with a personalized name. You can enter up to eight characters for a disc. If you label a CD, you can locate the disc by name (page 18) and select specific tracks for playback (page 19). 1 Play the CD and press (LIST) for two seconds. Displaying the disc memo name Press (DSPL) during CD or CD TEXT disc playback.
Erasing the disc memo 1 Press (SOURCE) repeatedly to select CD. 2 Press (MODE) repeatedly to select the CD unit. 3 Press (LIST) for two seconds. 4 Press (DSPL) for two seconds. 5 Rotate the dial to select the name you want to erase. 6 Press (5) (ENTER) for two seconds. The name is erased. Repeat steps 5 and 6 if you want to erase other names. 7 Press (LIST) for two seconds. The unit returns to normal CD playback mode.
Selecting specific tracks for playback — Bank (ForaCDunitwiththecustomfilefunction) If you label the disc, you can set the unit to skip or play the tracks of your choice. 1 Playing specific tracks only You can select: • BANK-ON – to play the tracks with the “PLAY” setting. • BANK-INV (Inverse) – to play the tracks with the “SKIP” setting. 1 During playback, press (SHIFT), then press (3) (PLAY MODE) repeatedly until “BANK” appears. 2 Press (4) (n) repeatedly until the desired setting appears.
Additional Information Precautions • If your car was parked in direct sunlight resulting in a considerable rise in temperature inside the car, allow the unit to cool off before operating it. • If no power is being supplied to the unit, check the connections first. If everything is in order, check the fuse. • If no sound comes from the speakers of a 2-speaker system, set the fader control to the centre position.
Cassettes longer than 90 minutes The use of cassettes longer than 90 minutes is not recommended except for long continuous play. The tape used for these cassettes is very thin and tends to stretch easily. Frequent playing and stopping of these tapes may cause them to become entangled in the cassette deck mechanism. Cleaning the Connectors The unit may not function properly if the connectors between the unit and the front panel are not clean.
Dismounting the unit 1 Release key (supplied) 2 3 4 22
Specifications Cassette player section Tape track Wow and flutter Frequency response Signal-to-noise ratio General 4-track 2-channel stereo 0.08 % (WRMS) 30 – 18,000 Hz Cassette type Dolby B NR Dolby NR off TYPE II, IV 67 dB 61 dB TYPE I 64 dB 58 dB Tuner section Tone controls Power requirements Dimensions FM Tuning range FM tuning interval: 50 kHz/200 kHz switchable 87.5 – 108.0 MHz (at 50 kHz step) 87.5 – 107.
Troubleshooting guide The following checklist will help you remedy the problems you may encounter with your unit. Before going through the checklist below, check the connections and operating procedures. General Problem Cause/Solution No sound. •Cancel the ATT function. •Set the fader control to the centre position for two-speaker systems. •Rotate the dial clockwise to adjust the volume. The contents of the memory have been erased. • The power cord or battery has been disconnected.
CD/MD playback Problem Cause/Solution The sound skips. A dirty or defective disc. Cannot turn off the “--------” indication. You cannot label MDs unless you connect a CD unit with the custom file function. n Press (LIST) for two seconds. Error displays (when an optional CD/MD unit is connected) The following indications will flash for about five seconds, and an alarm sound will be heard. Display NO MAG NO DISC Cause Solution The disc magazine is not inserted in the CD/MD unit.
¡Bienvenido! Gracias por adquirir este reproductor de cassettes de Sony. Esta unidad le permitirá disfrutar de distintas funciones, así como de un mando rotativo opcional o del control remoto de tarjeta suministrado. Además de las operaciones de reproducción de cassettes y de la radio, es posible ampliar el sistema mediante la conexión de una unidad*1 de CD/MD opcional.
Localización de los controles OPEN – PRESET 6 SOUND MODE + DISC D-BASS LIST DSPL OFF 1 2 3 SOURCE g SHIFT SEEK / AMS OFF SET UP 1 2 PLAY MODE 3 ENTER 4 5 6 XR-C7300/C7300W Consulte las páginas indicadas para obtener más información.
Mando a distancia inalámbrico opcional (RM-X47) OFF MODE SOURCE DIR SEEK AMS – REW – PRESET DISC SOUND + FF + SEL ATT DSPL Botones del mando a distancia inalámbrico con la misma función que los de esta unidad. 1 Botón OFF 6 Botón DSPL 2 Botón SEEK/AMS 7 Botón PRESET/DISC 3 Botones (–) (+) 4 Botón ATT 5 Botón SOUND/SEL No es posible realizar la búsqueda manual ni la sintonización manual con el mando a distancia.
Procedimientos iniciales Fijación del panel frontal Coloque el orificio a del panel frontal en el eje b de la unidad como se ilustra y, a continuación, presione sobre el lado izquierdo para introducirlo. Restauración de la unidad Antes de utilizar la unidad por primera vez o después de sustituir la batería del automóvil, es necesario restaurar dicha unidad. Presione el botón de restauración con un objeto puntiagudo, como un bolígrafo.
Ajuste del reloj 2 Presione (SHIFT). El reloj dispone de una indicación digital de 12 horas. El reloj se pone en funcionamiento. Ejemplo: Para ajustar el reloj a las 10:08 1 Presione (SHIFT) y, a continuación, (2) (SET UP) varias veces hasta que aparezca “CLOCK”. 1 Presione (4) (n). Los dígitos de la hora parpadean. 2 Ajuste la hora. para retroceder para avanzar 3 Presione (4) (n). Los dígitos de los minutos parpadean. 4 Ajuste los minutos. para retroceder para avanzar 6 3 Presione (SHIFT).
Reproductor de cassettes Bobinado rápido de la cinta Durante la reproducción, desplace el control SEEK/AMS hacia arriba o abajo y manténgalo en esa posición. Avance rápido Escucha de cintas Rebobinado 1 Presione (OPEN) e inserte el cassette. La reproducción se iniciará de forma automática. 6 SEEK / AMS Para iniciar la reproducción durante el avance rápido o el rebobinado, presione (MODE) (*). Localización de un tema específico — Sensor de música automático (AMS) 2 Cierre el panel frontal.
Reproducción de cintas en diversos modos Es posible reproducir la cinta en los siguientes modos: •REP (Reproducción repetida), que permite repetir el tema actual. •NR (Dolby NR), que permite seleccionar el sistema Dolby* NR B. •METAL (Metal) permite reproducir una cinta metálica o CrO2. •BL SKP (omisión de espacios en blanco), que omite espacios en blanco superiores a ocho segundos. •ATA (activación automática del sintonizador) activa automáticamente el sintonizador durante el bobinado rápido de la cinta.
5 Presione (SHIFT). Notas • La unidad no almacena emisoras de señales débiles. Si se reciben pocas emisoras, algunos botones numéricos conservarán sus parámetros anteriores. • Si el visor ya muestra un número, la unidad almacenará las emisoras por orden a partir del actualmente mostrado. 3 Consejo Presione cualquier lado de (PRESET/DISC) para recibir por orden las emisoras almacenadas en la memoria (función de búsqueda programada).
2 Presione (4) (n) una vez localizado el carácter que desee. El cursor parpadeante se desplaza al espacio siguiente. Cambio de los elementos visualizados Cada vez que presione (DSPL), el elemento cambiará de la forma siguiente: Frecuencia ˜ Reloj Después de seleccionar el elemento deseado, el visor cambiará automáticamente al modo de desplazamiento de indicaciones después de unos segundos. En dicho modo, todos los elementos anteriores se desplazan por el visor uno por uno en orden.
Borrado del nombre de la emisora 1 Sintonice cualquier emisora y presione (LIST) durante dos segundos. 2 Presione (DSPL) durante dos segundos. 3 Gire el dial para seleccionar el nombre Otras funciones También es posible controlar esta unidad con un mando rotativo opcional. que desee borrar. 4 Presione (5) (ENTER) durante dos segundos. El nombre se borra. Repita los pasos 3 y 4 si desea borrar otros nombres.
Uso del mando rotativo Mediante el giro del control (SEEK/AMS) Este mando funciona mediante la presión de botones y/o el giro de controles.
Presione (SOUND) para ajustar el menú de sonido y el volumen. Presione (LIST) para: • Mostrar los nombres memorizados. • Mostrar el tipo de programa. Ajuste de las características de sonido Es posible ajustar los graves, los agudos, el balance, y el equilibrio entre altavoces e, igualmente, almacenar para cada fuente un nivel de graves y agudos.
Es posible seleccionar diversos modos: •CLOCK (Reloj) (página 6). •BEEP – que permite activar o desactivar los pitidos. •RM (Mando rotativo) – que permite cambiar la dirección de funcionamiento del mando rotativo. — Seleccione “NORM” para emplear el mando rotativo con la posición ajustada en fábrica. — Seleccione “REV” si monta el mando rotativo en la parte derecha de la columna de dirección. •M.DSPL (MOTION DISPLAY) – para activar o desactivar el desplazamiento de indicaciones por el visor. •A.
Con equipo opcional Unidad de CD/MD Es posible controlar un máximo de diez unidades externas de CD/MD con esta unidad, con la siguiente configuración: Unidades de CD – máximo de cinco Unidades de MD – máximo de cinco Cualquier combinación de hasta diez unidades funcionará. Si conecta una unidad opcional de CD con la función CD TEXT, la información CD TEXT aparecerá en el visor al reproducir discos CD TEXT.
Para cancelar la función de desplazamiento automático, seleccione “A.SCRL-OFF” en el paso 3 anterior. Nota Para algunos discos con un gran número de caracteres, pueden ocurrir los siguientes casos: — Algunos de los caracteres no se muestran — La función de desplazamiento automático no funciona.
Asignación de títulos a los discos compactos — Memorando de discos (Para unidades de CD con función de archivo personalizado) Puede etiquetar los discos con un nombre personalizado, pudiendo introducir un máximo de ocho caracteres por cada disco. Si etiqueta un CD, podrá localizar el disco mediante el nombre (página 18) y seleccionar temas para su reproducción (página 19). 1 Reproduzca el CD y presione (LIST) durante dos segundos.
Borrado del memorando de discos 1 Presione (SOURCE) varias veces para seleccionar CD. Localización de discos mediante el título 2 Presione (MODE) varias veces para seleccionar la unidad de CD. — Función de listado (Para unidades de CD con función de archivo personalizado o unidades de MD) 3 Presione (LIST) durante dos segundos. 4 Presione (DSPL) durante dos segundos. 5 Gire el dial para seleccionar el nombre que desee borrar. 6 Presione (5) (ENTER) durante dos segundos. El nombre se borrará.
Selección de temas específicos para su reproducción — Función de banco (Unidad de CD con función de archivo personalizado) Si etiqueta el disco, podrá programar la unidad para que omita temas o para que reproduzca los que desee. 1 Reproduzca el disco, presione (SHIFT) y, a continuación, (3) (PLAY MODE) durante dos segundos. Reproducción de temas específicos solamente Es posible seleccionar: • BANK-ON – para reproducir los temas con el ajuste “PLAY”.
Información complementaria Precauciones •Si aparca el automóvil bajo la luz solar directa y se produce un considerable aumento de temperatura en su interior, deje que la unidad se enfríe antes de utilizarla. •Si la unidad no recibe alimentación, compruebe las conexiones en primer lugar. Si todo está en orden, examine el fusible. •Si los altavoces no emiten sonido con un sistema de dos altavoces, ajuste el control de equilibrio en la posición central.
Cassettes de duración superior a 90 minutos No se recomienda el uso de cassettes de duración superior a 90 minutos, salvo para reproducciones extensas y continuas. Las cintas utilizadas para estos cassettes son muy finas y tienden a estirarse con facilidad. Las operaciones frecuentes de reproducción y parada de estas cintas pueden causar que se enreden en el mecanismo de la platina de cassettes.
Desmontaje de la unidad 1 Llave de liberación (suministrada) 2 3 4 22
Especificaciones Sección del reproductor de cassettes Pista de cinta Fluctuación y trémolo Respuesta de frecuencia Relación señal-ruido 4 pistas, 2 canales, estéreo 0,08 % (WRMS) 30 – 18.
Guía de solución de problemas La siguiente lista de comprobaciones resulta útil para solucionar los problemas que puedan producirse al utilizar la unidad. Antes de consultar la lista que aparece a continuación, compruebe los procedimientos de conexión y funcionamiento. Generales Problema Causa/Solución Ausencia de sonido. •Cancele la función ATT. •Ajuste el control de equilibrio entre los altavoces en la posición central para sistemas de 2 altavoces.
Reproducción de CD/MD Problema Causa/Solución El sonido salta. Disco sucio o defectuoso. No es posible desactivar la indicación “--------”. No es posible asignar títulos a MDs, a menos que conecte una unidad de CD con función de archivo personalizado. n Presione (LIST) durante dos segundos. Indicaciones de error (cuando se ha conectado una unidad de CD/MD opcional) Las siguientes indicaciones parpadearán durante cinco segundos aproximadamente y se oirá una alarma.
Sony Corporation Printed in Thailand