
Operation Manual


4
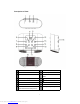
LED Display
AL1 indicator is ON when Alarm 1 is on.
AL2 indicator is ON when Alarm 2 is on.
PM indicator is ON when time is in PM time.
FM indicator is ON when using radio function.
INSTRUCTIONS FOR USE
This unit requires AC/DC Power Adaptor (included). 2pcs AAA batteries (Not
included) are required for the clock, radio, preset and alarm memory back-up.
Installing Back-Up Batteries
Unscrew and remove the Back-Up Battery Cover, install 2pcs AAA batteries (Not
included) into the compartment with correct polarities.
NOTE:
Do not mix old and new batteries.
Do not mix different battery types; alkaline, standard (Carbon – Zinc), or
rechargeable (Nickel – Cadmium) batteries.
Do not expose battery to excessive physical shock, vibration, or liquids.
Do not disassemble, attempt to repair or deform the battery.
Do not dispose batteries in fire.
Do not peel or damage the battery label. Risk of explosion and damage to product
if batteries are replaced incorrectly. Follow safety information on battery.
Remove batteries from the unit, if it is not intended to be used for an extended
period of time.
Batteries shall not be exposed to excessive heat such as sunshine or fire.
Dispose of the used batteries according to the requirements of the local regional
needs.
Connecting the AC Power Source
Insert the small plug from the supplied AC/DC Power Adaptor to DC-IN Power Port at
the rear of the unit. Plug the AC/DC Power adaptor to a wall outlet (with AC
100-240V~50/60Hz).
Clock Setting
Connect the power adaptor. The unit will be in standby mode. You can now set the
clock time and adjust the LED brightness as follows:
Downloaded from www.Manualslib.com manuals search engine