
Owner's manual

INSTALLATION
WARNINGS / CAUTIONS:
WARNING: Electricity, even low voltage electricity, can be dangerous. Installation should be performed by a
licensed electrical contractor or other qualified personnel only. It is recommended that the requirements of the
U.S. National Electrical Code (NEC) be followed. Relevant sections of the 1984 NEC include articles 250 and
690.
CAUTION: DO NOT drill or punch holes in the enclosure while the panel is still mounted in it. Refer to "MOUNTING
AND WIRING" section.
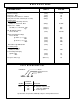
CAUTION: DO NOT exceed the maximum current or voltage ratings as stated in the specifications.
TOOLS AND MATERIALS NEEDED
1. Standard screwdriver
2. Wire strippers
3. If holes must be drilled in the mounting surface: Drill and appropriate bit
4. Chassis punch of appropriate size for installation of conduit hubs of waterproof fittings for wire entry into
enclosure.
5. Fasteners to mount unit to wall of structure: Several types are suitable and will depend upon the type of
material of which the wall is made. These fasteners must support the weight (about 30 pounds) of the unit.
These are not included with the LPU.
6. Water-tight feed throughs or conduit of the proper type and size.
MOUNTING AND WIRING
MOUNTING
1. Location: A suitable location must be found for mounting the LPU. Ideally, this location would be close to the
systems control electronics and out of direct sunlight if possible.
2. Complete System Installation: Follow the instructions for the system installation, including the array, control and
battery installation and wiring. Determine a proper location for the LPU and run the array wires and control wires
up to the selected location, leaving sufficient wire for easy connection. Insure that the polarity of the wires is
marked.
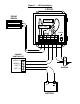
3. Enclosure cutouts: To punch hole-cutouts in the enclosure, first remove the internal panel containing the
components from within the enclosure. This can be accomplished by removing the four screws in the four
corners of the panel, thereafter carefully lifting the panel out of the enclosure and placing it in a safe location.
Proceed with making the hole-cutouts and installing the entries. Thoroughly clean the inside of the box to
remove all metal shavings before re-installing the panel.
4. Mounting: Secure the LPU enclosure to the selected location using the four mounting holes provided on the box,
and suitable fasteners. Replace the component panel in the enclosure and tighten the four screws to secure it.
5. Prepare for wiring: It is assumed at this point that the system batteries and the PV array and control are
installed and properly wired. The wires should reach at least to the desired location for the LPU with a few extra
inches for ease of connection. The wires should be labeled and color coded for polarity identification. Insure that
all wires are disconnected from their power sources.
WIRING
CAUTION: Before doing the wiring to the LPU, insure that all wires are disconnected from their power sources
(battery and array) to prevent accidental damage and/or bodily harm.
1. Connect the wires to the LPU based upon the labeled terminal strips.
2. Insure that a proper earth ground is provided for each LPU.