
User's Manual
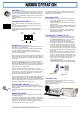
Table Of Contents

VOLUME (OPTIONAL‐T13)
Rotate the volume control clockwise to adjust the volume control
for a comfortable listening level. If no sound is heard, temporarily
un-mute the radio by briefly rotating the Squelch Control full anti-
clockwise. You can adjust the volume by listening to the receiver's
background noise.
When finished, return squelch setting. (See section on setting
Squelch.)
CHANNEL SELECTING (OPTIONAL‐T14)
Push to select the memory channel number for the selected
readout.
The channel display will Rotate and select the higher channel
when the up button is pressed.
By pressing the down button the Channel display will rotate to
display the lower channel selected. The selected channel is
displayed.
SQUELCH (Frontpaneloption‐T13)
The squelch is used to eliminate any annoying background noise
when there are no signals present.
This control is located on the main controller motherboard (RV6)
an optional model can have it fitted on the front panel. A
technicians tuning tool will be required to adjust this setting.
(Factory set for 8dB SINAD)
When no signal is received, rotate the Squelch control (SQL) fully
counterclockwise first, and then rotate SQL clockwise to the point
that the noise just disappears. This will provide optimum Squelch
performance.
When the Squelch is Open, the receiver's background noise can
be heard and 'Amber RX LED' is lit on the front panel display.
When the Squelch is closed, the receiver remains quiet when there
are no signals present but any incoming signals will override the
Squelch and be heard in the speaker.
NOTE: If an incoming signal is very weak and is close to the
minimum squelch level, it may become broken or “chopped” by the
squelch action. To prevent this, simply open the squelch to allow
the signal to be heard clearly. Alternatively, you can reduce the
squelch sensitivity as described above.
When CTCSS is enabled the channel remains quiet until someone
transmits using the same tone, and the 'Green Tone LED' lamp
will be lit. When the transmission ends, the channel becomes quiet
again. By using different tones, several groups of people can share
the same channel without disturbing each other.
ACCESSORY SWITCH (Depends on Options)
The Accessory button is a programmable momentary switch.
Which is assigned a function in software programming. (Subject to
Radios firmware)
See Dealer for application notes for further information on this
feature.
REPEATER MODE
In repeater mode, the received signal is processed and retransmits
at a different frequency.
Repeaters are usually located on hills, mountains or tall buildings.
The increased elevation greatly improves the range of the repeater
beyond that of a normal base or Mobile. This means that the
repeaters are able to receive and retransmit signals to radios that
would otherwise be out of range of each other.
To enable the Repeater Function (TTR) the operating channel
will required to be programmed as a repeater and User Dip
Switch2-4 enable on motherboard.
Receiving A Call
With the MX800 powered ‘ON’ the front panel Green led is lit.
• Set the audio and squelch levels as per SQUELCH
and VOLUME section.
• Select the desired receiving channel as per Channel
selecting section.
• When receiving a signal the ‘Amber RX LED‘ indicator
lights green when the squelch is open, and audio is
emitted from the speaker.
• Listen for your call sign when you hear activity, and
reply promptly by identifying yourself if called. (For
example: Base receiving).
Transmitting To Making A Call
With the MX800 powered ‘ON’ the front panel Green led is lit.
• Select the desired channel, as previously described.
• If the ‘Amber RX LED' indicator is on, the channel is
busy and you must wait until it is free, before
proceeding. If you attempt to transmit anyway, the
other party may not receive your transmitted signal.
• Lift the microphone off-hook and listen to check that
no one else is using the channel. You may also have
to press the Monitor Key on the desktop Microphone
or the Accessory button on the radio briefly, depending
on the microphone used and the options programmed
to your radio.
• When using the Hand-Held microphone, Hold it about
5cm from your mouth and press the Press-To-Talk
(PTT) key, located on the side of the microphone (see
Figure 3-1). Speak clearly into the microphone at your
normal voice level, identifying yourself by your call
sign, and the person you wish to contact. (For
example: Base to Mobile 2.).
• The ‘Red RX LED’ indicator lights while transmitting.
• Release the PTT key when you have finished talking.
Transmit Timer
Your MX800 is fitted with a preprogrammed timer to limit the
maximum length of transmissions.
When the time limit is reached, the transmission is terminated.
(Subject to Radio Firmware)
Illustration only. Microphone not included
0 0
0 0
UP
CHANNEL
UP
CHANNEL
DOWN
CHANNEL
DOWN
CHANNEL
TEN UNITS UNITS
PTT
PTT
Fi
g
ure 3-1
Fi
g
ure 3-2
__________________________________________________________________________________________
© SPECTRA ENGINEERING 2009 Revision 1.0.3