
Installation Guide
For quick and easy installation of your folding door, read these
instructions thoroughly. A few minutes of prior planning will make the
job easier and will ensure years of trouble-free use.
The Tools You Will Need
You will need a small #1 Phillips screwdriver, a athead screwdriver,
a tape measure, a small nail, and a 3/32” drill bit for pilot holes, a
hacksaw or ne tooth saw (saw needed to trim top track for the
appropriate width or to trim height of panels if door is less than 80”
high); and masking tape (to secure doors if trimming is necessary.)
Safety glasses.
Fine sandpaper (used to smooth edges after trimming.
SINGLE DOOR INSTALLATION
1. Measure the Door Opening
I
f the height of your door opening is
approximately 80”, you will not need to alter the
door itself. If the opening is less than 80”/96”
high, the door may be shortened by sawing off
excess from the bottom of the door panels.
Stack the door panels together and secure with
masking tape. Remove bottom hinge screws.
Cut excess with a hacksaw or ne tooth saw.
Cut the overhead track 1/8”shorter than the
width of the opening.
Fine sandpaper may
be used to smooth rough edges. Reinsert hinge screws.
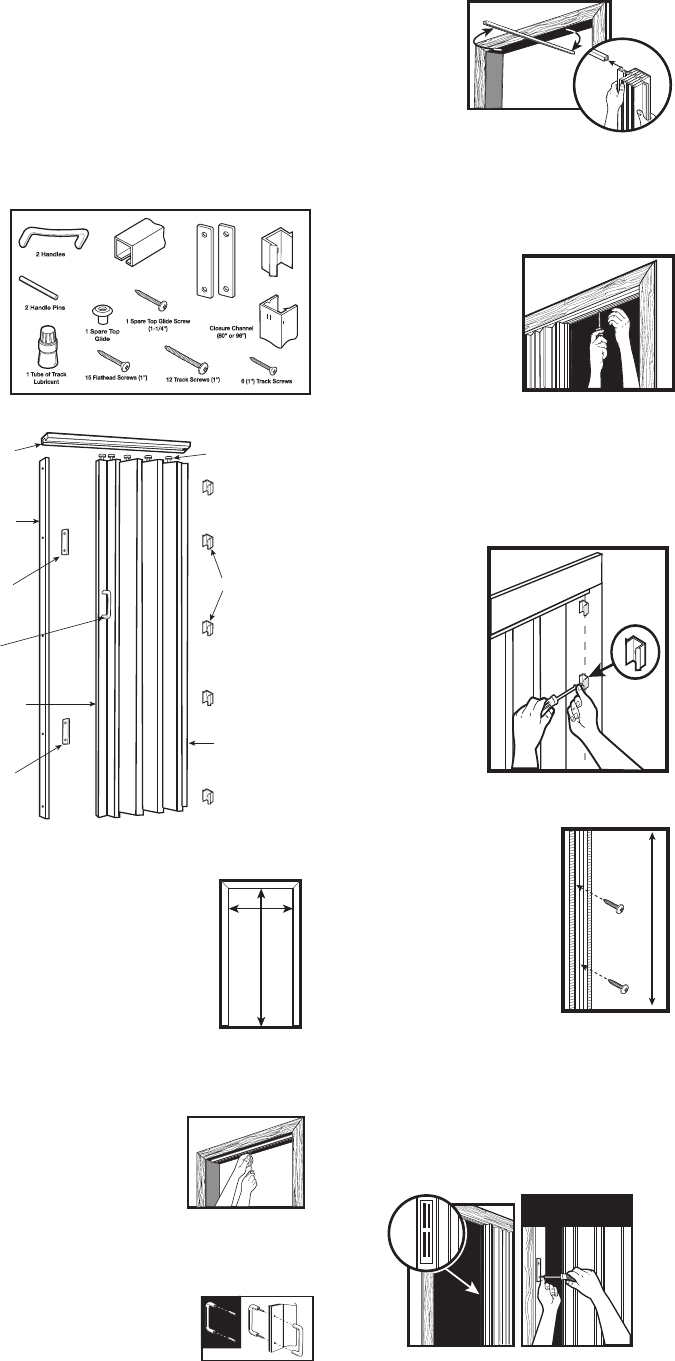
2. Install the Top Track
Position the overhead track on the top of
the door opening so that it is straight and
centered.
After making a pilot-hole (with a nail or
3/32” drill), drive a 1” track screw through
the screw hole nearest the center of the
track. Do not tighten. (Tape may be used to
hold the track in place while you mark and drill.)
3. Install the Handles
Tap the two handle attachment pins into one
handle, then t the pins through the door panel
holes. Press the other handle onto the pins.
If necessary, you may back one handle with
a solid object and tap the other handle alternately
over each pin area until the handles are seated.
Do not strike the middle of either handle.
4. Install the Door Panels
Apply track
lubricant to each
top glide. Swing
one end of the
overhead track out
of the door
opening to accept
the top glides.
Decide if you want
the door to open from the left or the right, then slide all top
glides onto the track. Stack the panels together near the
center screw.
5.Secure The Top Track
Swing the track back to its
original position. After
making pilot holes (with a
nail or a 3/32” drill), drive the
1” track screws through all
track holes. Set all screws as
straight and tight as possible
to assure smooth operation
of the door.
6. Secure The Anchor Panel
Use the closure channel to measure and align the
channel clips. Align the channel on the non-opening side
of the door jamb. Make sure the top of the channel is
straight up and down.
Mark each of the ve
closure channel screw
holes and remove the
closure channel. Make
pilot holes (with a nail or
3/32 drill) and
install the channel clips
loosely, using ve of the
1” roundhead screws.
Align the clips vertically
and press the door
anchor panel onto them
until it snaps into place.
7. Secure The Closure Channel
Align the closure channel on the
opening side of the door jamb.
Make sure the channel is straight
up and down.
Mark each of the ve screw holes
(as above). If necessary, cut the
channel to match door size. Make
pilot holes in door jamb (with a nail
or a 3/32” drill) and install the
closure channel, using ve of the 1”
athead screws.
8. Install The Magnetic Latch Striker Plates
Position both of the striker plates inside the closure
channel, across from the two magnets on the lead edge
of the door. Mark the locations of the striker plate holes
on the channel. Make pilot holes (with a nail or a 3/32”
drill) in the closure channel. Install the striker plates with
four 1” athead screws.
INSTALLATION INSTRUCTIONS
Attach the
Striker plate
Door
Magnet
Closure
Channel
80”
Double Door Installation
1.Measure The Door Opening
Divide the width of the opening by two. Cut each overhead
track to this measurement so that when installed, the tracks
butt against one another in the center of the door opening.
It is also acceptable to use one track if it will t your
opening.
2. Install Top Track
On a center line drawn across the top of the door opening,
install either half track and install all screws in the half track.
if using a single track, use one center screw.
3. Install The Door Panels
Please lubricate the top glides with the lubricant
supplied. Install the two doors in the half track with lead
edges facing each other. If necessary install the second
track and push one door onto this track. Set a track screw
at the track center joint and leave the screw projecting
down 1/2” to prevent glides from passing the joint.
4. Secure The Anchor Panel
Use the closure channel to measure and align the channel
clips. Align the channel on the non-opening side of the door
jamb. Make sure the top of the channel is straight up and
down.
Mark each of the ve closure channel screw holes and
remove the closure channel. Make pilot holes (with a nail or
3/32 drill) and install the channel clips loosely, using ve of
the 1” roundhead screws. Align the clips vertically and press
the door anchor panel onto them until it snaps into place.
Repeat on the left door jamb.
5. Install The Closure Channel
Align the closure channel on the lead edge of this door so
that it is ush with the top and bottom of the door. Mark
each of the ve screw holes on the lead edge and drill ve
pilot holes with 3/32” bit. Install the closure channel using
ve 1” athead screws.
6.
Install The Magnetic Latch Striker Plates
to Closure Channel
If closure channel is not used, it may be necessary to
remove the magnets from one door and reverse polarity.
Follow single door installation step number 8 for both sides
of the jamb.
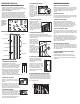
Make Sure All
The Following
Parts Are
Included With
Your Folding
Door:
Top Track
Top Glides
Channel Clips
Anchor Panel
Striker Plate
Closure Channel
Lead Edge Door
Handle
Striker Plate
Door Parts Location
Oakmont/Encore
Channel Clips
1 Top Track
5 Channel Clips
Attach the
Striker plate
Door
Magnet
Closure
Channel
80”
2 Magnetic Latch
Striker Plates
ENCORE
OAKMONT