4-Channel 2.
EN NOTICE All instructions, warranties and other collateral documents are subject to change at the sole discretion of Horizon Hobby, LLC. For up-to-date product literature, visit horizonhobby.com and click on the support tab for this product.
EN Building on the success of the DX3S transmitter, the Spektrum™ DX4S transmitter with DSMR™ protocol brings you even more features, including pre-programmed steering mixes, full switch assignability and a convenient back-lit display. Spektrum DSMR technology is an exclusive, frequency-agile 2.4GHz protocol that provides surface RC vehicles and boats with superb range and response. This is particularly true in environments where many other 2.4GHz transmitters are in use at the same time.
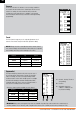
EN Identifying Controls and Switches Function Function A Switch A I Rubber Grip B Switch B J Power Switch C Switch C K Power LED D Switch D L Battery Cover E Switch E M Throttle Trigger F Switch F N Steering Wheel G Roller Selector O Antenna H Memory Card Port (under rubber grip) P LCD Screen Press the power switch (J) to power ON the transmitter. The Power LED (K) will come on, a Spektrum logo screen will show, then the Main Screen will show on the LCD screen (P).
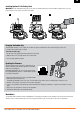
EN Installing Optional Li-Po Battery Pack IMPORTANT: Set the transmitter battery type to LiPo in the System/Alert menu and ensure the battery voltage alert is set to the proper voltage. See the System section for more details. 1 2 3 Changing the Rubber Grip This transmitter includes 3 sizes of grips. The medium-size grip is installed at the factory. Inside the grip is a letter size: L for large, M for medium and S for small. To change the rubber grip: 1.
EN Warning Screens Low Battery Alarm An alarm will sound and a warning screen will show when the transmitter’s battery power falls below a set limit. This alarm reminds the user to bring the model under full control, power off the transmitter and replace the batteries. Press the Roller to stop the alarm and go to the Main Screen. Set the low battery limit using the System Screen. CAUTION: If you decide to use the optional Li-Po battery back, never allow the battery voltage to fall below 6.4V.
EN Individual Direction Adjustments In some instances, you may find it necessary to independently adjust the control directions; for example, if you want more travel for left steering than right steering, perform the following steps: 1. Scroll to the value you wish to change and press the Rolling Selector. 2. When both directions are selected, move the control (steering or throttle) toward the control direction you wish to change. The selection box moves to the desired direction.
EN Reverse The Reverse function, also known as servo reversing, establishes the channel direction relative to the channel input. Use the reverse menu if, for example, the wheels turn left when you turn the steering wheel to the right. Reverse is available on all channels and is normally the first function you should test and adjust during programming. Travel The Travel function supports precise endpoint adjustments in all channels. Travel values range from 0–150% (Default is 100%).
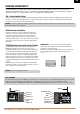
EN Receiver Compatibility The DX4S transmitter is compatible with Spektrum™ DSMR™, DSM®, DSM2®, and Marine surface receivers. The inlcuded Spektrum SRS4210 DSMR Surface receiver is compatible with all Spektrum DSMR transmitters and is also backwards compatible with DSM2 transmitters. The SR410 DSMR receiver is only compatible with DSMR transmitters. AVC – Active Vehicle Control AVC™ technology is the newest Spektrum™ RC innovation from Horizon Hobby.
EN Electric Vehicle Installation To Motor Battery Electronic Speed Control Typical Nitro Vehicle Installation Receiver Steering Servo Battery Receiver Throttle Servo Steering Servo IMPORTANT: If you adjust the steering and throttle trim on your transmitter, the receiver must be turned off and back on again in order to save the new trim settings. Otherwise, AVC will not function properly. Failsafe The throttle failsafe position is set during binding.
EN Bind Transmitter to SR410 Receiver 1. 2. 3. 4. 5. 6. Insert a bind plug in the receiver’s BIND port. Power on the receiver and wait until the receiver LED begins flashing. Power on the transmitter. Select the Model Memory you wish to bind to. Select Bind from the List menu. Move the throttle channel to the desired failsafe position. IMPORTANT: The throttle channel must stay in the failsafe position until binding is complete. 7. Scroll to Bind and press the Rolling Selector.
EN Timer The transmitter Timer can function as either an Up or Down Timer. Down Timer (default selection) The Down Timer allows you to adjust the amount of time in 10 second increments to a maximum of 21 minutes, which will then start a countdown to “0” once activated. The Down Timer value is normally the length of a race or vehicle run time. The Down Timer can be reset by selecting Timer Reset or by holding the switch that is assigned to that timer for 3 seconds.
EN Mixing The DX4S features a Steer Mix, Brake Mix and two programmable mixes (Mix A and Mix B). Steer Mix Use the Steer Mix for vehicles requiring either four-wheel steering (4WS) or dual steering servos (Dual ST). NOTICE: Before driving a model, always do a check of the transmitter’s control of the vehicle with the vehicle’s wheels off the ground. Mix Options 1. Select AX1 or AX2 as the slave channel. Aux1 and Aux2 can only be assigned to one mix at a time.
EN Dual ST (Dual Steering) Trim: Act (Default) or Inh. We recommend activating the Trim, as it adjusts the trim for both the left and right steering servos. If you need to make small adjustments to the individual servos, you can do so in the Sub-Trim menu. Switch: You may assign the Dual ST mix to a switch, enabling a B Value in the mix. Assigning the Dual ST mix to a switch is valuable when you want to assign dual steer values for different conditions.
EN Active Vehicle Control (AVC) Options: • ST Gain • TH Gain • Priority 1. Select AVC from the LIST menu. 2. Change the State field to ACT . 3. Adjust the ST Gain and/or TH Gain Sensitivity The default value is 0% (ST Gain and TH Gain OFF). As the value increases, the AVC steering stability and throttle management increases. Adjust the ST Gain until you reach the ideal amount of steering control. If the front wheels begin to shake, the ST Gain value is too high.
EN Programmable Mix The programmable mixes enable you to assign any channel as a Master or Slave, which is particularly helpful when you need to assign an Aux channel as a Master. 1. Scroll to Inh. Press the rolling selector once and select a Master channel. 2. Select a Slave channel. 3. Adjust the A Value percentage. Switch: You may assign the mix to a switch, enabling a B Value in the mix. To adjust the B Value: 1. Assign a switch to the mix. 2. Press the switch forward or back.
EN Throttle Punch The Throttle Punch function is used to offset the throttle to a preprogrammed position and activate when 4% of throttle travel is applied. Throttle punch is typically used in nitro vehicles to reduce the lag due to throttle linkage slack. To Access the Throttle Punch Function: • In the List screen, use the Rolling Selector to highlight the Th Punch function. • Press the Rolling Selector to access the Throttle Punch function. The above screen will appear.
EN System The System function lets you adjust transmitter functions. List Two modes are available: Expert and Standard. The DX4S defaults to Expert where all of the programming menus are available. Standard mode eliminates the expert screens and functions from the list, making it ideal for basic models. Display Contrast The contrast function provides adjustment to the brightness ratio of the lightest to the darkest part of the screen.
EN Telemetry The Telemetry setting function is used to select a default screen for display, including Main, Telemetry or Roll. It is also used to access the Telemetry SPEED, BATTERY and TEMPERATURE sensor settings. To Access the Telemetry Setting function: In the List screen, use the Rolling Selector to highlight Telemetry, then press the Rolling Selector. The TELEMETRY screen will appear.
EN Troubleshooting Guide Problem The system will not connect 20 Possible Cause Solution Transmitter and receiver too near each other Move transmitter 8 to 12 feet (2.4 to 3.6m) from receiver Transmitter and receiver too near large metal objects (vehicles, etc.) Move away from large metal objects (vehicles, etc.
EN 1-Year Limited warranty What this Warranty Covers Horizon Hobby, LLC (Horizon) warrants to the original purchaser that the product purchased (the “Product”) will be free from defects in materials and workmanship for a period of 1 years from the date of purchase. assistance. For questions or assistance, please visit our website at www.horizonhobby.
EN Warranty and Service Contact Information Country of Purchase United States of America Horizon Hobby Contact Information Horizon Service Center (Repairs and Repair Requests) servicecenter.horizonhobby.com/ RequestForm/ Horizon Product Support (Product Technical Assistance) www.quickbase.
EN Compliance Information for the European Union AT EE IE PL IS BE BG ES FI IT LT PT RO LI NO CZ CY DE DK FR GR HR HU LU LV MT NL SE SI SK UK CH Declaration of Conformity (in accordance with ISO/IEC 17050-1) No.