
User guide


10 11
EN
Installation
• Mount the Receiver unit in the position recommended by the helicopter manu-
facturer. Foam or thick double-sided tape is recommended to isolate the receiver
from vibration.
• Mount the switch and insert the switch plug into the port in the main unit marked
SWITCH. Note: The AR7110/AR7110R uses a specifically designed switch.
Conventionally wired switches are not compatible with the AR7110.
• Using the battery capacity guidelines select the battery system that best ts
your application and install the battery in your heli. Connect the battery to the
receiver’s EC3 connector. Spektrum batteries are pre-wired with an EC3 conne-
ctor and plug directly in. If using another brand of battery it will be necessary to
solder EC3 connectors to the battery leads.
• Using double-sided foam tape and tie wrap, mount a minimum of 1 and up to
2 remote receivers in your aircraft and plug them into the receiver ports. NOTE:
It’s necessary that one receiver be plugged into port B or R in order to operate.
The receiver should be mounted at least 2” away from the main receiver with the
antennas perpendicular.
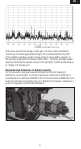
• If using the RevLimit Limiter (AR7110R only) mount the rpm sensor and bracket
to the backplate under two backplate screws of your engine as shown.
IMPORTANT: Normally, the pickup is mounted touching the backplate of the
engine. If your system is not limiting RPM in flight, re-position the sensor .5 to
1mm away from the back plate. This can be easily accomplished by loosening the
2-56 button head screw on the sensor mount, re-adjusting the position, and then
tightening. This should resolve the issue.
Threadlock must be used on the screws. The rpm sensor bracket is adjustable for
50-size or 90-size engines by extending or retracting the rpm sensor and fastening
the screw in place.