PROGRAMMABLE REFRACTOMETER 300037 INSTRUCTION MANUAL
CONTENTS Introduction ……………………………………………... 2 Panel Description………………………………………. 3 Faceplate & LCD Display……..…….………………….3 Operating Instructions A. General Measurement……..…….………………….4 B. Calibration Procedure……..…….……………….….4 C. Zero Checking……..…….…………………..……....4 5. Parameter Settings A. Changing Temperature Scale..….………………….5 B. Automatic Temperature Compensation………...…5 C. Scale Selection..….……………………………...….5 D. High/Low Range Limit Alert..….……..…………….5 6. Erratic Readings..….…………………………….……….6 7.
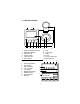
2. PANEL DESCRIPTION 11 1 1. 2. 3. 4. 5. 6. 2 12 3 4 5 6 7 8 High/Low Range Limit Alert READ and ENTER ZERO and ◄ SCALE and ▼ FUNC and Y/N ON and OFF 7. 8. 9. 10. 11. 12. 3. FACEPLATE & LCD DISPLAY 1. 2. 3. 4. 5. 6. 7. 8. 9. Prism Temperature ATC (active) High Limit Alert Low Limit Alert Low Battery Measurement Value Calibration Error Scale Indicator Red LED 9 1 10 LCD Prism plate Prism Cover 9V DC Power Input USB Data Port 2 3 4 5 76.4°F ATC H-Limit L-Limit nD -1.8.8.8.
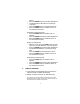
. OPERATING INSTRUCTIONS A. General Measurement To avoid damage, it is important to clean the PRISM WINDOW before and after each use. Press the ON/OFF button to turn the Refractometer ON. The unit will automatically shut off after about 3 minutes of inactivity. Perform the Calibration Procedure (4B) With the unit on, fill the PRISM WINDOW with the sample to be measured and then close the COVER. Press the READ button immediately to ensure accurate readings.
5. With the unit on, press the ZERO button. A refractive index reading between 1.3329~1.3331 indicates that the unit accurately reads to the calibrated zero point. If the unit is out of range, a flashing crosshair symbol will be displayed, indicating that recalibration is required. Press any other button to exit this function. Perform Zero Checking if the unit has sustained a shock, is subjected to temperature changes, or seems inaccurate. PARAMETER SETTINGS A.
played. Press the READ button and the last digit flashes. Use the and the buttons to set the high range limit. Press the READ button to activate the function. Press the FUNC button as needed to return to the measurement screen. Deactivating High Range Alert Press the FUNC button as needed until HL n appears. Press the READ button and the last digit flashes. Press the FUNC button as needed to return to the measurement screen.
C. When diluting samples, be sure to use a pure solution such as distilled water. D. Sample contains suspended solids. Filter and thoroughly mix the sample before testing. E. Perform a calibration and check the zero point. F. Replace the battery. G. Outside light can cause erratic readings, make sure to close the COVER to the PRISM during measurement. 7. BATTERY REPLACEMENT A. When the battery is low, the above symbol appears on the LCD. B. Open the back cover to replace the 9V battery. C.
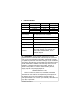
9. SPECIFICATIONS Type Brix nD Temperature Range 0~95.0% 1.3330~1.5318 0~40°C -32~104°F Res. 0.1% 0.0001 0.1°C 0.1°F Accuracy ±0.2% ±0.001 ±1°C ±2°F Power Supply 9V Battery (approx.