
Use and Care Manual

4
4.0 FUNCTIONS
4.1 MAX/MIN BUTTON
1. Press MAX/MIN once to enter MAX mode. The symbol “MAX” will appear on the display
and the display will show the maximum reading that the meter measures while in this mode.
2. Press MAX/MIN again to enter MIN mode. The symbol “MIN” will appear on the display
and the display will show the minimum reading that the meter measures while in this mode.
3. To exit the MAX/MIN mode and erase stored readings, press and hold down the
“MAX/MIN” button or turn the rotary switch.
4.2 HOLD BUTTON
1. Press HOLD once to enter data hold mode and freeze the displayed value.
2. Press HOLD again to exit data hold mode and resume normal measurement mode.
4.3 AUTO POWER OFF
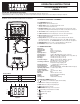
1. The
1.8.8.8
Autorange MAX
MIN
AC
DC
symbol on the display indicates that the auto power-off feature is enabled. If you have not operated the meter for 15 minutes,
the meter will turn off automatically and go into Sleep mode. It will beep 1 minute prior to turning off as a warning. To wake the meter
from Sleep mode, turn the rotary switch or press a button.
2. To disable the automatic power-off function, hold down the “SELECT” button while turning the meter on.
The
1.8.8.8
Autorange MAX
MIN
AC
DC
symbol will be absent from the display.
5.0 DIAL SETTINGS
5.1 AC VOLTS
A
A
400A
400A
To avoid personal injury or damage to the meter, do not attempt to measure voltages higher than 600V AC.
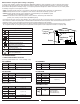
1. Insert the black (negative) test lead into the COM input terminal.
2. Insert the red (positive) test lead into the INPUT terminal to the right of the COM terminal.
3. Set the Rotary Switch to
A
A
400A
400A
.
4. Touch the test leads to the circuit under test. With AC voltage, the polarity of the test leads is not a factor.
Note: It is best to touch one of the test leads to ground or neutral first and then touch the 2nd test lead to the hot wire.
5. Read the value of the measurement displayed.
6. Typical AC Voltage measurements include wall outlets, appliance outlets, motors, light fixtures and switches.
5.2 DC VOLTS
A
A
400A
400A
To avoid personal injury or damage to the Meter, do not attempt to measure voltages higher than 600 VDC.
1. Insert the black (negative) test lead into the COM input terminal.
2. Insert the red (positive) test lead into the INPUT terminal to the right of the COM terminal.
3. Set the Rotary Switch to
A
A
400A
400A
.
4. Touch the test leads to the circuit under test. Touch the black (common) test lead to the
negative DC source (ground) first and red (positive) test lead to the “live” source second.
5. Read the value of the measurement displayed. If the leads are reversed a “-“ indicator will appear on the display.
6. Typical DC Voltage measurements include car batteries, automotive switches, motors, and household batteries.
5.3 AC AMPS
A
A
400A
400A
If the fuse burns out during measurement, the meter may be damaged or personal injury may occur. To avoid possible damage
to the meter or to the equipment under test, check the meter’s fuses before measuring current. Use the proper terminals, function,
and range for the measurement. Never place the test leads in parallel with any circuit or component when the leads are plugged
into the current terminals. Do not attempt to measure current exceeding 10A AC. If you are not sure if the current exceeds 10A
do not attempt to measure current with this meter.
1. Insert the black (negative) test lead into the COM input terminal.
2. Insert the red (positive) test lead into the 10A terminal to the left of the COM terminal.
3. Set the Rotary Switch to
A
A
400A
400A
.
4. Press the “SELECT” button until AC is shown on the display.
5. Turn off power to the circuit to be measured.
6. Open the circuit to be measured.
7. Touch the red test lead to one side of the break in the circuit and the black test lead to the other side of the break in the circuit.
For AC Amp measurements the polarity of the leads does not matter.
8. Return power to the circuit.
9. Read the amps on the display.
Note: When measuring AC Amps this meter displays the effective value of the sine wave (mean value response).
When the measured current is <5 amps continuous measurement is acceptable.
When the measured current is 5–10 amps do not exceed 10 seconds of continuous measurement. Wait 15 minutes before performing
additional current measurements. Always turn off power to circuit and remove the leads from the circuit before removing and reinserting
the leads into the meter’s input terminals. Once the measurement is complete, immediately remove the test leads from the circuit under
test and remove the test leads from the input terminals of the meter.