
Use and Care Manual

SSGSB99 Single Stage Gas Snow Blower Instruction Manual
6
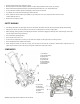
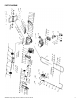
Includes knob (1), and washer
and locknut (2). Install the
bolts from the inside of the
discharge chute assembly so
that the washers and the
locknuts are on the outside of
the chute. Important: Do not
over tighten the locknuts.
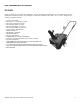
ASSEMBLY
The following items need assembly before use:
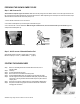
1)
Installing the handle,
ensure the cable is 2) Position
the grip around hook
3) Position
chute assembly
routed to outside of handle as shown.
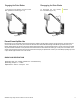
Checking the Control Cable
Check the Control Cable after the first hour, and then adjust it if necessary thereafter. Move the control bar back
towards the handle to remove the slack in the control cable. Important: The Control Cable must contain some
slack when you disengage the control bar to let the rotor blades stop properly. Adjust the Control Cable by
sliding up the spring cover and unhook the spring from the adjuster link. Move to a higher or lower hole on the
adjuster link as needed, in order to obtain the
1/16-inch to 1/8-inch (2 mm to 3 mm) gap between the control
bar and the handle. Note: Moving the Z-fitting higher decreases the gap between the control bar and the
handle; moving
it lower increases the gap. Hook the spring to the adjuster link and slide the spring cover over
the adjuster link.
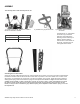
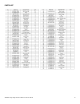
Quantity: 2
Oval-head bolts (#1)
Quantity: 2
Curved washers
Quantity: 2
Handle knobs (#2)