Micro-Computer Induction Cooktop SR-1885SS INSTRUCTION MANUAL Thank you for your purchase. Please read thoroughly before initial use and keep in a safe place for future reference.
INDEX Important safeguards….…………………………... 2 Specifications………………………………………. 2 Product configuration & Control panel.…………. 3 Operation…………………………………………... 4 Timer setting…………………………………..…... 4 Lock function....……………………………..……... 5 Selecting the proper cookware.………….………. 5 Care and maintenance….………………………… 5 Error code..…………..…………………………….. 6 Troubleshooting……….……………………….….. 6 Warranty…………………………………………….
Read all instructions. Do not touch hot surfaces Close supervision is necessary when any appliance is used by or near children. Unplug from outlet when not in use and before cleaning. Do not operate any appliance with a damaged cord or plug; or after the appliance malfunctions or has been damaged in any way. Return appliance to the Sunpentown for examination, repair or adjustment.
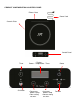
PRODUCT CONFIGURATION & CONTROL PANEL Exhaust Vent Power Cord Ceramic Plate Control Panel Timer Child lock Display: Power – Temperature - Timer • Decreases power / temp • Hour setting for timer. 3 • Increases power / temp • Minute setting for timer.
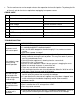
COOK Mode: Heat is constantly added at the selected power level. • 13 COOK levels (wattage): 100,200,300,400,500,650,800,950,1100,1250,1400,1550,1650W (factory default is set at 800W) Note: unit’s lowest possible power is 650 watts, thus the five low power settings (100W, 200W, 300W, 400W and 500W) cannot be actually achieved, but “simulated”: o 100W = 650W intermittently heat for 1 second and stop for 6 seconds. o 200W = 650W intermittently heat for 2 second and stop for 5 seconds.
TIMER SETTING 1. Turn unit on and set desired operation and level setting. 2. Touch the TIMER key, display will show default [00:00] and Timer indicator will illuminate. 3. Touch - button to set the hour and + button to set the minute. Max is 9 hours and 59 minutes. Each touch is increment of 1 hour or 1 minute; touch and hold for 3 seconds for quick adjustment. 4. After setting, touch TIMER key again to confirm or wait until the display stops flashing. 5.
The fan continues to run for couple minutes after operation for heat dissipation. To prolong the life of the unit, wait for the fan to stop before unplugging from power source.
Your Guarantee If this product is found to be faulty as a result of faulty materials or workmanship within one year from date of purchase, it will be repaired free of charge. This guarantee is subject to the following terms: • Sunpentown must be notified of the fault. • Proof of purchase must be presented to Sunpentown’s nominated representative. • The warranty will be void if the product if modified, misused or repaired by an unauthorized person.