
Use and Care Manual


Preventive Maintenance and Troubleshooting Guidelines for Class 9013F and 9013G Pressure Switches 9013DB0701
Troubleshooting 12/2007
© 2007 Schneider Electric All Rights Reserved4
Troubleshooting
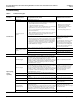
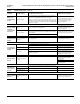
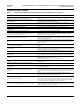
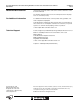
Table 2: Troubleshooting Tips
Condition Possible Causes Description/Corrective Action
Corrective Procedure for
Qualified Service Personnel
No water flow
Power is off Confirm that the power is on. —
No water in pressure
system
Confirm the pressure tank pressure reading.
A. If the pressure is below cut-in, and the switch has low pressure cut-
out (Form M4), hold lever in the Run position.
• Marginal or low producing well
• The pump may exceed well
capacity. Restrict pump output or
install smaller pump.
• Check the pumping water level.
1. The pump should turn on and run.
2. When you release the lever, if the M4 feature cuts out the pump
again (within 10 psi of cut-in), the water source is low.
3. Do not actuate the M4 lever again until source has recharged
(the well has water in it).
B. Where Form M4 is not present, check the water source. The well
may be low. Turn off the power to the pump until source has
recharged (the well has water in it).
C. The line to the pressure switch may be plugged, so that the switch
cannot read tank pressure. Check the tank pressure. If it is below
cut-in pressure setting, complete Steps 1–6 of “Providing Routine
Maintenance” on page 1. Look at the contacts to confirm that the
contacts are closed. Complete remaining steps in “Providing
Routine Maintenance” on page 1.
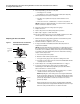
1. Remove the pressure switch from the
pipe and confirm that the entry to the
diaphragm is free of silt and
obstructions.
2. Confirm that any check valves in the
system between the source and the
pressure tank are functioning properly.
3. Confirm that pressure reading at the
pressure switch accurately reflects the
pressure in the pressure tank.
Switch contacts severely
burned
Insects or objects may have entered the space between the contacts.
Remove nests or other havens for insects or vermin near the switch.
Replace the contacts.
The pump is too large. Add a contactor designed for the load.
The application requires a switch with heavy duty contacts.
Replace the switch. Use higher hp
rating.
Rapid cycling
(erratic
operation)
Tank waterlogged
For pre-charged tanks, check the bladder or air valve for leaks and
check tank pressure. If it is below cut-in pressure setting, complete
Steps 1–5 of “Providing Routine Maintenance” on page 1.
Drain some air from the compressed air valve stem. If water comes out,
the bladder is leaking. Completely drain the bladder and recharge with
air as required. Complete the remaining procedures in “Providing
Routine Maintenance” on page 1.
Replace or repair the pressure tank.
Tank not charged
For pre-charged tanks, check the bladder or air valve for leaks and
check the tank pressure. If it is below cut-in pressure setting, complete
Steps 1–5 of “Providing Routine Maintenance” on page 1.
Drain some air from the compressed air valve stem. If water comes out,
the bladder is leaking. Completely drain the bladder and recharge with
air as required. Complete the remaining procedures in “Providing
Routine Maintenance” on page 1.
1. Replace or repair the pressure tank.
2. For conventional tanks, check air
volume control for proper operation.
Drain and recharge tank. Clean or
replace any faulty parts.
Diaphragm damaged
During routine maintenance (see “Providing Routine Maintenance” on
page 1) water is found leaking around diaphragm.
Replace the diaphragm.
Undersized tank
Restrict water usage. Limit the number of devices in operation at any
one time.
Install a larger tank.
Major leak in service lines
Visible water or wet spots may be present. The pump runs, but the tank
is slow to fill.
Check for leaks. Replace damaged
pipes or repair leaks.
Faulty check valve (open) In some systems, water can flow back into the well, emptying the tank.
Check for leaking or open check valve.
Replace if defective.
Foreign material
(calcium deposits)
The line to the pressure switch may be plugged and the switch cannot
read the tank pressure.
Check the tank pressure. If it is below cut-in pressure setting, complete
Steps 1–5 of “Providing Routine Maintenance” on page 1. Look at the
contact plate to confirm that the contacts are closed. Complete the
remaining procedures in “Providing Routine Maintenance” on page 1.
There may be a block in the line
allowing the pressure switch to see high
pressure all the time.
No holding tank — Install a properly sized holding tank.