MAX-E-GLAS IITM and DURA-GLAS IITM CENTRIFUGAL PUMPS WITH INTEGRAL TRAP O W N E R’ S M A N U A L INSTALLATION, OPERATION & PARTS Series P4E, P4EA, P4R, and P4RA See Page 2 for Model Numbers This manual should be furnished to the end user of this pump; its use will reduce service calls and chance of injury and will lengthen pump life.
‘P4R’ and ‘P4E’ SERIES II PUMP WITH TRAP To avoid unneeded service calls, prevent possible injuries, and get the most out of your pump, READ THIS MANUAL CAREFULLY! The Sta-Rite ‘P4R’ and ‘P4E’ Series II Self-priming Centrifugal pumps: • Are designed for use with swimming pools or as centrifugal pumps. • Are excellent performers; durable, reliable. Table of Contents Safety Instructions ........................................................................................3 Installation.....................
IMPORTANT SAFETY INSTRUCTIONS Always follow basic safety precautions with this equipment, including the following. To reduce the risk of injury, do not permit children to use this product unless they are closely supervised at all times. This pump is for use with permanently installed pools and may also be used with hot tubs and spas if so marked. Do not use with storable pools.
Figure 1 Have enough ventilation to maintain air temperature at less than the maximum ambient temperature rating (Max. Amb.) listed on the motor model plate. If this pump is installed in an enclosure/pump house, the enclosure must have adequate ventilation and air circulation to keep the temperature in the enclosure at or below the motor’s rated ambient temperature whenever the pump is running. Be solid - Level - Rigid - Vibration free - Non-combustible.
Piping: Use at least 2" IPS PVC (51mm) pipe. Increase size if a long run is needed. To avoid strains on the pump, support both suction and discharge pipes independently. Place these supports near the pump. To avoid a strain left by a gap at the last connection, start all piping at the pump and run pipe away from the pump. Never use a suction pipe smaller than pump suction connection. To avoid airlocking, slope suction pipe slightly upward toward the pump.
Testing and Certification Suction outlet covers must have been tested by a nationally recognized testing laboratory and found to comply with the latest ASME/ANSI Specification for Suction Fittings For Use in Swimming Pools, Spas, Hot Tubs, and Whirlpool Bathtub Applications. Outlets Per Pump NOTICE: 3 phase models require magnetic motor starters and external overload protection. If in doubt about the procedure, consult a licensed electrician.
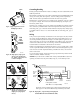
Grounding/Bonding BONDING LUG GREEN GROUND SCREW 510 0993 Figure 3: Typical ground screw and bonding lug locations. Blue Install, ground, bond and wire motor according to local or National Electrical Code requirements. Permanently ground motor. Use green ground terminal provided under motor canopy or access plate (See Figure 3); use size and type wire required by code. Connect motor ground terminal to electrical service ground. Bond motor to pool structure. Use a solid copper conductor, size No.
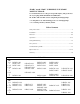
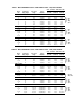
TABLE I - RECOMMENDED FUSING AND WIRING DATA – P4E, P4EA MODELS Serv. to Motor - Dist. in Ft. (M) Motor HP Branch Fuse Rating Amps* P4E Models: 3/4 1 1 1-1/2 2 2 3 3 P4EA Models: 1 1-1/2 1 1-1/2 1-3/4 2 2-1/2 P4E62 Models: 3/4 3/4 1 1-1/2 2 3 Max Load Amps Voltage/ Hz/Phase 0-100' (0-30 M) 101-200' 201-300' (30-60 M) (60-90 M) 20 25 15 15 15 15 15 25 13.8 16.0 8.0 10.4 11.2 1.5 3.4 15.
OPERATION NEVER run pump dry. Running pump dry may damage seals, causing leakage and flooding. Fill pump with water before starting motor. Before removing trap cover: 1. STOP PUMP before proceeding. 2. CLOSE GATE VALVES in suction and discharge pipes. 3. RELEASE ALL PRESSURE from pump and piping system. 4. NEVER tighten or loosen clamp while pump is operating! If pump is being pressure tested, be sure pressure has been released before removing trap cover. Do not block pump suction.
3. Remove strainer basket and clean. Be sure all holes in basket are clear, flush basket with water and replace in trap with large opening at pipe connection port (between ribs provided). If basket is replaced backwards cover will not fit on trap body. 4. Clean and inspect lid O-Ring; reinstall on trap cover. 5. Clean O-Ring groove on trap body and replace lid. To help keep lid from sticking, tighten hand tight only (no wrenches!). 6. Prime pump (see priming instructions). Draining Pump 1.
Startup For Winterized Equipment 1. Remove any temporary weather protection placed around system. 2. Follow filter manufacturer’s instructions for reactivation of the filter. 3. Inspect all electrical wiring for damage or deterioration over the shutdown period. Have a qualified serviceman repair wiring as needed. 4. Inspect and tighten all watertight connections. 5. Open all valves in suction and return piping. 6. Remove any winterizing plugs in piping system. 7. Drain all antifreeze from system. 8.
7. Unscrew impeller from shaft (turn counterclockwise when facing it). NOTICE: On models with impeller screw: Remove impeller screw (left hand thread - turn clockwise) and gasket before removing impeller. Inspect gasket for damage, cracks, etc. Replace if damaged. 8. Pull rotating member of seal off of impeller sleeve; clean sleeve. 9. Remove four screws holding seal plate to motor. 10. Place seal plate face down on flat surface and tap out ceramic seat. 11.
TROUBLESHOOTING GUIDE Read and understand safety and operating instructions in this manual before doing any work on pump! Only qualified personnel should electrically test pump motor! FAILURE TO PUMP; REDUCED CAPACITY OR DISCHARGE PRESSURE Suction leaks/lost prime: 1. Pump must be primed; make sure that pump volute and trap are full of water. See priming instructions, Page 9. 2. Make sure there are no leaks in suction piping. 3.
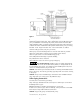
P4E, P4EA and P4E62 SERIES MAX-E-GLAS II POOL PUMP 3/4 through 3 HP Models 2A 1 3 2 4 5 6 8 16 1860 0795 9 7 17 24 10 14 10A 11 15 18 12 23 19 13 14 20 22 21
P4E, P4EA and P4E62 SERIES REPAIR PARTS LIST 15 Key No. Part Description 1 2 2A 3 4 5 Motor #10-32x1/2” Screw Lock Washer Bonding Lug Water Slinger Seal Plate Kit (Incl. Key Nos. 6, 7)# O-Ring Shaft Seal† Clamp Knob Clamp Impeller Impeller Screw Assembly Diffuser Diffuser O-Ring #8 Lock Washer Screw (w/C1-271P Diffuser) Screw (w/C1-271P1 Diffuser) Tank Body Trap Cover Trap O-Ring Basket 1/4” NPT Drain Plug Base Screw Base Washer Base w/Motor Pad** Motor Pad 3/8-16x1” Hex Hd.
P4R and P4RA SERIES DURA-GLAS II POOL PUMP 1 through 2-1/2 H.P. Models 1 2 3 4 6 1860 0795 NL 14 7 5 15 22 8 8A 9 13 16 10 21 11 12 18 17 19 20 REPAIR PARTS LIST Key No. Part Description 1 2 3 4 5 6 7 8 8A 9 10 11 12 13 14 15 16 17 18 19 20 21 22 • • • • • • Motor Water Slinger Seal Plate (includes Key Nos.
2A 1 P4R SERIES DURA-GLAS II POOL PUMP 208-230/460V 3 Phase Models 3 2 4 5 6 8 16 1860 0795 9 7 17 24 10 10A 11 15 18 12 Models P4R6D3-186 P4R6E3-187 P4R6F3-188 P4R6G3-189 P4R6H3-190 23 19 13 14 20 22 21 REPAIR PARTS LIST Key No. Part Description 1 2 2A 3 4 5 6 7 8 9 10 10A 11 12 13 14 15 16 17 18 19 20 21 22 23 24 • • • • Motor #10-32 x 1/2” Screw Lock Washer Bonding Lug(#) Water Slinger Seal Plate (includes Key Nos.
2A 1 P4R SERIES DURA-GLAS II POOL PUMP 200/400V 3 Phase Models 3 2 4 5 6 8 16 1860 0795 9 7 17 24 10 10A 11 15 18 12 Models P4R62D3-186 P4R62E3-187 P4R62F3-188 P4R62G3-189 23 19 13 14 20 22 21 REPAIR PARTS LIST Key No. Part Description 1 2 2A 3 4 5 6 7 8 9 10 10A 11 12 13 14 15 16 17 18 19 20 21 22 23 24 • • • • Motor #10-32 x 1/2” Screw Lock Washer Bonding Lug Water Slinger Seal Plate (includes Key Nos.
STA-RITE LIMITED WARRANTY Pumps, filters, skimmers, underwater lights (except bulbs), accessories and fittings manufactured by Sta-Rite are warranted to be free of defects in material and workmanship for one (1) year from date of installation. Year from date Product specific warranties: of installation HRPB, DEPB, System 3, System 2 and Posi-Clear Tanks . . . . . . . . . . . . . . . . . . . . . . . . . . . . . . . . . .10 years Internal filter components and valves . . . . . . . . .