
Installation Instructions
5
ROOF SURFACE PREPARATION
RoofKit Rubber Roong Membrane will adhere to insulation
boards compatible with RoofKit adhesives (this does not include
polystyrene insulation). The roof membrane will also adhere to
plywood, OSB (Oriented Strand Board), one-half inch (1/2")
high-density wood berboard, and concrete. If polystyrene
insulation is used, cover the insulation with one-half inch
(1/2") high-density wood berboard. Butt all insulation boards
together, staggering all of the joints. All spaces larger than 1/4"
must be lled to provide a uniform, smooth surface.
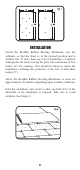
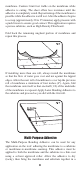
Fastening Screws and Plates shall be applied at the minimum
rate of ten (10) per 4 ft. x 8 ft. board of insulation, and ve (5) per
4 ft. x 4 ft. board, or as required by the insulation manufacturer.
When installing insulation around the perimeter, the fastening
pattern is one (1) fastening screw and plate every two (2) square
feet (16 per 4 ft. x 8 ft. board). Examples of fastening patterns
are shown in Figure 1.
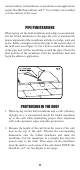
NOTE: Extra fastening screws should be installed around
protrusions such as pipes, chimneys, skylights and irregularities
in the roof deck.
Do not install more than can be covered with RoofKit Rubber
Roong Membrane by the end of the day.
Re-roong over a wet substrate is not a good roong practice.
All wet materials should be removed and replaced prior to the
installation of new materials.
The roof surface must be dry. Moisture will cause poor
membrane adhesion and blistering.
The roof surface should be swept to remove dirt, dust and other
loose particles.
Good roong practice dictates that the roof surface must have
positive drainage of at least 1/8" in 12 inches.
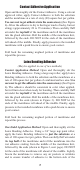
Be certain at this point to install RoofKit 6" x 50' Rein-
forced Strip at the base of any roof angle changes such
as parapet walls, transition to sloped roofs, chimneys,
skylights, etc.