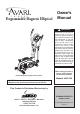
Programmable Magnetic Elliptical Owner's Manual ! WARNING Exercise can present a health risk. Consult a physician before beginning any exercise program with this equipment. If you feel faint or dizzy, immediately discontinue use of this equipment. Serious bodily injury can occur if this equipment is not assembled and used correctly. Serious bodily injury can also occur if all instructions are not followed. Keep others and pets away from equipment when in use.
TABLE OF CONTENTS Safety Instructions ...................................... 2 Before You Begin ........................................ 4 Equipment Warning, Caution & Notice Labels ... 5 Hardware Identification Chart .................... 6 Assembly Instructions ................................ 7 Set Up Instructions .................................... 13 Usage Guide ............................................... 14 Operational Instructions ........................... 15 Computer Instructions .............
Call Us First Customer Service 1 (800) 375-7520 www.staminaproducts.com THANK YOU FOR PURCHASING THE AVARI® Programmable Magnetic Elliptical To enact your warranty, please register your product by going to register.staminaproducts.com To help you get started, we have pre-assembled most of your AVARI® Programmable Magnetic Elliptical at the factory with the exception of those few parts left unassembled for shipping purposes. Simply follow the few assembly instructions set forth in this manual.
BEFORE YOU BEGIN T h a n k y o u f o r c h o o s i n g t h e AVA R I ® Programmable Magnetic Elliptical. We take great pride in producing this quality product and hope it will provide many hours of quality exercise to make you feel better, look better, and enjoy life to its fullest. It's a proven fact that a regular exercise program can improve your physical and mental health. Too often, our busy lifestyles limit our time and opportunity to exercise.
EQUIPMENT WARNING, CAUTION & NOTICE LABELS This chart is provided to help identify the warning, caution, and notice labels on the AVARI® Programmable Magnetic Elliptical. Please take a moment to familiarize yourself with all of the warning, caution, and notice labels.
HARDWARE IDENTIFICATION CHART This chart is provided to help identify the hardware used in the assembly process. Place the washers or the ends of the bolts or screws on the circles to check for the correct diameter. Use the small scale to check the length of the bolts and screws. 3/16" 1/4" 5/16" 3/8" 1/2" INCHES 0 0 1/2 10 1 20 1/2 30 40 2 50 1/2 60 3 70 1/2 80 90 4 1/2 5 8 10 6 100 110 120 130 140 150 MILLIMETERS 6 1/2 in. mm.
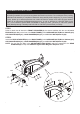
ASSEMBLY INSTRUCTIONS Place all parts from the box in a cleared area and position them on the floor in front of you. Remove all packing materials from your area and place them back into the box. Do not dispose of the packing materials until assembly is completed. Read each step carefully before beginning. If you are missing a part, please go to staminaproducts.com under the Service section and order the part needed, e-mail us at customerservice@staminaproducts.
ASSEMBLY INSTRUCTIONS STEP 3 Slide the UPRIGHT SLEEVE(88) over the UPRIGHT(4). Connect the EXTENSION CONTROL WIRE(28) to the CONTROL WIRE(96). Insert the UPRIGHT(4) into the MAIN FRAME(1) and secure with BUTTON HEAD BOLTS(M8x1.25x88mm)(48), BUTTON HEAD BOLTS(M8x1.25x20mm)(52), LOCK WASHERS(M8) (68), WASHERS(M8)(65), ARC WASHERS(M8)(62), and NYLOCK NUTS(M8x1.25)(70). Slide down the UPRIGHT SLEEVE(88) to cover the bolt heads. STEP 4 Attach the TRAY(87) to the UPRIGHT(4) with ROUND HEAD SCREWS(M4x30mm)(59).
ASSEMBLY INSTRUCTIONS STEP 5 Slide the PIVOTING ARMS(6) onto the SHAFT on the UPRIGHT(4) on both sides and secure with WASHERS(M8)(65), LOCK WASHERS(M8)(68), and BUTTON HEAD BOLTS(M8x1.25x20mm)(52). STEP 6 There is a tie on the lower end of the PIVOTING ARM(6) at right side to keep the parts in place during shipping. Use scissors to cut the tie. Slide the lower end of the PIVOTING ARM(6) into the bracket on the PEDAL ARM(5), and secure with BUTTON HEAD BOLT(M10x1.
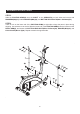
ASSEMBLY INSTRUCTIONS STEP 7 There is a “R” decal on the RIGHT HANDLEBAR(9), and a “L” decal on the LEFT HANDLEBAR(10). Refer to detail view B. Feed the plug end of the PULSE SENSOR WIRE(30) through the tube on the top of the PIVOTING ARM(6). Insert the LEFT HANDLEBAR(10) into the PIVOTING ARM(6) and secure with BUTTON HEAD BOLTS(M8x1.25x36mm)(50) and THIN NYLOCK NUTS(M8x1.25)(71). Connect the PULSE SENSOR WIRE(30) to the PULSE CONNECTION WIRE(29) and push the plugs into the PIVOTING ARM(6).
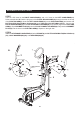
ASSEMBLY INSTRUCTIONS STEP 9 There is a “R” decal on the RIGHT PEDAL CAP(78), and a “L” decal on the LEFT PEDAL CAP(79). Attach the RIGHT PEDAL CAP(78) to the PEDAL ARM(5) on the right side with the LOCKING KNOBS(77), WASHERS(M10)(63), and CARRIAGE BOLTS(M10x1.5x50mm)(45). Repeat on the left side. NOTE: You can loosen the LOCKING KNOBS(77) to adjust the PEDAL CAPS(78, 79) to the front or back. Securely tighten the LOCKING KNOBS(77) after adjustment.
ASSEMBLY INSTRUCTIONS STEP 11 Attach the FRONT and BACK PIVOT COVER(7, 8) to the LEFT HANDLEBAR(10) and PIVOTING ARM(6) with SMALL ROUND HEAD SCREWS(M4x35mm)(57). Repeat on the right side. STEP 12 Refer to detail views E and F. Attach the RIGHT and LEFT PEDAL ARM COVERS(91, 92) to the PEDAL ARMS(5) on both sides with SMALL ROUND HEAD SCREWS(M4x20mm)(58). STEP 13 Attach the CONNECTOR COVERS(89) to the PEDAL ARM CONNECTORS(14) on both sides with SMALL ROUND HEAD SCREWS(M5x0.8x10mm)(56).
SET UP INSTRUCTIONS Place the AVARI® Programmable Magnetic Elliptical in the area where it will be used. It is recommended that the AVARI® Programmable Magnetic Elliptical be placed on an equipment mat. The maximum operation dimensions of the AVARI® Programmable Magnetic Elliptical are approximately 52.6 inches long x 25.4 inches wide x 57 inches tall. (These dimensions may vary up to one inch.
AVARI® Programmable Magnetic Elliptical This monitor has extra features that will help you track your progress to keep you motivated. Complete monitor instructions are on pages 16-24.
OPERATIONAL INSTRUCTIONS PEDAL CAP ADJUSTMENT The position of the PEDAL CAPS(78, 79) can be adjusted by loosening the LOCKING KNOBS(77) and adjust the PEDAL CAPS(78, 79) to the front or back. Securely tighten the LOCKING KNOBS(77) after adjustment. Always set the PEDAL CAPS(78, 79) at the same position on both sides. Start with the center position and adjust if necessary. Use the back position if users are taller than average. Use the front position if users are shorter than average.
COMPUTER INSTRUCTIONS Your AVARI® Programmable Magnetic Elliptical utilizes a magnetic braking system to create resistance for your workout. You control the amount and pattern of this resistance by means of the advanced computer console mounted at the center of the Handrails. We recommend that you use this computer console to vary your workout from session to session and note your progress toward your fitness goals.
COMPUTER INSTRUCTIONS LCD DISPLAY INSTRUCTIONS Displays flashing “0:00” for presetting the program time during setup, from 1:00 to 99:00, and counts down from the preset value. If no value is preset, displays the time during exercise, from 1 second up to 99:59 minutes. Displays the current speed from zero to 99.9 miles per hour. Displays the rotations per minute (RPM) of the crank from zero to 999 RPM. NOTE: The SPEED and RPM display will switch every 6 seconds while exercising.
COMPUTER INSTRUCTIONS PROGRAM DESCRIPTIONS This computer contains 19 different programs. You can preset the program time and the computer will divide the time into 20 intervals. If you do not set the program time in advance, the computer will use the preset distance 0.1 mile for each interval to run the program. (MAN.) MANUAL MANUAL PROGRAM: Program “MAN.” is a manual program allowing the user to have full manual control of the workload. Turn the UP/DOWN dial to increase or decrease the load.
COMPUTER INSTRUCTIONS (H.R.C.) HEART RATE CONTROL HEART RATE CONTROL PROGRAMS: There are four preset automatic heart programs, 55%, 75%, 90%, and TAG (Target Heart Rate). You must always hold the Pulse Sensors on the Handlebar with both hands when using the heart programs. You must input your age for determining your Maximum Heart Rate. Heart Rate Control Program Heart Rate Control Program: The program allows you to select the percentage of your Maximum Heart Rate you desire, 55%, 75%, and 90%.
COMPUTER INSTRUCTIONS COMPUTER OPERATION DESCRIPTIONS DATE / CLOCK SET UP (Only can be done right after the unit is powered on by the ADAPTER(98)). The computer uses the ADAPTER(98) as a power source. The date and clock must be reset anytime when you plug the ADAPTER(98) into an electrical outlet to power on the AVARI® Programmable Magnetic Elliptical. Once power is on, the computer will then display all items on the screen and a “beep” will sound for two seconds.
COMPUTER INSTRUCTIONS OPERATION INSTRUCTIONS B. PRESET PROGRAMS (Program P01 to P12) STEP 1: POWER ON Pedaling or press any button. STEP 2 : SELECT PROGRAM Use the UP/DOWN dial and ENTER button to select the program “PROG” (Preset Programs). After pressing the ENTER button, then you can select the desired preset program, P01 to P12, and the computer will skip to setting mode for presetting the function values.
COMPUTER INSTRUCTIONS D. HEART RATE CONTROL PROGRAMS (Program H.R.C.) STEP 1: POWER ON Pedaling or press any button. STEP 2 : SELECT PROGRAM Use the UP/DOWN dial and ENTER button to select the program “H.R.C.” (Heart Rate Control Programs). After pressing the ENTER button, input your age, from 1 to 99 (if your age was previously entered, the computer will display a flashing age). Then you can select one of the Heart Rate Control Programs, 55%, 75%, 90%, and TAG (TARGET HEART RATE).
COMPUTER INSTRUCTIONS When running the Target Watt Control program, the program will monitor your pedaling speed and adjust the workload automatically to keep your workload as close as possible to the preset target WATT. For example, if the preset Target Watt is 300 and you pedal with proper speed, the display will be as shown in illustration B. There should be no Arrow Indicator appearing on the display. B. The program will adjust the workload automatically.
COMPUTER INSTRUCTIONS PULSE RECOVERY FUNCTION The PULSE RECOVERY function measures how quickly you return to a resting heart rate after exercising. You can use this function to measure improvement as you get into shape. The computer will monitor your heart rate for 60 seconds and calculate a Pulse Recovery value from F1 to F6. F1.0 = Excellent F4.0 = Below Average F2.0 = Good F5.0 = Not Good F3.0 = Fair F6.0 = Poor The readout should only be used as a comparison between workouts.
STORAGE 1. To store the AVARI® Programmable Magnetic Elliptical, simply keep it in a clean dry place. 2. The minimum rest dimensions of the AVARI® Programmable Magnetic Elliptical are approximately 48 inches long x 25.4 inches wide x 60 inches tall. These dimensions may vary. Please measure your AVARI® Programmable Magnetic Elliptical if exact dimensions are needed. 3. Move the AVARI® Programmable Magnetic Elliptical with the moving wheels on the FRONT STABILIZER(3).
CONDITIONING GUIDELINES How you begin your exercise program depends on your physical condition. If you have been inactive for several years or are severely overweight, start slowly and increase your workout time gradually. Increase your workout intensity gradually by monitoring your heart rate while you exercise. Remember to follow these essentials: Have your doctor review your training and diet programs. Begin your training program slowly with realistic goals that have been set by you and your physician.
WARM-UP and COOL-DOWN Warm-Up The purpose of warming up is to prepare your body for exercise and to minimize injuries. Warm up for two to five minutes before strength training or aerobic exercising. Perform activities that raise your heart rate and warm the working muscles. Activities may include brisk walking, jogging, jumping jacks, jump rope, and running in place.
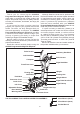
PRODUCT PARTS DRAWING FRONT BACK 28
PARTS LIST PART# 1 2 3 4 5 6 7 8 9 10 11 12 13 14 15 16 17 18 19 20 21 22 23 24 25 26 27 28 29 30 31 32 33 34 35 36 37 38 39 40 41 42 43 44 45 46 47 48 49 50 51 PART NAME QTY Main Frame Rear Stabilizer Front Stabilizer Upright Pedal Arm Pivoting Arm Front Pivot Cover Rear Pivot Cover Right Handlebar Left Handlebar Stationary Handlebar Idler Arm Tension Adjustment Hook Pedal Arm Connector Right Crank Left Crank Magnetic Unit Pulley V-Ribbed Belt Idler Arm Bushing Idler Wheel Control Motor Pulse Sensor Cov
PARTS LIST PART# 52 53 54 55 56 57 58 59 60 61 62 63 64 65 66 67 68 69 70 71 72 73 74 75 76 77 78 79 81 82 83 84 85 86 87 88 89 90 91 92 93 94 95 96 97 98 99 100 101 102 103 104 PART NAME QTY Bolt, Button Head (M8 x 1.25 x 20mm) Bolt, Button Head (M8 x 1.25 x 25mm) Bolt, Button Head (M10 x 1.5 x 50mm) Screw, Round Head (M5 x 0.8 x 16mm) Screw, Small Round Head (M5 x 0.
LIMITED WARRANTY MODEL A550-705 WARRANTY Stamina Products, Inc. warrants that this product will be free from defects in materials and workmanship under normal use, service, proper assembly and proper operation for a period of 90 days on the parts and three years on the frame from the date of the original purchase from an authorized retailer.
NOTES 32
NOTES 33
TO CONTACT CUSTOMER SERVICE For your convenience, Stamina’s customer service representatives can be reached by email at customerservice@ staminaproducts.com or by phone at 1-800-375-7520 (in the U.S.). Our customer service representatives are available Monday through Thursday from 7:30 a.m. until 5:00 p.m., and Friday 8:00 a.m. until 3 p.m. Central Time. ONLINE CUSTOMER SERVICE customerservice@staminaproducts.com www.staminaproducts.