
User's Manual


ASSEMBLY INSTRUCTIONS
10
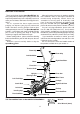
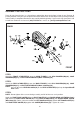
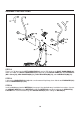
STEP 12
There is an "L" decal on the LEFT HANDLEBAR(81), and an "R" decal on the RIGHT HANDLEBAR(82).
Attach the LEFT and RIGHT HANDLEBARS(81, 82) onto the PIVOTING ARMS(79) with HEX BOLTS
(M6 x 35mm)(74), ARC WASHERS(M6)(71), LOCK WASHERS(M6)(72), and ACORN NUTS(M6)(73).
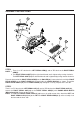
STEP 13
Lubricate the HANDLEBARS(81, 82) with a small amount of liquid soap, then slide the two FOAM GRIPS(83)
onto the HANDLEBARS(81, 82).
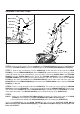
STEP 14
Install an AAA battery into the METER(22). See page 12 for detailed battery installation instructions. Connect
the SENSOR WIRE(23) to the METER(22). Slide the METER(22) onto the bracket on the UPRIGHT(6).
CAUTION: Be careful not to damage the SENSOR WIRE(23) when sliding the METER(22).
R
L