User ’s manual User ’s manual STAR PROPELLER User's manual STAR PROPELLER STAR PROPELLER Net weight KGS. LBS. WARNING : Read and follow these instructions carefully and be mindful of all warnings shown throughout.
READ AND SAVE THESE INSTRUCTIONS WARNING : TO REDUCE THE RISK OF FIRE, ELECTRICAL SHOCK, OR INJURYS, PLEASE OBSERVE THE FOLLOWING : 1]. To ensure the success of the installation, be sure to read the instructions and review the diagrams thoroughly before beginning. 2]. To avoid possible electric shock, be sure electricity is turned off at the main power box before wiring. All electrical connections must be made in accordance with local codes, ordinances and/or the National Electric Code.
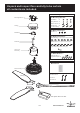
Unpack and inspect fan carefully to be certain all contents are included.
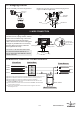
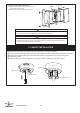
WARNING: blades should be at least 7 feet from floor Note 1: Note 2: Use metal outlet box suitable for fan support. Outlet box must support 35 lbs min. Turn off power at breaker box to avoid possible electrical shock. OFF OFF OFF 1. HANGING SYSTEM INSTALLATION 1A.Installing mounting bracket to ceiling outlet box 1 Install mounting bracket to outlet box in ceiling by using screws included with the outlet box and washers from the hardware bag. 2 Loosen the bottom screws from Mounting Bracket.
1C. Hanging the fan Lift fan assembly onto Mounting Bracket. Rotate fan to let the groove on the ball engages the ridge in the Mounting Bracket. Mounting Bracket Mounting Bracket Ridge Ball Groove 2. WIRE CONNECTION 2A. Attaching safety cable to ceiling joist Use wood screw, spring washer, and flat washer from hardware bag. Pass wood screw through closed loop of safety cable. Secure wood screw to ceiling joist through any available slot on mounting Mounting Bracket bracket.
AFTER ALL WIRES ARE CONNECTED: ( 1 ) Attach wall control unit to outlet box using the two 6-32 screws provided. ( 2 )Attach wall plate to the switch control front. SPEED CONTROL OUTLET BOX SCREW ! WARNING To avoid possible fire or shock, make sure that the electrical wires are completely inside the outlet box and not pinched between the wall plate and the wall.
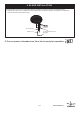
4. BLADE INSTALLATION Attach blades to motor by using Plastic Bushing & Blade screws provided in the hardware bag. (* Repeat this step for every blade until the 3 blades are installed firmly. Do not tighten the screws too hard to prevent harming the wood.) Blade(3) Plastic Bushing Blade Screw L Type Small Screw Driver (Hexagon) 5.Turn on power at breaker box,Your fan is ready for operation. P6 www.starfans.
info@starfans.co www.starfans.