
Owner's Manual
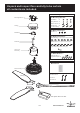

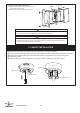


Mounting
Bracket
Lift fan assembly onto Mounting Bracket.
Rotate fan to let the groove on the ball engages the
ridge in the Mounting Bracket.
1C. Hanging the fan
Ridge
Ball Groove
Mounting
Bracket
P4
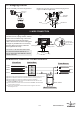
2. WIRE CONNECTION
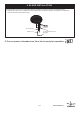
2A. Attaching safety cable to ceiling joist
Safety Cable
Safety
cable
Flat Washer
Spring Washer
Wood Screw
Outlet Box
Use wood screw, spring washer, and flat
washer from hardware bag. Pass wood
screw through closed loop of safety
cable. Secure wood screw to ceiling joist
through any available slot on mounting
bracket. Make sure safety cable has
beentightened securely.
CAUTION: THE WOOD SCREW AND
ITS SUPPORT MUST BE ABLE TO
FULLY SUPPORT THE WEIGHT OF AT
LEAST 100 LBS.
Canopy
Mounting Bracket
2B.Make wire connection - for Wall Controller
White
Green
( Motor - N )
( Motor - L )
Black
( from downrod )
Green
( AC - L )
( AC - N )
From Fan
From House
1 Connect two green wires from fan and green wire from house by wire nut.
2 Connect white wire from fan and white wire from house by wire nut.
3 Connect black wire from fan and black wire from outlet box.
4 Connect black wire from outlet box and black wire from wall control
marked ”To FAN” by wire nut.
5 Connect black wire from wall control marked ”To HOT” and black wire
from House by wire nut.
6 Connect green/yellow wire from wall control and green wire from
House by wire nut.
White
Black
TO HOT
TO FAN
Wall Controller
Outlet Box
1
2
3 4 5
( from mounting bracket )
Green
Green / Yellow
6
www.starfans.co