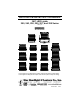
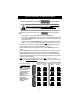
INSTALLATION AND INSTRUCTION MANUAL 360° LED Lights 200, 240, 250, 255, 257, and 258 Series featuring the 200SHL/200SH8L SERIES 200BHL/200BH8L SERIES 255/257/258 "S" Series 240HSL / 240H8SL Series 240HSFL / 240H8SFL Series 250HSL / 250H8SL Series 255/257/258 "C" Series 240HCL / 240H8CL Series 240HCFL / 240H8CFL Series 250HCL / 250H8CL Series 255/257/258 "A" Series 240HAL / 240H8AL Series 240HAFL / 240H8AFL Series 250H8AL Series All 4-LED lights are non-rotating with the exception of the 258
Magnet Mounting If you are mounting the light on the roof of your vehicle, take extreme care to ensure that the magnet is firmly seated on your roof, and that the pull of the magnet is sufficient to secure the light in place. As the composition of the metal in the roofs of different vehicles may vary, as well as the contour, texture and/or condition, Star cannot guarantee the ability of the light to remain in place upon a moving vehicle.
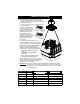
(Perm Mount Cont’d) 8. After the holes have been drilled, push the enclosed rubber well nuts through the outer holes until the bottom side of the wider lip rests on the surface of the vehicle. 9. Place the light on the surface of the vehicle, routing the wires through the center hole, if applicable, align the holes with the well nuts, install the screws through the base, into the well nuts, and tighten until snug. Wiring Instructions CAUTION: All of our DC powered warning lights are polarity sensitive.
Pattern Programming 1. Set the flash pattern using any of the following: • Green wire (permanent mount versions only) • Pattern Select switch on the cig plug (single color mag mount versions) • Internal jumper (dual color mag mount versions). 2. Power up the light by connecting the red and black wires or by plugging the cig plug into a powered outlet and activating the Power switch. For dual color lights, the cig plug will have two Power switches.
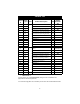
Pattern List Flash Pattern Pattern Phase Type # 1 K Pattern Description Flicker † CPS 1 2 L Fast Doubleflash 3.3 3 M Tripleflash † 2.5 N A5 O A6 PSU Flicker (Non-Rotating Models) CCW Rotation 1 (Rotating Models) † PSU Random (Non-Rotating Models) CCW Rotation 2 (Rotating Models) 0.7 1.3 0.6 2.7 4 5 6 F 1 Quadflash †‡ 7 G Quadflash w/Post-Pop †‡ 1 H Singleflash †‡ 1 9 I Doubleflash †‡ 1 10 J Variable AKA Delta-Omega 0.3 11 C Post pop 1.4CPS † 1.4 12 E Random 0.4CPS 0.
Synchronization of Multiple Lights (Permanent Mount Versions Only) You can synchronize up to six total approved lights. If you will be synchronizing two or more units together, leave the white wires disconnected until programming for each has been completed. Connect the white wires from the units together ONLY AFTER PROGRAMMING them all for the same Pattern Type (Phase MAY differ).
Photocell (255TCL-TX only) 255HTCL-TX-* Models Only The 255HTCL-TX versions have a built in photocell that can detect the ambient light and automatically switch the light between high power (day mode) and low power (night mode). Please note: By default the 255HTCL-TX-* light is set to auto-switch between Day and Night mode. To change this, proceed below. To Deactivate Day/Night Auto-Switching: 1. Activate the light. 2. Apply +12V to the White wire. 3. Hold Green wire to Ground for 3 sec.
Service These lights use state-of-the-art Light Emitting Diode (LED) technology. These warning lights are comprised of ultra-high intensity LEDs that are controlled by a solid state flasher unit to efficiently produce light output with lifetimes up to 100,000 hours. Under normal circumstances, you will not need to replace any LEDs in this light. If any of the LED's in your light do fail, please contact your distributor for arrangements to have them repaired.