
Owner manual


-1-
Magnet Mounting
If you are mounting the light on the roof of your vehicle, take extreme care to ensure that the magnet is
firmly seated on your roof, and that the pull of the magnet is sufficient to secure the light in place. As
the composition of the metal in the roofs of different vehicles may vary, as well as the contour, texture
and/or condition, Star cannot guarantee the ability of the light to remain in place upon a moving vehicle.
It is the sole responsibility of the owner to ensure the warning light is secure.
WARNING!!!! Care should be taken when positioning any warning light on the roof,
dash, or instrument panel of the vehicle, so that the light and/or cord
does not interfere with the proper operation of any airbags! Failure to
heed this warning may result in serious or fatal injury.
• CAUTION: Please be sure to check that your cigarette plug outlet is properly fused.
Testing the light before this fuse is properly installed will void the warranty on
the light.
• Once the light is secured, route your cord such that it does not interfere with the
vision of the driver or the operation of any controls, including, but not limited to, the
steering wheel, gear shifter, and/or airbag.
• This light has been factory tested and approved. If the light fails to work when the
plug is inserted into the cigarette plug socket, twist the plug a few times to remove
any ash or other deposits which might be preventing a good contact from being
made. If the problem persists, check for a fuse inside of the plug itself. If present,
remove the fuse from the circuit, check to see if it has blown, and clean the lighter
socket and contact surfaces. Reconnect the fuse and test the light again.
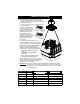
Permanent Mounting
1. CAUTION: All of our DC powered warning lights are polarity sensitive. These lights
are polarity protected only if the appropriate fuse is used. All wires connected to the
positive terminal of the battery should be fused at the battery for their rated load.
Testing the light before this fuse is properly installed will void the warranty on
the light.
2. Your new warning light comes complete with a foam mounting gasket, mounting
screws, lock washers, and well nuts.
3. If you will be utilizing a flange mount base, please skip to Step 6.
4. Many of these warning lights come equipped with a combination base, allowing the
light to be either mounted on threaded conduit pipe or permanently mounted. For NPT
pipe, mount the light using the threaded entrance hole in the base of the light, then skip
to the Wiring Instructions. For the permanent mount, proceed to Step 5.
5. Carefully remove either the clamp ring or the three or four screws near the base of the
lens and lift off the lens (simply unscrew the dome for the 255 series). Examine the
inside of the base and use a punch or drill to remove the knock-outs present.
6. Next, you will need to drill the holes in your mounting surface. Place the gasket in the
exact position the light is to be mounted, and mark the holes on the mounting surface.
(NOTE: You might have to stretch the gasket slightly to find the location of the holes in
the gasket.) Take care to ensure that the gasket does not move while you are marking
each of the holes. Be sure to mark the center hole if you will be running your wires
through the mounting surface.
7. Remove the gasket and drill your holes using an appropriate 3/8" drill bit.
CAUTION: If you are mounting the light on a vehicle, and plan to wire it through the
roof of the vehicle, remove the headliner from the inside of the vehicle. If you do not
remove the headliner, take care so that you do not drill through it.