
Owner manual


-2-
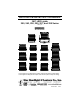
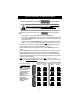
GOOD
CHASSIS
GROUND
BLACK
WHITE: Synchronization Wire
GREEN: Pattern Select - Touch and release to Ground
PURPLE: High/Low Power Select (Ground for Low/Open for High)
(Purple wire only on single color lights)
SWITCH
SWITCH
ORANGE: Power for secondary color
RED: Power for light (primary color)
5 AMP
FUSE
5 AMP
FUSE
+12 VDC
+12 VDC
(Orange wire only
on dual color lights)
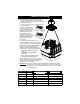
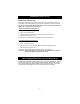
High/Low Power Settings (single color lights only)
There are 3 modes these lights can be set to work in:
• Constant High Power
• Constant Low Power
• Manually Switched High/Low Power
By default all single color lights are set up for Manually Switched High/Low
power. This means that you can use the Purple wire to control whether the
light operates under high power (day mode) or low power (night mode):
• High Power Only:
Cut the Purple wire short
and tape it off.
• Low Power Only:
Connect the Purple wire to
Ground.
• Manually Switched
High/Low Power:
Connect the Purple wire to
Ground through a switch.
(Perm Mount Cont’d)
8. After the holes have been drilled, push the enclosed rubber well
nuts through the outer holes until the bottom side of the wider lip
rests on the surface of the vehicle.
9. Place the light on the surface of the vehicle, routing the wires through the center hole, if
applicable, align the holes with the well nuts, install the screws through the base, into
the well nuts, and tighten until snug.
Wiring Instructions
CAUTION: All of our DC powered warning lights are polarity sensitive. These lights are
polarity protected only if the appropriate fuse is used. All wires connected to the
positive terminal of the battery should be fused at the battery for their rated load.
Testing the light before this fuse is properly installed will void the warranty
on the light.
Black : Ground lead - Connect to a good chassis ground.
Red : Power - Connect to the positive side of your power source (+12-24VDC)
through a switch and a 5 Amp fuse. Check your light for proper voltage.
Purple : Found only on the single color lights - Used for High/Low power selection.
• Leave disconnected for constant high power.
• Connect it to Ground for constant low power.
• Connect it to Ground through a switch for High/Low select.
Orange : Found only on dual color lights - Power for secondary color - Connect to the
positive side of your power source (+12-24VDC) through a second switch and a
5 Amp fuse. Check your light for proper voltage.\
Green : Pattern Select - Touch and release to ground to cycle through patterns.
White : Synchronization - Cut short and cap off if not synchronizing this light with
additional lights. If synchronizing, set flash patterns BEFORE
connecting white wires together.