
Fitness Equipment User's Manual
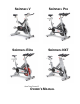


Page 9 SPINNER
®
OWNER’S GUIDE
ASSEMBLY
Following these steps in order will minimize the build time and ensure proper assembly.
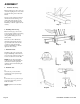
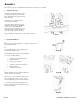
1. Install the Back Leg
Lift up the rear of the bike frame and place
the rear leg assembly in position under the
frame, aligning the holes in the leg with the
holes in the frame.
Position the leg so the thicker end faces
toward the front of the bike
Using the 5mm hex wrench and a 13mm
combination wrench insert 2- M10X55mm
(rear-most holes) and 2-M10X65mm
(front-most holes) button head screws, nuts
and washers (under bolt head and nut), to
secure the rear leg assembly to the frame.
Tighten all hardware securely using a torque wrench to 85 lbs-in.
Step 1
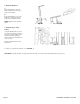
2. Install the Handlebar
A.
Insert pop -pin into frame handlebar post. Tightly secure pop -pin into
place using multi-wrench.
B.
Position the handlebar post in its upright position
(numbers will be right side up).
Insert handlebar water bottle cage into the handlebar
post. Secure assembly with the:
• (2) M8x1.25, 16mm Flat Head Screw
• 5mm Hex Wrench
• Torque down to 60 lbs-in
• (1) M8x1.25, 16mm Socket Set Screw
• 4mm Hex Wrench
• Torque down to 60 lbs-in
C.
Slide the handlebar post into the frame making sure
the holes face the front of the bike.
Allow the post to go into the frame all the way in to
level 1 and align the pop pin so it snaps into the
hole then tighten the pop pin and test for steadiness.
Loosen the pop pin and raise the handlebar to its
highest position number 10 and tighten the pop pin
and test for steadiness.
Step 2A
Step 2B
Step 2C