STAR TRAC 14410 MYFORD ROAD, IRVINE, CA 92606 USA STAR TRAC FITNESS™ SPINNER® BIKES USER'S MANUAL Spinner® V Spinner® Elite Spinner® Pro Spinner® NXT
Introduction ………………………………………………………………………………………… 3 Safety Instructions ……………………………………………………………………………… 4 Spinner® NXT/Elite/Pro/V Assembly and Setup ……………………………………………… 5-14 Spinner® V Assembly and Setup …………………………………………………………….. Spinner® NXT Assembly and Setup …………………………………………………………. Spinner® Elite / Pro Assembly and Setup ……………………………………………………. 5-7 8-11 12-14 Testing the Bike ……………………………………………………………………………………. 15 Instructions for Use ………………………………………………………………………………..
This manual will acquaint you with the assembly, operation and maintenance of your Spinner® indoor cycling bike.
INSTRUCTIONS The following fitness safeguards and operating precautions are directed to purchasers and users of Spinner® indoor cycling bikes. Club Managers should ensure that members and fitness staff are trained to follow these same instructions. Failure to follow these safeguards may result in injury or serious health risk.
ASSEMBLY AND SETUP SPINNER® V ASSEMBLY AND SETUP Use the following procedures to unpack and assemble your SPINNER® V. UNPACKING Position the shipping carton so the “Heavy End” logo is located at the bottom. Open the top of the carton and fold back all four flaps. Carefully tilt the box forward so that the box may be lifted to expose the bike.
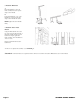
ASSEMBLY 1. Install the Back Leg Place the back leg in position at the rear of the bike, aligning the two holes in the leg with the mating holes in the frame bracket. Insert two 8mm x 70mm bolts through the frame bracket and back leg, and install a flat washer and nut on each bolt. Using the #5 Allen Wrench and Multi-Purpose Wrench, tighten the nuts securely. Step 1 2.
5. Install the Handlebar A. Insert the handlebar post into the frame assembly and secure in place using a tension handle. B. Position the handlebar on top of the handlebar post and secure in place using a tension handle and washer. NOTE: Tighten the tension handles firmly. Step 5A Step5B 6. Install the Water Bottle Holders Using the Allen Wrench, remove the two screws from the right side fork of the frame assembly.
SPINNER NXT ASSEMBLY AND SETUP ® Use the following procedures to unpack and assemble your SPINNER® NXT. UNPACKING Prepare the area that you will be unpacking and assembling the bike to be free from debris that may cause damage. Observe all safety precautions and care while unpacking and assembling the bike. Position the shipping carton so the “Heavy End” logo is located at the bottom. Open the top of the carton and fold back all four flaps.
ASSEMBLY Following these steps in order will minimize the build time and ensure proper assembly. 1. Install the Back Leg Lift up the rear of the bike frame and place the rear leg assembly in position under the frame, aligning the holes in the leg with the holes in the frame.
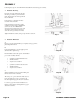
3. Install the Front Leg NOTE: The front foot assembly has wheels attached to the front edge. Be sure the wheels face forward when installing the front leg assembly. Stand the bike frame upright and gently tip the front of the bike up and position the front foot under the frame, with the wheels facing forward. Attach the front foot assembly to the frame, aligning the holes in the foot with the holes in the frame.
5. Install the Pedals NOTE: The pedal shafts are marked “R” and “L”. Trying to install the pedals on the wrong side may damage the pedal and the crank arm take caution to attach the pedals to the correct side of the bike. Install the pedals on the pedal cranks using a 15mm open-end wrench and tighten securely. Turn the left pedal spindle counterclockwise when threading into the left crank arm; turn the right pedal spindle clockwise when threading into the right crank arm.
SPINNER ELITE / PRO ASSEMBLY AND SETUP ® Use the following procedures to unpack and assemble your SPINNER® ELITE / PRO. UNPACKING Prepare the area that you will be unpacking and assembling the bike to be free from debris that may cause damage. Observe all safety precautions and care while unpacking and assembling the bike. Position the shipping carton so the “Heavy End” logo is located at the bottom. Open the top of the carton and fold back all four flaps.
ASSEMBLY Following these steps in order will minimize the build time and ensure proper assembly. 1. Install the Back Leg A. Have one person lift up the rear of the bike frame and hold -or- lift up the bike frame and wedge a block (i.e wood…something that will not damage paint and frame) B.
4. Install the Seat A. Slide Seat Slider into Seat Post. B. Disengage pop-pin by loosening then pulling away from the frame. While still holding onto the pop-pin, install the seat post into the frame and lower it to the lowest position and tighten the pop pin securely once again. Test the seat slide for proper operation and full travel. Step 4A Step 4B 5. Install the Pedals NOTE: The pedal shafts are marked “R” and “L”.
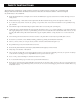
$ % & Use this checklist to perform the bike test procedure. Recheck all the bolts and make sure they are all tightened to the proper torque specification and no parts are missing. Test the handlebar and seat post to make sure they move freely and you are able to lock in at different positions. Check the seat to make sure it is level and tight and does not rotate around or tilt. Tighten and adjust as needed.
Your Spinner® indoor cycling bike is easy to use. The bike allows the user full control over resistance by simply adjusting the brake pad. Typically, lower resistance levels enable you to pedal at a faster pace, placing increased demand on the cardiovascular system. Higher resistance levels will typically deliver a greater muscle/endurance workout at lower RPMs.
To adjust the seat horizontal position: Spinner® V Dismount the bike. Loosen the seat fore-and-aft tension handle by turning the handle counterclockwise. Move the seat forward or back to the desired position, then tighten the tension handle by turning clockwise. Be sure to tighten firmly. V Seat Fore/Aft Pop-Pin Spinner® Pro / Elite / NXT Dismount the bike. Loosen the seat fore-and-aft tension knob by turning the knob counterclockwise.
HANDLEBAR ADJUSTMENTS Position the handlebar at the same height as your seat, or higher if you feel any discomfort in your back. All Spinner® indoor cycling bikes allow for adjustment of handlebar height. Additionally, the Spinner® V allows for fore and aft adjustment of the handlebar. To adjust the handlebar height: Spinner® V Loosen the handlebar height tension handle by turning the handle counterclockwise.
RESISTANCE CONTROL Pedaling resistance is controlled by the resistance knob. Resistance adjustments can be made while riding to vary the intensity of your workout. To increase resistance, turn the Push Brake System knob clockwise (+); to decrease resistance, turn the knob counterclockwise (-). NOTE: In case of emergency, you may press directly down on the Push Brake System knob to bring the flywheel to an abrupt stop.
$ This section provides hints on how to stay motivated, and suggestions for getting the most out of your workouts with maximum ease, efficiency and enjoyment. IMPORTANT: User should be aware of the features, functions and proper operation of the bike before using the bike for the first time.
BIKE SETUP Proper bike setup gives you a more comfortable ride and reduces your risk of injury. SEAT HEIGHT SEAT FORE-AND-AFT POP-PIN At the proper height, there should be a slight bend in your knee when you’re at the bottom of a pedal stroke.
HAND POSITIONS The Spinning® program is a simple and effective way to get the fitness results you want. Following are the three hand positions used in the Spinning® program. HAND POSITION 1 can be used for warm-up, cool-down and light to moderate intensity seated flats. Form loose fists and rest the outsides of your hands on the handlebars. Keep your elbows and shoulders relaxed. HAND POSITION 2 is used at all times except out-of-the-saddle climbs.
STRETCHING Stretching will help prevent injury and soreness. It keeps the lower back and leg muscles flexible, which enhances physical performance and reduces strain. Below are some key stretches to incorporate at the beginning and end of your workout. You should stretch slowly to the point where mild discomfort is felt in the muscle being stretched. Practice deep breathing through the nose at all times. Do not bounce during the stretch, since this may result in injury.
GLUTES 1 Stand facing the bike about 2-3 feet away and place a hand on handlebar for stability. 2 Stand on one leg and rest the other foot above the knee of your standing leg. 3 Flex the knee of your standing leg and allow your hips to sink back. 4 Feel the stretch in the glutes area of the crossed leg. 5 Hold the stretch and breathe for 30-60 seconds. OUTER HIP 1 Stand facing the bike about 2-3 feet away and place a hand on the bike for stability.
HEART RATE GUIDELINES Every ride begins with a goal—and heart rate training is an unbeatable way to achieve it. The Spinning® program’s Energy Zone™ system promotes a sound and complete approach to fitness by addressing strength, endurance and recovery. Use the chart below to determine your ideal heart rate for each Energy Zone™. For additional heart rate training guidelines or to purchase a heart rate monitor visit spinning.com.
This section provides the procedures to maintain the Spinner® indoor cycling bikes in serviceable condition. Differences between models are noted where applicable. MOVING AND LEVELING To move the bike to a new location: Lift the bike from the rear and use the front wheels (located on the front leg, below the handlebar) to roll the bike from one location to another.
Inspection / Adjustment Inspect major moving parts that require constant proper torque. Loose or misadjusted parts can result in personal injury or damage to the bike. Check the following parts for security and/or proper torque. Crank arms The crank arms should be re-torqued after the first 10 hours of use and every 100 hours of operation, thereafter. The crank arm to the bottom bracket torque is 30 lbs-ft (± 3 lbs-ft). Pedals Use a pedal wrench. Verify that the pedal is not cross-threaded.
ADJUSTMENTS CHAIN TENSION & ADJUSTMENT The chain on your bike has been factory set and lubricated. It should not require adjustment initially. Over time, however, you may need to adjust the tension. CAUTION: Improper chain adjustment will cause premature wear and may void the warranty. To adjust chain on Spinner® V: 1. Using a 3mm Allen Wrench, remove the three screws supporting the plastic chain guard shroud. 2. With an adjustable wrench, loosen the two nuts on both sides of the flywheel (Figure 1 & 2).
STAR TRAC® 14410 Myford Road Irvine, California 92606 Telephone: (800) 228-6635, (714) 669-1660 Fax: (714) 508-3303 http://www.startrac.com Document Number 620-7835, Rev.