
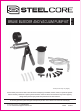
Use and Care Manual


customerservice@focus-ontools.com
5
1-800-348-5004
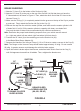
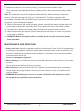
BRAKE BLEEDING
1. Attach a 3" Hose (5) to the bottom of the Suction Lid (2a).
2. Attach a 23" Hose (4) to the port on the top of the Suction Lid (2a) that does not have the
3" Hose attached, as shown in Figure A. Then, attach the other end of that 23" Hose to the
Vacuum Pump (1).
3. Make sure the O-ring (11) is completely seated into the groove on the top of the Cup to provide
a good seal. Firmly attach the Suction Lid (2a) to the Cup (3).
4. Remove the cap from the vehicle’s master cylinder, and make sure the master cylinder is full
of brake fluid. If not full, fill the master cylinder to capacity with clean, new brake fluid.
(Use only the kind of brake fluid recommended by the vehicle manufacturer.)
Note: Determine the proper brake bleeding sequence from your vehicle service manual
(i.e., right rear wheel, left rear wheel, right front wheel, left front wheel).
5. Connect the 23" Hose (4) to the remaining port on the Suction Lid (2a).
to the Brake Bleed Screw Adapter (9).
7. Squeeze the Handle of the Vacuum Pump (1) 10 to 15 times to create a vacuum in the Cup (3).
Note: The Gauge on the Vacuum Pump should read at approximately 10 inHg. Do not exceed
20 inHg. A greater vacuum could damage the vehicle’s brake system.
8. Open the vehicle’s brake caliper bleed screw, and allow brake fluid to flow into the Cup (3)
until fluid appears clear and free of bubbles. Then, retighten the bleed screw.
FIGURE A
23" HOSE (4)
BRAKE BLEED
SCREW ADAPTER
(9A, 9B, OR 9C)
TAPERED
HOSE
ADAPTER
(6)
23"
HOSE (4)
TO BRAKE CALIPER
BLEED SCREW
3" HOSE (5)
SUCTION
LID (2A)
O-RING (11)
CUP (3)
PUMP
SCREW
VACUUM
PUMP (1)
GAUGE
VACUUM
RELEASE
VALVE