
User Manual
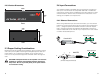


3.2.1 Indicators
The AV 25 has 4 rear panel LED indicators. The first is the power indi-
cator which will illuminate when power is supplied to the amplifier. The
next 2 LED indicators are the “Clip” indicators, one for each channel.
These lights will indicate that the input signal is too “hot” and will
sound distorted when amplified. To fix this, the gain should be reduced
at the preamp or mixer level. The final light is the signal present LED
which will illuminate when signal is detected on either one of the input
connection channels.
3.2.2 Controls
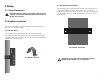
All AV 25 controls are located on the rear of the unit. There is no power
switch so the AV 25 will turn on whenever power is supplied to it. The
AV25’s Signal Sense Technology (SST ) will power up the amplifier
from sleep when a signal is detected. After 5 minutes without an input
signal the amplifier will go into sleep mode.
The rear panel contains two channel volume . The amplifier is set to run
off of a line-level source and the level should be adjusted for optimum
performance. To adjust this knob, you will need a small flat-head
screwdriver. While a typical program source level is present, spin the
rotary knob as far clockwise as you can without hearing distortion or
without the “Clip” indicator illuminating. If the signal is distorting and
the knob is all the way counter-clockwise, adjust the gain down at the
source level.
3.2.3 Remote Mute
The AV 25 can be remotely muted when needed for such applications
as muting during a fire alarm. To do so, 5-12VDC should be applied to
the terminal block labeled “MUTE” on the rear of the AV 25. Polarity
should be observed when connecting the triggering power source as
the amplifier will not be muted if polarity is reversed.
4 Troubleshooting
Problem: Power indicator does not turn on.
Procedure: Check that the amplifier is plugged into a live outlet. After
you have ensured that it is not a power issue, disconnect any speakers.
If the amplifier turns on after a few seconds delay, then the problem is
in the output connection. Check wiring and speakers for short circuits.
Problem: No output on one or both channels; Power indicator is
lit.
Procedure: Check that level controls are not turned down. Check that
input and output connections are secure. Ensure signal present LED is
flashing to denote a signal. If there is no signal detected check signal
source and that level controls are set high enough.
Problem: Amplifier overheats and/or shuts off.
Procedure: Review section 2.3 on proper cooling procedures. Check
the signal lights on the rear of the amplifier to see if the signal is over-
driving (the signal light flashes red frequently). Overdriving the amplifier
for extended periods of time can cause a thermal shutdown.
Problem: Output sound is distorted or cracking.
Procedure: Check all cables for damage or loose connections and re-
duce the gain on the input signal at the mixer or preamp level. Replace
the cables and loudspeakers temporarily to see if this resolves the
problem. If problem still exists, contact your Authorized Dealer for ser-
vice.
14 15