
Install Instructions


6 |CNS E WWW.STIEBEL-ELTRON-USA.COM
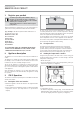
INSTALLATION
INSTALLATION
aaa
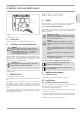
26_07_31_0124
1
3
2
4
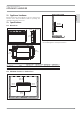
» Drill holes at all four markings. Secure the wall mounting bracket
with suitable materials (screws, rawl plugs) depending on the
type of wall. With the vertical slots, you can compensate for an
offset fi xing hole.
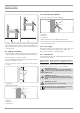
10.2 Appliance installation
» Hook the appliance by its slots in the back of the appliance on
to all four tabs of the wall mounting bracket simultaneously.
» Push the appliance to latch it in position.
» Turn the locking bolt in the wall mounting bracket fully clockwise;
this locks the appliance in place.
» Push the safety cap onto the locking bolt to prevent it from
loosening.
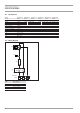
26_07_31_0035
1
2
1 Locking bolt
2 Wall mounting bracket
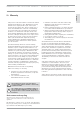
26_07_31_0127
1
2
3
1 Appliance
2 Safety cap
3 Locking bolt
10.3 Dismounting the appliance
» Remove the safety cap from the locking bolt.
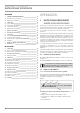
26_07_31_0128
1
2
3
1 Appliance
2 Safety cap
3 Locking bolt
» Undo the locking bolt on the wall mounting bracket.
» Lift the appliance up slightly and pull it forwards and away from
the wall mounting bracket.
10.4 Power supply
This appliance does not come with an electric cable. Cable must
be routed to the unit from a circuit breaker of suitable size.
Ensure the power cable is of a suitable gauge.
10.5 Terminal block
Consult the chart below for the recommended torque amounts on
the terminal block screws.
Screw Size (mm) Min. Torque (N•cm) Min. Torque (lbf•in)
M3.5 60-80 5.31-7.08
Using the proper torque specifi cations to secure wire to the wiring
block helps to avoid personal loss or property damage.
DANGER: Electrocution
Carry out all electrical connection and installation
work in accordance with all national, state and local
building code.
DANGER: Electrocution
Each heater must be wired directly to the circuit
breaker panel with the proper size breaker and wire
gauge.
DANGER: Electrocution
Do not plug the heater into a wall outlet.
The specifi ed voltage on the nameplate must match
the voltage at the circuit breaker panel.