BA_017_018_engl_USA 30.10.2000 11:02 Uhr Seite 1 (Schwarz Bogen) STIHL 017 018 Instruction Manual Owner’s Manual Assembling Safety Precautions Operating Instructions Maintenance ä WARNING! The engine exhaust from this product contains chemicals known to the State of California to cause cancer, birth defects or other reproductive harm. englisch / english / USA / CARB / EPA Warning! Read and follow all safety precautions in Owner’s Manual – improper use can cause serious or fatal injury.
Important Safety Precautions for Chain Saw Users A. Kickback Safety Precautions !Warning! Kickback may occur when the nose or tip of the guide bar touches an object, or when the wood closes in and pinches the saw chain in the cut. Tip contact in some cases may cause a lightning fast reverse reaction, kicking the guide bar up and back towards the operator. Pinching the saw chain along the top of the guide bar may push the guide bar rapidly back towards the operator.
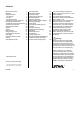
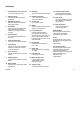
Contents Main Parts of the Saw Definitions Safety Precautions - The Operator - The Saw - The Use of the Saw - Maintenance, Repair and Storing Mounting the Bar and Chain: - Models with Quick Chain Tensioner* Tensioning the Saw Chain Checking Chain Tension Fuel Mix Fueling Chain Lubricant Filling Chain Oil Tank Checking Chain Lubrication Chain Brake Information Before You Start Starting During Break-in Period * Special equipment 2 3 4 4 6 6 21 25 26 28 29 29 30 31 31 31 32 31 33 37 During Operation After
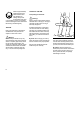
Main Parts of the Saw 2 3 9 10 4 59 8 6 12 16 17 14 21 19 13 = 14 = 15 = 16 = 17 = 18 = 19 = 20 = 21 = 22 = 23 = Oil filler cap Muffler Front hand guard Front handle (handlebar) Starter grip Fuel filler cap Master Control lever Throttle trigger Throttle trigger interlock Rear handle Rear hand guard 11 7 15 Twist lock Spark plug boot Decompression valve * Chain brake Chain sprocket Chain sprocket cover Chain catcher Chain tensioner Adjusting wheel of quick tensioner * Bumper spike Guide bar O
Definitions 1. Carburetor Box Cover Twist Lock Lock for carburetor box cover. 11. Guide Bar Supports and guides the saw chain. 2. Spark Plug Boot Connects the spark plug with the ignition wire. 12. Oilomatic Saw Chain A loop consisting of cutters, tie straps and drive links. Decompression Valve Releases compression pressure to make starting easier. 13. Oil Filler Cap For closing the oil tank. 3. 4. 5. 6. 7. 8. 9.
Safety Precautions The use of any chainsaw may be hazardous. The saw chain has many sharp cutters. If the cutters contact your flesh, they will cut you, even if the chain is not moving. At full throttle, the chain speed can reach 45 mph (20 m/s). It is important that you read, fully understand and observe the following safety precautions and warnings. Read the Owner’s Manual and the safety instructions periodically. Pay special attention to the section on reactive forces.
reduce the hand’s ability to feel and regulate temperature, produce numbness and burning sensations and may cause nerve and circulation damage and tissue necrosis. All factors which contribute to whitefinger disease are not known, but cold weather, smoking and diseases or physical conditions that affect blood vessels and blood transport, as well as high vibration levels and long periods of exposure to vibration are mentioned as factors in the development of whitefinger disease.
Wear an approved safety hard hat to protect your head. Chainsaw noise may damage your hearing. Always wear sound barriers (ear plugs or ear mufflers) to protect your hearing. Continual and regular users should have their hearing checked regularly. THE USE OF THE SAW THE SAW Accidental acceleration of the engine can cause the chain to rotate. During operation, the powerhead muffler and the material around it reach extremely high temperatures.
Preparation for the use of the saw Take off the chain guard and inspect for safety in operation. For assembly, follow the procedure described in the chapter “Mounting the Bar and Chain” of your Owner’s Manual. STIHL Oilomatic chain, guide bar and sprocket must match each other in gauge and pitch. Before replacing any bar and chain, see the sections on “Specifications”, "Kickback" and the "ANSI B 175.1-1991 chainsaw kickback standard" in this manual.
!Warning! Unit vibrations can cause an improperly tightened fuel filler cap to loosen or come off and spill quantities of fuel. In order to reduce the risk of fuel spillage and fire, tighten fuel filler cap by hand with as much force as possible. !Warning! Your chainsaw is a one-person saw. Do not allow other persons to be near the running chainsaw. Start and operate your saw without assistance. For specific starting instructions, see the appropriate section of the Owner’s Manual.
!Warning! Important adjustments Be sure that the guide bar and chain are clear of you and all other obstructions and objects, including the ground. When the engine is started, the engine speed with the starting throttle lock engaged will be fast enough for the clutch to engage the sprocket and, if the chainbrake is not activated, turn the chain. If the upper quadrant of the tip of the bar touches any object, it may cause kickback to occur (see section on reactive forces).
eliminated, the operator and any bystanders should always wear a respirator approved by NIOSH / MSHA for the type substance at issue. !Warning! Breathing asbestos dust is dangerous and can cause severe or fatal injury, respiratory illness or cancer. The use and disposal of asbestos containing products have been strictly regulated by OSHA and the Environmental Protection Agency. Do not cut or disturb asbestos, asbestos containing products (e.g.
!Warning! Do not operate your chainsaw with the starting throttle lock engaged. Cutting with the starting throttle lock engaged does not permit the operator proper control of the saw or chain speed. ! Warning! Never touch a chain with your hand or any part of your body when the engine is running, even when the chain is not rotating. The chain continues to rotate for a short period after the throttle trigger is released.
powerful force used to cut wood can be reversed (and work against the operator). If the rotating chain is suddenly stopped by contact with any solid object like a log or branch or is pinched, the reactive forces may occur instantly. These reactive forces may result in loss of control which may, in turn, cause serious or fatal injury. An understanding of the causes of these reactive forces may helpyou avoid loss of control. The most common reactive forces are – kickback, – pushback, – pull-in.
It may also occur during limbing. The greater the force of the kickback reaction, the more difficult it becomes for the operator to control the saw. Many factors influence the occurrence and force of the kickback reaction. These include chain speed, the speed at which the bar and chain contact the object, the angle of contact, the condition of the chain and other factors. The type of bar and saw chain you use is an important factor in the occurrence and force of the kickback reaction.
!Warning! Devices for reducing the risk of kickback injury Never operate your chainsaw without a front hand guard. In a kickback situation this guard helps protect your left hand or other parts of your body. In addition, removal of the hand guard on a saw equipped with a chain brake will deactivate the chain brake. STIHL recommends the use of the STIHL Quickstop chain brake on your powerhead with green labeled reduced kickback bars and low kickback chains.
!Warning! An improperly maintained chain brake may increase the time needed to stop the chain after activation, or may not activate at all. !Warning! Never run the chainsaw above idle speed for more than 3 seconds when the chain brake is engaged or the chain is pinched or otherwise caught in the cut. Clutch slippage can cause excessive heat, leading to severe damage of the motor housing, clutch and oiler component and may interfere with the operation of the chain brake.
Low kickback chain Some types of saw chain have specially designed components to reduce the force of nose contact kickback. STIHL has developed low kickback chain for your powerhead. “Low kickback saw chain” is a chain which has met the kickback performance requirements of § 5.12.2.4 of ANSI B 175.1-1991 (Safety Requirements for Gasoline-Powered ChainSaws) when tested on a selected representative sample of chainsaws below 3.8 cubic inch displacement specified in ANSI B 175.1-1991.
Cutting Techniques Felling 001BA038 LÄ 001BA037 LÄ Felling is cutting down a tree. Before felling a tree, consider carefully all conditions which may affect the direction of fall, including: A = Pull-in: B = Pushback: The intended direction of the fall. Pull-in occurs when the chain on the bottom of the bar is suddenly stopped when it is pinched, caught or encounters a foreign object in the wood. The reaction of the chain pulls the saw forward and may cause the operator to lose control.
1/ 2 1 21/2 001BA088 LÄ 1 Felling Instructions: 001BA041 LÄ 001BA040 LÄ When felling, maintain a distance of at least 21/2 tree lengths from the nearest person. When felling in the vicinity of roads, railways and power lines, etc., take extra precautions. Inform the police, utility company or railway authority before beginning to cut. Escape path Buttress roots The noise of your engine may drown any warning call.
001BA042 LÄ 001BA019 KN Gunning sight Conventional cut Open-face technique When making the felling notch, use the gunning sight on the shroud and housing to check the required direction of fall: A = felling notch - determines the direction of the fall A = felling notch - determines the direction of the fall • For a conventional cut: For an open-face cut: • • Position the saw so that the gunning sight points exactly in the direction you want the tree to fall.
• • • For medium sized or larger trees make cuts at both sides of the trunk, at same height as subsequent felling cut. Cut to no more than width of guide bar. This is especially important in soft wood in summer - it helps prevent sapwood splintering when the tree falls. B = Felling cut Conventional and open-face technique: Begin 1 to 2 inches higher than center of felling notch Cut horizontalIy towards the felling notch Leave approx.1/10 of diameter uncut.
Felling cut for large diameter trees: Be extremely careful with partially fallen trees which are poorly supported. When the tree hangs or for some other reason does not fall completely, set the saw aside and pull the tree down with a cable winch, block and tackle or tractor. If you try to cut it down with your saw, you may be injured. Warning! Felling a tree that has a diameter greater than the length of the guide bar requires use of either the sectioning felling cut or plunge-cut method.
First, cut a large, wide felling notch. Make a plunge cut in the center of the notch. The plunge cut is made with the guide bar nose. Begin the plunge cut by applying the lower portion of the guide bar nose to the tree at an angle. Cut until the depth of the kerf is about the same as the width of the guide bar. Next, align the saw in the direction in which the recess is to be cut. With the saw at full throttle, insert the guide bar in the trunk. Enlarge the plunge cut as shown in illustration.
MAINTENANCE, REPAIR AND STORING 2. Cut only one log at a time. 3. Shattered wood should be cut very carefully. Sharp slivers of wood may be caught and flung in the direction of the operator of the saw. 4. When cutting small logs, place log through “V” - shaped supports on top of a sawhorse. Never permit another person to hold the log. Never hold the log with your leg or foot.
changing the saw chain or cleaning the saw. Do not attempt any maintenance or repair work not described in your Owner’s Manual. Have such work performed at your STIHL service shop only. !Warning! Never test the ignition system with ignition wire terminal removed from spark plug or with unseated spark plug, since uncontained sparking may cause a fire. !Warning! To reduce the risk of fire and burn injury, use only spark plugs authorized by STIHL.
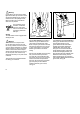
Mounting the Bar and Chain 143BA034 KN 143BA003 KN Models with Front Chain Tensioner 6 3 4 You can run chains of different pitches on this chainsaw - depending on the chain sprocket (see “Specifications”) The chain pitch must match the guide bar. In addition, the drive link gauge must match the guide bar groove width. • • Unscrew nuts and take off cover. Turn tensioning screw (1) counterclockwise until the tensioning nut (2) butts against left end of housing slot.
Mounting the Bar and Chain Models with Quick Chain Tensioner 4 135BA004 KN 7 135BA006 KN 6 1 5 3 8 You can run chains of different pitches on this chainsaw - depending on the chain sprocket (see “Specifications”) The chain pitch must match the guide bar. In addition, the drive link gauge must match the guide bar groove width. • • • 26 • • Remove the tensioning gear (4) and turn it over. Take out the screw (5).
135BA009 KN 10 12 • • • Wear work gloves to protect hands. Fit the chain - start at the bar nose pay attention to position of tensioning gear and the cutting edges. Turn tensioning gear (9) clockwise up to the stop. 017, 018 135BA011 KN 135BA010 KN 135BA008 KN 9 11 • • • Disengage the chain brake: Pull hand guard (10) toward the front handle. Turn the guide bar so that the tensioning gear is facing you.
Tensioning the Saw Chain Tensioning the Saw Chain 1 Models with Quick Chain Tensioner 143BA045 KN 135BA012 KN Models with Front Chain Tensioner 1 Retensioning during cutting work: 135BA013 KN 14 • • • • 28 Place sprocket cover in position engage guide lugs in recesses in engine housing and check that the teeth of the adjusting wheel and tensioning gear mesh. If necessary, turn the adjusting wheel (13) slightly until the sprocket cover can be pushed flush against the engine housing.
Checking Chain Tension Fuel Mix All Versions 143BA007 KN This engine is certified to operate on unleaded gasoline and oil with the mix ratio 50:1. • • Turn off the engine. Wear work gloves. Chain must fit snugly against the underside of the bar - and, with the chain brake disengaged, it must still be possible to pull the chain along the bar by hand. • If necessary, retension the chain.
Before fueling, clean the fuel filler cap and the area around it to ensure that no dirt falls into the tank. Always thoroughly shake the mixture in the canister before fueling your machine. 143BA009 KN 143BA008 KN Fueling Change the fuel pick up body every year. Before storing your machine for a long period, drain and clean the fuel tank and run engine until carburetor is dry.
Chain Lubricant Filling Chain Oil Tank Checking Chain Lubrication For automatic and reliable lubrication of the chain and guide bar: Use only a quality, environmentally compatible chain and bar lubricant. STIHL chain lubricant with non-fling additive or the rapidly biodegradable STIHL Bioplus is recommended. If special chain lubricant is not available, you may - in an emergency - use an HD single grade or multigrade engine oil with a viscosity that suits the prevailing outside temperature.
Chain Brake The chain brake is also activated by the inertia of the front hand guard if the kickback force of the saw is high enough: The hand guard is accelerated toward the bar nose - even if your left hand is not behind the hand guard, e.g. during felling cut. The chain brake will operate only if the hand guard has not been modified in any way. 143BA011 KN 143BA012 KN Check operation of chain brake Locking chain with chain brake - in an emergency - when starting - at idling speed.
Starting Information Before You Start - don’t start yet - 0 4 3 1 The four positions of the Master Control lever To start the engine, move the lever to the “cold start” position l (1) - do not use force. If the Master Control lever is in the “run” position # (3): Press down the throttle trigger interlock and move the Master Control downward. “Cold Start” position: Choke shutter is closed throttle trigger is in starting-throttle position. This position is used to start a cold engine.
STOP 0 1 All versions Observe safety precautions see section “Safety Precautions”. Push hand guard forward (1): The chain is now locked.
STOP 0 5 • • • • Pull the starter grip slowly with your right hand until you feel it engage then give the grip a brisk strong pull and push down the front handle at the same time. Do not pull out starter rope more than 70 cm (about 28 in) it might otherwise break. Do not let the starter grip snap back - guide it slowly into the housing so that the starter rope can rewind properly. If engine is new, pull starter grip several times to prime the fuel line.
At very low outside temperatures: Allow engine to warm up As soon as the engine runs: Blip the throttle trigger to disengage it from starting throttle position Master Control lever will move to normal operating position engine settles down to idling speed. Disengage chain brake: Pull hand guard toward front handle as shown in illustration Open throttle slightly warm up engine for short period.
During Break-in Period During Operation After Finishing Work A factory new machine should not be run at high revs (full throttle off load) for the first three tank fillings. This avoids unnecessary high loads during the break-in period. Check chain tension frequently. A new chain has to be retensioned more often than one that has been in use for some time. Slacken off the chain if you have retensioned it at operating temperature during cutting work. The chain contracts as it cools down.
Cleaning Air Filter Taking Care of Guide Bar 143BA022 KN • • Dirty air filters reduce engine power, increase fuel consumption and make starting more difficult. Clean the air filter when there is a noticeable loss of engine power. • • • Press down the interlock lever and set Master Control lever to “Cold Start” l Turn the twist lock above the rear handle 90° counterclockwise Lift off the shroud vertically. Lift filter off vertically. Wash filter element in a clean, non-flammable cleaning solution (e.
Adjusting Carburetor with two adjusting screws L LA Motor Management Engine stops while idling: ’L’ screw must be one turn open. Exhaust emissions are controlled by the design of the fundamental engine parameters and components (e.g. carburetion, ignition, timing and valve or port timing) without the addition of any major hardware. Turn the idle speed screw (LA) clockwise until chain begins to run then back off the screw one quarter of a turn.
Adjusting Carburetor with one adjusting screw Spark Arresting Screen in Muffler LD Carefully screw down the idle speed screw (LD) counterclockwise (left-hand thread) until it is firmly seated. Then back off the screw two full turns clockwise (standard setting LD = 2) • • 1 1 Start and warm up the engine. Use idle speed screw (LD) to adjust idle speed correctly: chain must not rotate LD 3 The carburetor is set at the factory to provide an optimum fuel-air mixture under all operating conditions.
Checking Spark Plug Starter Rope The starter rope is subject to normal wear and tear. To prolong its service life, please observe the following points: 000BA039 KN A • • Wrong fuel mix (too much engine oil in the gasoline), a dirty air filter and unfavorable running conditions (mostly at part throttle etc.) affect the condition of the spark plug. These factors cause deposits to form on the insulator nose which may result in trouble in operation.
Checking and Replacing Chain Sprocket Storing the Machine For periods of about 3 months or longer: Replace the chain sprocket after using two Oilomatic chains - or even sooner if the wear marks on the sprocket are deeper than approx. 0.5 mm (1/64") since this would reduce the life of the chain. Check wear marks: - on teeth of spur sprockets. K 143BA042 KN • • Before removing chain sprocket Remove chain sprocket cover, chain and guide bar.
Maintaining and Sharpening Saw Chain Correctly sharpened chain A Do not work with a dull or damaged chain as it will increase the physical effort required, produce unsatisfactory results and a higher rate of wear. Clean and check your chain for cracks in the links and damaged rivets replace any damaged or worn parts of the chain and match the new parts to the shape and size of the original parts. Important: It is absolutely imperative to comply with the angles and dimensions specified below.
689BA025 KN 90° As these requirements can be met only after sufficient and constant practice: File correctly Use a file holder.* A file holder must be used for manual resharpening of Super chain. The correct filing angle is marked on the file holder. • • • • • 80° 30° 35° 10° 0° 689BA022 KN 90° 85° 70° 60° 689BA018 KN • • For checking angles STlHL filing gauge* (see table) A universal tool for checking the filing and side plate angles, depth gauge setting and cutter length.
a Depth gauge distance “a” (mm) mm (Inch) Depth gauge setting 1/4 3/8-PM 3/8-PMN 0.325 3/8 0.404 (6.35) (9.32) (9.32) (8.25) (9.32) (10.26) 0.65 0.65 0.45 0.65 0.65 0.80 (0.026) (0.018) (0.026) (0.026) (0.026) (0.031) The depth gauge determines the height at which the cutter enters the wood and thus the thickness of the chip removed. This setting may be increased by 0.2 mm (0.008") for cutting softwood in mild weather season - no frost.
Chain brake Filter in fuel tank Fuel tank Chain oil tank Chain lubrication Saw chain Guide bar Chain sprocket Air filter Cooling inlets Cylinder fins Carburetor Spark plug All accessible screws and nuts (not adjusting screws) Rubber vibration buffers Spark arresting screen in muffler Chain catcher 46 x Check operation x x Check operation Have cleaned by STIHL dealer Check Clean, replace filter element Clean Clean Check Inspect, also check sharpness Check chain tension Sharpen Check (wear, damage) Clea
Specifications Engine Fuel/Oil System STIHL single cylinder two-stroke engine Carburetor: All position diaphragm carburetor with integral fuel pump Air filter: Felt mat Fuel tank capacity: 0.25 l (0.53 US pt) Fuel mix: See chapter “Fuel Mix” Chain lubrication: Fully automatic speed-controlled rotary piston oil pump. Oil tank capacity: 0.15 l (0.32 US pt) 017 Displacement: Bore: Stroke: 30.1 cm3 (1.89 cu. in) 37 mm (1.46 in) 28 mm (1.10 in) 018 Displacement: Bore: Stroke: 31.8 cm3 (1.91 cu.
Ordering Spare Parts Please enter your saw model, machine number as well as the part numbers of the guide bar, saw chain and chain sprocket in the spaces provided. This will make re-ordering simpler. Warranty claims following repairs can be accepted only if the repair has been performed by an authorized STIHL servicing dealer using original STlHL spare parts. The guide bar, saw chain and chain sprocket are subject to normal wear and tear.
STIHL Incorporated Limited Warranty Federal and California Emission Control Systems Utility Engines Your Warranty Rights and Obligations The California Air Resources Board and Andreas Stihl are pleased to explain the emission control system warranty on your 1995 and later utility equipment engine. In California, new utility and lawn and garden equipment engines must be designed, built and equipped to meet the State’s stringent anti-smog standards.
2. Warranty Period Any warranted part which is not scheduled for replacement as required maintenance, or which is scheduled only for regular inspection to the effect of "repair or replace as necessary" will be warranted for the warranty period. Any warranted part which is scheduled for replacement as required maintenance will be warranted for the period of time up to the first scheduled replacement point for that part. The use of add-on or modified parts can be grounds for disallowing a warranty claim.
Continuation of Important Safety Precautions 4. Use caution when handling fuel. Move the chainsaw at least 10 feet (3 m) from the fueling point before starting the engine. 5. Do not allow other persons to be near the chainsaw when starting or cutting with the chainsaw. Keep bystanders and animals out of the work area. 6. Do not start cutting until you have a clear work area, secure footing, and a planned retreat path from the falling tree. 7.
BA_017_018_engl_USA 30.10.2000 11:02 Uhr Seite 1 (Schwarz Bogen) STIHL 017 018 Instruction Manual Owner’s Manual Assembling Safety Precautions Operating Instructions Maintenance ä WARNING! The engine exhaust from this product contains chemicals known to the State of California to cause cancer, birth defects or other reproductive harm. englisch / english / USA / CARB / EPA Warning! Read and follow all safety precautions in Owner’s Manual – improper use can cause serious or fatal injury.