STIHL BG 45 Instruction Manual Owner's Manual Manual de instrucciones ..
english / USA Contents Parts and Controls ............................ 2 Safety Precautions ........................... 4 Assembling the Blower ................... 10 Fuel ................................................ 11 Fueling ............................................ 11 Starting / Stopping .......................... 12 Using the Blower ............................ 14 Cleaning the Air Filter ..................... 15 Adjusting the Carburetor ................ 16 Checking the Spark Plug ..............
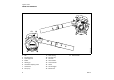
english / USA Parts and Controls 2 1 6 7 3 5 4 13 9 8 10 11 14 12 15 16 294BA001 KN 17 1 Tab 2 3 9 Filter housing Interlock button 10 Fuel filler cap Spark plug boot 11 Fuel tank 4 Muffler 12 Assist handle 5 Starter grip 13 Control handle 6 Carburetor adjusting screw 14 Switch 7 Choke lever 15 Throttle trigger 8 Fuel pump 16 Blower tube 2 17 Round nozzle BG 45
english / USA Definitions 1. Tab. Designed to secure the blower tube to the machine. 2. Interlock Button. To position the throttle trigger. 3. Spark Plug Boot. Connects the spark plug to the ignition wire. 4. Muffler. Attenuates exhaust noises and diverts exhaust gases away from operator. 5. Starter Grip. The grip of the pull starter, which is the device to start the engine. 6. Carburetor Adjusting Screws. For tuning carburetor. 7. Choke Lever. Eases engine starting by enriching mixture. 8.
english / USA Safety Precautions Warning! The use of any blower may be dangerous. It is important that you read, fully understand and observe the following safety precautions. !Warning! Reread the owner`s manual and the safety instructions periodically. !Warning! Careless or improper use of the machine may cause serious injury. Have your STIHL Dealer show you how to operate your blower. Observe all applicable local safety regulations, standards and ordinances.
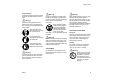
english / USA Proper Clothing Clothing must be sturdy and snug-fitting, but allow complete freedom of movement. !Warning! Avoid loose-fitting jackets, flared or cuffed pants, scarfs, unconfined long hair or anything that could be drawn into the air intake. Wear overalls or long pants to protect your legs. Do not wear shorts. Use of gloves when working with the blower is recommended. Good footing is most important. Wear sturdy shoes with nonslip soles.
english / USA Use extreme caution when handling gasoline or fuel mix. Do not smoke or bring any fire or flame near the fuel. Fueling instructions !Warning! Unit vibrations can cause an improperly tightened fuel cap to loosen or come off and spill quantities of fuel. In order to reduce risk of fuel spillage and fire, tighten fuel cap by hand with as much force as possible. Fuel your machine in well-ventilated areas, outdoors only. Always shut off the engine and allow it to cool before refueling.
english / USA Failure to follow this procedure may result in injury to hand or fingers and may damage the starter mechanism. Working instructions Work carefully. Operate the blower under good visibility and daylight conditions only. !Warning! Your blower produces poisonous exhaust fumes as soon as the combustible engine is running. These gases (e.g. carbon monoxide) may be colorless and odorless.
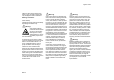
english / USA The blower fan between the air intake and output openings rotates whenever the engine is running. In order to reduce the risk of injury from contact with the fan, never operate your unit without a properly mounted intake screen and blower tube. Never insert any foreign object into the air intake or output openings of the machine. When working with the blower, always wrap your fingers tightly around the handle, keeping the control handle cradled between your thumb and forefinger.
english / USA !Warning! !Warning! Always stop the engine and make sure that the fan is stopped before doing any maintenance or repair work or cleaning the blower. Do not attempt any maintenance or repair work not described in your owner's manual. Have such work performed at your STIHL service shop only. In order to reduce the risk of fire, do not modify or remove any part of the muffler or spark arrestor. Check fuel filler cap for leaks at regular intervals.
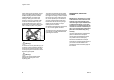
english / USA Assembling the Blower 6 1 3 5 1 10 Push the blower tube (1) with lug (2) into the fan housing stub (3) and rotate it in the direction of the arrow to lock in position. b 295BA004 KN 295BA003 KN a : 3 4 295BA005 KN 2 : Push nozzle (4) as onto the blower tube (1) as far as lug (5), position a (long) or position b (short), and rotate it in the direction of the arrow to lock in position. Removing blower tube : Use a suitable tool to lift the tab (6) on the fan housing stub (3).
english / USA Fueling This engine is certified to operate on unleaded gasoline and with the mix ratio 50:1. We recommend STIHL 50:1 two-stroke engine oil since it is specially formulated for use in STIHL engines. Your two-stroke engine requires a mixture of brand-name gasoline and quality two-stroke engine oil with the classification TC. Do not use BIA or TCW (two-stroke water cooled) mix oils! Use regular branded unleaded gasoline with a minimum octane rating of 89 RON.
english / USA Starting / Stopping 3 2 295BA013 KN 1 6 5 Observe safety precautions - see chapter “Safety Precautions”. Change the fuel pick up body every year. Before storing your machine for a long period, drain and clean the fuel tank and run engine until carburetor is dry. 12 : Set switch (1) to position I : Squeeze the throttle trigger (2) and press in the interlock button (3) at the same time. : Release the throttle trigger.
english / USA : Do not let the starter grip snap back. Guide it slowly back into the housing so that it can rewind properly. Note: If the engine does not start after 10 pulls with the choke lever set to e : Set choke to g , pull the starter rope five times, set choke to e and continue cranking. 295BA016 KN : Place the unit on the ground. : Make sure you have a firm footing: Hold the unit firmly on the ground with your left hand on the handle and press down.
english / USA Using the Blower Refit the spark plug and connect the spark plug boot - push it down firmly. : Move switch to I Additional hints on starting : Set choke lever to e even if the engine is cold. - If the engine does not start: : Now start the engine.
english / USA Cleaning the Air Filter To minimize blowing time, use rakes and brooms to loosen debris before blowing. Recommended working techniques to minimize noise: : Recommended working techniques to minimize airborne debris and pollution: : In dusty conditions, slightly dampen surfaces. : Use the full blower nozzle extension so the air stream can work close to the ground. : Do not direct debris at subjects such as open windows or freshlywashed cars. : After using blowers, clean up.
english / USA Adjusting the Carburetor : Fit the foam element (3) in the filter cover (2). : Fit the felt element (4) in the filter housing (5). : Fit the filter cover (2) so that it snaps into positon. - LD + 2 3 295BA022 KN 4 295BA020 KN 5 : Take the foam element (3) out of the filter cover (2). : Take the felt element (4) out of the filter housing (5). : Wash the foam element in a clean, non-flammable solution (e.g. warm soapy water) and then dry.
english / USA Checking the Spark Plug Standard setting : Check the air filter and replace if necessary. : Start and warm up the engine. : Carefully screw the idle speed screw (LD) down onto its seat counterclockwise (left-hand thread). Then open it two full turns clockwise (standard setting). If engine is down on power, difficult to start or runs poorly at idling speed, first check the spark plug. : Remove spark plug as discribed in chapter “Starting“ : Clean dirty spark plug.
english / USA 1 Engine Running Behavior Rewind Starter If engine running behavior is unsatisfactory even though the air filter is clean and the carburetor properly adjusted, the cause may be in the muffler. To help prolong the wear life of the starter rope, observe the following points: : Pull the starter rope only in the direction specified. Have the muffler checked for contamination (coking) by a STIHL dealer. : Do not pull the rope over the edge of the guide bush.
english / USA Operating Instructions Storing the Machine During break-in period For periods of about 3 months or longer A factory new machine should not be run at high revs (full throttle off load) for the first three tank fillings. This avoids unnecessary high loads during the break-in period. As all moving parts have to bed in during the break-in period, the frictional resistances in the engine are greater during this period. : Remove the blower tube and nozzle.
english / USA Complete machine Control handle Air filter Filter in fuel tank Fuel tank Carburetor Visual inspection (conditon, leaks) x x x x Clean x x x x x Readjust idle Readjust electride gap if required x x Replace Check idle setting if damaged if problem monthly weekly after each refueling stop x Check Clean 20 x Replace Cooling air intakes All accessible screws and nuts (not adjusting screws) x x Clean Spark plug Spark arresting screen in muffler x Clean Check operation a
english / USA Maintenance and Repairs Key to Symbols The user of this unit should carry out only the maintenance operations described in this manual. Other repair work may be performed only by an authorized STIHL dealer. This instruction manual refers to models with different scopes of supply. Parts or features not included in all models and their resultant applications are marked thus *.
english / USA Specifications Engine Ignition System Single cylinder two-stroke engine Displacement: 1.66 ci (27.2 cc) Bore: 1.34 in (34 mm) Stroke: 1.18 in (30 mm) Idle speed: 2,800 rpm Type: Spark plug (suppressed): Electrode gap: Spark plug thread: Model BG 45 22 Bystanders noise per ANSI B 175.2-1999 dB(A) 65 Fuel System Electronic magneto ignition Bosch WSR 6 F or NGK BPMR 7 A 0.02 in (0.5 mm) M 14 x 1.25; 0.37 in (9.
english / USA STIHL Incorporated Federal and California Emission Control Warranty Statement Your Warranty Rights and Obligations The U.S. Environmental Protection Agency (EPA), the California Air Resources Board (CARB) and STIHL Incorporated are pleased to explain the Emission Control System Warranty on your model year 2000 and later equipment type engine. In California, new small off-road engines must be designed, built and equipped to meet the State's stringent anti-smog standards.
english / USA Warranty Period Warranty Work Maintenance Requirements The warranty periods will begin on the date the utility equipment engine is purchased by the initial purchaser and you have signed and sent back the warranty card to STIHL. If any emission related part on your engine is defective, the part will be replaced by STIHL Incorporated at no cost to the owner.
español / EE.UU. Contenido Piezas y controles .......................... Medidas de seguridad .................... Armado del soplador ...................... Combustible ................................... Llenado de combustible ................. Arranque / Parada .......................... Uso del soplador ............................ Limpieza del filtro de aire ............... Ajuste del carburador ..................... Revisión de la bujía ........................ Funcionamiento del motor ..............
español / EE.UU.
español / EE.UU. Definiciones 1. Pestaña. Diseñada para fijar el tubo del soplador a la máquina. 2. Botón de bloqueo. Para colocar el gatillo de aceleración en posición. 3. Casquillo de la bujía. Conecta la bujía al alambre de encendido. 4. 5. 6. Silenciador. 11. Tanque de combustible. Contiene la mezcla de combustible y aceite. 12. Mango auxiliar. Mango adicional para usar el tubo como soplador sujetándolo con la mano izquierda. 13. Mango de control. Mango de arranque. 14. Interruptor.
español / EE.UU. Medidas de seguridad Advertencia El uso de cualquier soplador puede ser peligroso. Es importante que usted lea, comprenda bien y respete las siguientes medidas de seguridad. !Advertencia Vuelva a leer el manual del usuario y las instrucciones de seguridad periódicamente. !Advertencia El uso descuidado o inadecuado de cualquier máquina puede causar lesiones graves. Pida a su concesionario STIHL que le enseñe el manejo del soplador.
español / EE.UU. Vestimenta adecuada La ropa debe ser de confección fuerte y ajustada, pero no tanto que impida la completa libertad de movimiento. !Advertencia Evite el uso de chaquetas sueltas, pantalones anchos o con vuelta, pañoletas, cabello largo sin recoger o cualquier cosa que pudiera ser aspirada por el conducto de admisión. Use monos o pantalones largos para protegerse las piernas. No vista pantalones cortos. Se recomienda usar guantes cuando se trabaja con el soplador.
español / EE.UU. Tenga sumo cuidado cuando manipule gasolina o la mezcla de combustible. No fume cerca del combustible, ni acerque ningún fuego o llama al mismo. Siempre guarde la gasolina en un envase aprobado para ello. Instrucciones para el llenado de combustible Las vibraciones de la máquina pueden aflojar una tapa de combustible que ha quedado mal apretada, o simplemente soltarla y derramar combustible. Llene la máquina de combustible en lugares al aire libre bien ventilados solamente.
español / EE.UU. Instrucciones de trabajo Trabaje con mucho cuidado. Maneje el soplador solamente cuando tenga buena visibilidad y a la luz del día. !Advertencia Su soplador emite gases de escape tóxicos apenas el motor de combustión empieza a funcionar. Estos gases (por ej., monóxido de carbono) pueden ser incoloros e inodoros. Para reducir el riesgo de sufrir lesiones graves o mortales por respirar gases tóxicos, nunca haga funcionar el soplador puertas adentro o en lugares mal ventilados.
español / EE.UU. Al trabajar con el soplador, siempre cierre firmemente los dedos alrededor del mango, manteniéndolo bien apoyado entre el pulgar y dedo índice. Mantenga la mano en esta posición, para que siempre tenga la máquina bien controlada. Asegúrese que el mango de control (y el mango del accesorio de aspiradora) están en buenas condiciones y sin humedad, resina, aceite o grasa. El ventilador ubicado entre el conducto de admisión y las aberturas de salida gira siempre que el motor esté en marcha.
español / EE.UU. !Advertencia !Advertencia Siempre apague el motor y asegúrese que el ventilador está detenido antes de hacer cualquier trabajo de mantenimiento, reparación o limpieza del soplador. No intente hacer ningún trabajo de mantenimiento o reparación que no esté descrito en su manual del usuario. Este tipo de trabajo debe realizarse únicamente en el taller de servicio de STIHL. Para reducir el riesgo de incendios, no modifique ni retire parte alguna del silenciador ni del chispero.
español / EE.UU. Armado del soplador 6 1 3 5 1 34 Inserte el tubo (1) con el vástago (2) dentro del cabo (3) y gírelo en el sentido indicado por la flecha para trabarlo en su posición. b 295BA004 KN 295BA003 KN a : 3 4 295BA005 KN 2 : Meta la boquilla (4) en el tubo (1) hasta el vástago (5) hasta la posición a (larga) o la b (corta), y gírela en el sentido indicado por la flecha para trabarla en posición.
español / EE.UU. Combustible El motor de dos tiempos necesita una mezcla de gasolina de buena marca y aceite para motor de dos tiempos de buena calidad clasificado TC. Use gasolina regular sin plomo con un octanaje mínimo de 90 RON (EE.UU./Canadá: octanaje en gasolineras de 89 mínimo). Si el octanaje de la gasolina regular en su zona es más bajo, use gasolina superior sin plomo ("premium").
español / EE.UU. Arranque / Parada 3 2 295BA013 KN 1 6 5 Respete las medidas de seguridad - vea el capítulo “Medidas de seguridad”. : Ponga el interruptor (1) en la posición I : Cambie el recogedor de combustible una vez al año. Oprima el gatillo de aceleración (2) y pulse el botón de bloqueo (3) al mismo tiempo. : Suelte el gatillo de aceleración.
español / EE.UU. : Nota: Si el motor no arranca después de 10 intentos con la palanca del estrangulador en la posición e : No deje que el mango de arranque salte bruscamente hacia atrás. Guíelo lentamente hacia el interior de la caja para que la cuerda de arranque se enrolle correctamente. Ponga el estrangulador en la posición g , tire de la cuerda de arranque cinco veces, ponga el estrangulador en e y continúe intentando el arranque. 295BA016 KN : Coloque la máquina sobre el suelo.
español / EE.UU. Para apagar el motor: : Sugerencias adicionales para el arranque - Si el motor no arranca: : : : Vuelva a colocar la bujía y conecte su casquillo, empujándolo firmemente. : Mueva el interruptor a I : Ponga la palanca del estrangulador en e – aun si el motor está frío. : Ahora arranque el motor.
español / EE.UU. Limpieza del filtro de aire Para reducir al mínimo el tiempo de soplado, use rastrillos y escobas para aflojar la basura antes de usar el soplador. Técnicas recomendadas de trabajo para reducir los ruidos al mínimo: : Técnicas recomendadas de trabajo para reducir al mínimo la cantidad de basura llevada por el aire y la contaminación: : En condiciones muy polvorientas, humedezca las superficies ligeramente.
español / EE.UU. Ajuste del carburador : Coloque el elemento de espuma (3) en la cubierta (2) del filtro. : Coloque el elemento de fieltro (4) en la cubierta (5) del filtro. : Coloque la cubierta (2) del filtro de modo que se trabe en su lugar. - LD + 2 3 295BA022 KN 4 295BA020 KN 5 : Saque el elemento de espuma (3) de la cubierta (2) del filtro. : Saque el elemento de fieltro (4) de la caja (5) del filtro.
español / EE.UU. Revisión de la bujía Ajuste normal : Revise el filtro de aire y sustitúyalo si es necesario. : Arranque el motor y caliéntelo. : Gire cuidadosamente el tornillo de ajuste de ralentí (LD) en sentido contrahorario (roscas izquierdas) para enroscarlo en su asiento. Después aflójelo dos vueltas completas en sentido horario (ajuste estándar). Si el motor tiene poca potencia, le cuesta arrancar o funciona deficientemente a velocidad de ralentí, primero revise la bujía.
español / EE.UU. 000BA036 TR 1 Funcionamiento del motor Cuerda de arranque Si el funcionamiento del motor es insatisfactorio aunque el filtro de aire está limpio y el carburador ha sido debidamente ajustado, la causa puede hallarse en el silenciador. Para prolongar la vida útil de la cuerda de arranque, siempre observe los puntos siguientes: : Tire de la cuerda de arranque solamente en el sentido especificado.
español / EE.UU. Instrucciones de manejo Almacenamiento de la máquina Durante el período de rodaje Para intervalos de 3 meses o más Una máquina nueva no debe hacerse funcionar a velocidad alta (aceleración máxima sin carga) por el lapso que tome llenar el tanque tres veces. Esto evita la imposición de cargas innecesariamente altas durante el período de rodaje. : Quite el tubo del soplador y su boquilla. : Vacíe y limpie el tanque de combustible en una zona bien ventilada.
español / EE.UU.
español / EE.UU. Mantenimiento y reparación Clave de los símbolos El usuario de esta máquina deberá realizar solamente los trabajos de mantenimiento descritos en este manual. Otros trabajos de reparación debe hacerlos solamente un técnico de servicio autorizado por STIHL. Este manual de instrucciones se refiere a los modelos con diferentes campos de suministro. Las piezas o características no incluidas en todos los modelos y sus aplicaciones resultantes están marcadas con un *.
español / EE.UU.
español / EE.UU. Declaración de garantía de STIHL Incorporated sobre sistemas de control de emisiones según normas Federales y del Estado de California Sus derechos y obligaciones de garantía La Agencia de Protección del Medio Ambiente (EPA) de los EE.UU., el Consejo de Recursos del Aire del Estado de California (CARB) y STIHL Incorporated se complacen en explicarle la garantía del sistema de control de emisiones instalado en el motor de su equipo de modelos año 2000 y siguientes.
español / EE.UU. Período de garantía Trabajo bajo garantía El período de garantía comienza en la fecha en que el motor del equipo utilitario es entregado a usted y usted firma y remite la tarjeta de garantía a STIHL. Si cualquier pieza relacionada con el sistema de control de emisiones está defectuosa, la pieza será sustituida por STIHL Incorporated sin costo alguno para el propietario.
WARNING! The engine exhaust from this product contains chemicals known to the State of California to cause cancer, birth defects or other reproductive harm. ADVERTENCIA EI gas de escape del motor de esta maquina contiene producto~ qufmicos que en el estado de California son considerados como causantes de cancer, defectos de nacimiento u otros efectos nocivos para los 6rganos de la reproducci6n. = 0458 294 3021 english/espanal U.S.