
Installation Guide


MODEL No:
L-100-M
PACKAGE CONTENTS
2 YEAR LIMITED WARRANTY
This product is guaranteed against failure due to factory defects in materials or workmanship for two (2) years from the date of
purchase. This warranty is non-transferable and applies only to the original owner. Proof of purchase is required for repair or
replacement. This warranty does not cover normal wear of parts or damage resulting from any misuse of the product. Misuse of the
product includes, but is not limited to: washing the product, using in extreme weather conditions, opening the product, or trying to
remodel the product. Important: this warranty is only valid if the product has been purchased through an authorized reseller.
This fixture is IP65 rated and therefore is suitable for
indoor and outdoor use in wet locations.
CUSTOMER SERVICE
For questions regarding this product, please contact us at 303.652.6164, M-F 7am - 4pm MT or e-mail us at
info@stonepointledlighting.com.
TROUBLESHOOTING GUIDE
CLEANING INSTRUCTIONS
Using a soft cloth, clean the fixture using a mild, non-abrasive glass cleaner. DO NOT use solvents. DO NOT use cleaners
containing abrasive agents. NEVER spray liquid cleaner directly onto the light or LED. Periodically clean solar panel.
LED Facts:
Lumens: 100
Color Temperature: 5000K
CRI: 70
Efficacy (Lumens Per Watt): 100
Rated Watts: 1W
LED Life: 50,000 hours
Operating temperature: -13° to 122°F
(-25° to 50° C)
Beam Angle: 80°
Power Factor: 0.9
1
4
3
2
Shroud
Motion Sensor
Friction lock
Shatter-Resistant
Polycarbonate Lens
Stake
Monocrystalline
Solar Panel
Thumbscrew
Adjustment
screw
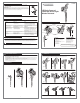
2.
The spot light has a solar panel at the top of the light head that can be adjusted by loosening the adjustment screw (Fig. 4). The
solar panel can be adjusted all the way up (nearly touching the motion sensor) and all the way down (Fig. 5). The solar panel can
be rotated for further adjustments (Fig. 6). Once adjusted be sure to tighten the adjustment screw.
3.
The solar panel can also be rotated from side to side over 180° depending on the positioning of the solar panel
to aim light in a multitude of
angles
(Fig. 7).
There are two stops located on the solar panel neck that prevents the solar panel from rotating beyond 180°
(Fig. 8)
.
Rotating beyond the set range could damage the wires and void the warranty.
4.
The light heads can be positioned from horizontal to straight up (Fig. 9). Loosen the thumbscrew to reposition the light head to
the proper angle and re-tighten.
(Fig. 1)
OPERATION
SOLAR PANEL ORIENTATION
5. Push stake into ground and aim light at desired location.
Revision Date: 04-11-2018
(Fig. 2) (Fig. 3)
(Fig. 4) (Fig. 5) (Fig. 6)
(Fig. 8)
(Fig. 7)
(Fig. 9)
3.25 in.
8,25 cm
2.5 in.
6,4 cm
South
LED Solar Powered
Landscape Accent Light
Motion Activated
Product Features:
Detection Angle: 180°
Detection Range: 5 ft.
Operating Voltage: DC 3.7v
Time On: 45 Sec. (Fixed)
Battery Type: (1) 3.7v 350mAh
Lithium-Ion Polymer Battery
(Non-Replaceable)
Run Time: 500 cycles
2.75 in.
6,98 cm
5.75 in.
14,6 cm
Problem
Probable Cause
Solution
Light comes on during the
daylight hours.
Nighttime light run time
becomes less and less.
Light cycles ON and OFF
continuously (strobe light
effect).
1. Dusk-to-dawn sensor is
detecting reflected light
from the landscape light.
1. Change the position of the light head.
Reposition light away from the reflecting surface.
2. Place a small piece of black electrical tape over
the bottom half of the dusk-to-dawn sensor.
3. Move the light to a different location where the
results are better.
1. Fixture is located in a shaded
area; dusk-to-dawn sensor is
detecting darkness.
1. Solar panel oriented the wrong way.
2. Shade gradually increasing over time.
3. Depleted battery.
1. Shine a light at the dusk-to-dawn sensor.
If the landscape light immediately shuts off,
then the fixture is located in an area that is
too dark to allow enough light to enter the
sensor. The light will need to be relocated.
1. Adjust solar panel orientation.
2. Move light.
3. Replace light.
Light does not come on
at night.
1. Sensor is detecting too much light.
2. Battery is not charging.
1. Move light to better location.
2. Make sure solar panel is positioned to see the sun.
Light stays on. 1. Light is in a shaded area.
2. Damaged sensor.
1. Shine light on sensor with flashlight, if the light
turns off relocate to brighter area.
2. Call customer service at 303.652.6164.
• Avoid locating the light in shadows. Shadows inhibit the solar panel’s ability to convert the sunlight.
• Check the position of the light every 3-4 months and adjust for maximize sun exposure to the sunlight.
• Charges off of direct sunlight.
WINTER MONTHS:
During the short daylight hours of winter, fully charging the battery pack may be nearly impossible. This will
reduce the available charge to run the light at night. Keep the solar panel clear of snow and ice for best results.
The light features an adjustable solar panel. During the winter months the sun’s trajectory is at it’s lowest across
the sky, adjust the solar panel to 45° to maximize the sun light hitting the panel.
INSTALLATION
SAFETY AND PRECAUTIONS
1. Suitable for both indoor and outdoor wet locations.
2. Do NOT look directly into LED lights.
3. The LED modules used in this fixture are not serviceable.
4. Do not use this product if damaged or missing parts.
5. Operating environments ranging from -13° to 122°F (-25° to 50° C). Prolonged exposure to extreme temperatures may reduce the
life of this product
6.
The batteries charge by day and discharge at night, when the light is on. Over time the batteries will lose their charging capability. A sign
this might be happening to your lights is reduced runtime in the evening, even after a sunny day.
7. WARNING: This light contains Lithium or Ni-Cad or batteries. Lithium-NiCad Batteries may leak harmful or ignitable materials.
The light should be disposed of properly.
1.
Remove the thumbscrew from the stake (Fig. 1). Line up the flat side of the ground stake with the friction lock, against the friction lock on the
back of the light head (Fig. 2). Fasten both pieces together with the thumb screw (Fig. 3).