SGdchw & SGX2HW Hardwire KITs User MANUAL
1 Product safety & precautions Thank you for purchasing the Street Guardian Hardwire Kit. Please read and follow this guide before installation and use. When installing the hardwire kit, please avoid any safety related power sources such as airbags in the fuse box. Please ensure that your Street Guardian camera is updated to the latest firmware available for download from the support section of our website.
2 INTRODUCTION The Street Guardian Hardwire Kit enables a special parking mode function for the supported camera models. Installation of this product provides the camera with a source of power from the vehicle’s battery while the ignition is off. A built-in power monitoring system will terminate power before low voltage discharge can occur to the vehicle’s battery.
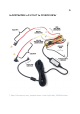
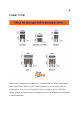
3 HARDWIRE LAYOUT & OVERVIEW * [Note] Fuse tap may vary, example shown is Low Profile Mini, SGDCHW shown
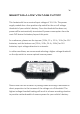
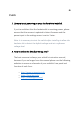
4 SELECTING A LOW VOLTAGE CUTOFF This hardwire kit has a nominal input voltage of 12v~24v. The power supply module has a four-position dip-switch for the cut off voltage threshold of your vehicle’s battery. Once the threshold has been set, power will be automatically terminated if power consumption from the main DVR drains the battery beyond this point. As a reference, please use the top row [11.8v, 12.v, 12.2v, 12.4v] for 12V batteries, and the bottom row [23.6v, 24.0v, 24.4v, 24.
5 FUSE TYPE Before purchasing the hardwire kit, it’s important to select the correct fuse type. Please refer to your vehicle owners manual and locate an appropriate fuse in your fuse panel that is not part of your vehicle’s safety power systems such as airbags, horn, etc, professional installation is recommended.
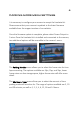
6 PARKING MODE MENU SETTINGS It is necessary to configure your camera to accept the hardwire kit. Please ensure that your camera is updated to the latest firmware available from the support section of our website. Once the firmware update in complete, please select Power Output to 3-wire. Once the hardwire kit is installed and connected to the camera, two additional options will be accessible in the camera’s menu. The Parking Monitor menu allows you to select the frame rate for time lapse recording.
7 To indicate that parking mode has been engaged, a clock icon “ ” will appear near the top right of the screen and an audio jingle will be heard when entering or exiting parking mode.
8 FAQ 1. Camera is not powering on once the hardwire installed. If you’re confident that the hardwire kit is receiving power, please ensure that the camera is updated to latest firmware and the power input in the settings menu is set to 3 wire. Note: it is necessary to start the vehicle after installing to allow the hardwire kit to detect the default voltage and set a reference voltage level. 2.
9 3. How to turn the camera off while parked? After the vehicle has been turned off and the camera has entered parking mode press and hold the power button to shutdown the camera 4. How to turn camera back on in parking mode? The camera can be turned back on while in parking mode manually by long pressing the power button.
10 Technical SPECIFICATIONS Input voltage (Nominal) 12v~24v Auto detecting Output voltage 5v 2A 12v Voltage cutoff (+/- 0.1v) 11.8v, 12.0v, 12.2v, 12.4v 24v Voltage cutoff (+/- 0.1v) 23.6v, 24.0v, 24.4v, 24.8v Cable length 4 meters (13 ft & 1.5 inch) Length from Camera to Module 3 meters (9 ft & 10.125 inch) Length from Module to Fuse Tap 1 meter (3ft & 3.
11 further information All attempts are made to ensure that the information contained in this user guide is correct at time of publication. The specifications and details within this guide are based on the Australian market version of the product and are subject to change, the pictures used are for illustration purposes only.