Version 1.
ENGLISH Operation Manual NUMA ORGAN 2 by Studiologic® 3 EN
Safety Instructions Important Safety Instructions Please read the entire manual. It contains all the information you need to use this unit. Please follow the instructions in the manual. The warranty will be void if unauthorized work is carried out on the instrument. Only accessories specified by the manufacturer should be used with this unit. Use the unit only as specified in this manual. DANGER! Risk of electric shock. Do not open the chassis. There are no user serviceable parts inside.
Table of contents Safety Instructions 4 Your new Numa Organ 2 What‘s behind Numa Organ 2 6 6 Tone Wheel Organ Models 6 Acoustic & Electronic Organ Sounds 8 External Rotary Speaker and amplifier 9 Connection / Back view 10 Control panel Volume How functions are shown in this manual 11 11 11 Operation / Drawbars Drawbars How the manual and drawbars are related Extension with other manuals 12 12 13 13 Operation Pitch Wheel Rotary / Modulation Wheel Chorus / Vibrato Split Split point Transpose E
Your new Numa Organ 2 Thank you very much for choosing the Numa Organ 2. You have obtained a state-of-the-art instrument made by the renowned manufacturer Studiologic. Get inspired by the new Numa Organ 2! Its Physical Modelling synthesis is the most authentic revival of the sound of an electromechanical tone wheel organ. But the Numa Organ 2 is much more. We recommend you to read the entire manual carefully to take full advantage of all the functions of your new instrument.
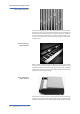
Tone Wheel Organ Models Model A Model A is another popular reference, with the same tone generator of Model B, but with a built in amplification system and some changes in the circuitry that could make its sound warmer than other instruments of the same kind (a built in Reverb was also available). The balance of the Numa Organ model A is different from the model B and C and it has a natural loudness, less middle frequencies.
Acoustic & Electronic Organ Sounds Classic Organ Diapason This sound model allows to create sounds with a classical timbre, thanks to its harmonic spectrum that emulates the typical timbre of the main Principal-diapason pipes; the option to store all the effects in each Preset allows to adapt these controls to this sound, that normally is associated with a noticeable Reverb and zero Drive/Click/ Leakage levels.
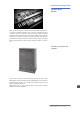
Acoustic & Electronic Organ Sounds Electronic Organ Model F Many electronic organs had tabs (instead of drawbars) with various sounds on different pitches, to be mixed in combinations.
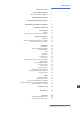
Connection / Back view Rotary Speaker Cabinet, Page 19 Audio out L/R Page 10 Direct-out Page 10 Stereo audio in • Level Page 10 Hold • Expression Page 10 USB 1 • Mini USB 2 Page 10 Fuse Page 4, 10 Headphone out 1/2 Page 10 MIDI In•Out•Thru Page 20 Mains • Power Page 4, 10 Power connection Use the power cord supplied with the device to connect the Numa Organ 2 to the power socket. Switch the unit on by using the power button next to the power socket.
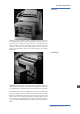
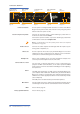
Control panel Pitch / Modulation / Rotary Page 14 Presets/ Sound Models Recall / store / Sound Page 17,18 Chorus • Vibrato 2 x 3 variations Page 14 Split • Transpose •Tune Keyboard functions Page 15 Drawbars for Upper, Lower, Pedal Page 12,13 Effects Reverb, Drive, Click, Leakage, Page 16 Percussion Page 16 When you use the Numa Organ 2 for the first time, we recommend you to turn the Volume knob on the Output section to not more than half way between 0 and Full.
Operation / Drawbars • Drawbars Drawbars Drawbars are a characteristic control of a tone wheel organ. In the text the drawbars of the Numa Organ 2 are indicated by coloured highlighted digits as shown below. • Upper • Lower • Pedal 1 2 3 4 5 6 7 8 9 The drawbars can be used to create a wide range of sounds of the Numa Organ 2. Each drawbar represents a different harmonic related to the 8‘ stop of a pipe organ (the 3rd drawbar) which is also called “native pitch“.
Operation / Drawbars • Drawbars At each push of a key all nine harmonics of this particular key are generated. The drawbars simply adjust the levels among them. Thus you can change the timbre while keys are pressed. How the manual and drawbars are related Note: Located under every single key of an original tone wheel organ were nine contacts, which were all closed at the same time by pressing the key. A bus system then regulated the volume for each contact via each of the nine drawbars.
Operation • Pitch • Rotary / Modulation • Chorus / Vibrato Pitch Wheel To vary the pitch while playing by ±2 semitones, use the Pitch wheel on the left. The wheel is self centering and it will go back to its center position after being released. Rotary / Modulation Wheel (Rotary Speaker Simulation) Press the On/Off button next to the Modulation / Rotary wheel to switch the internal Rotary Speaker effect on. The On/Off button lights up. Use the Modulation / Rotary wheel to adjust the speed of the rotor.
Operation • Transpose •Edit • Split • Split point Press Split to activate this function. The Split button will light up and the manual is splitted in two zones. Press Upper to adjust the sound of the upper zone. Press Lower to assign the drawbars to the lower zone. In addition, you can also assign to the left zone of the keyboard the pedal manual, by pressing Pedal to Lower. The button will light up. To control the sound press Pedal in the drawbar section.
Operation • Percussion • EQ / Volume • Effects Percussion To add more rhythmic elements to your performance you can switch on the Percussion. The Percussion effects the notes played staccato and fades away when playing legato, as in the original vintage tone wheel organs. Press On/Off to activate the Percussion. With the 2nd/3rd button you can decide whether the Percussion is generated by the second harmonic (button does not light up) or by the third harmonic (button lights up).
Operation • Preset recall / store You can use your Numa Organ 2 as a master keyboard, controlling external MIDI devices with full parameters. By pressing Dynamic TOUCH / [MIDI] button, you can get the following combinations: • dynamic TOUCH/[MIDI] Dynamic TOUCH / [MIDI] - Light OFF: Local ON, MIDI OFF. The keyboard plays the internal sounds. The MIDI output is off. - Light ON: Local OFF, MIDI ON. The keyboard sends the MIDI notes with the related velocity through the MIDI output and the USB.
Operation Preset Store To create your favourite sound, you can move through all the parameters on the control panel.
Preset Up/Download / External Rotary S. / Update You can save your complete Preset bank by uploading it on your computer. To enter the function activate the Edit mode by pressing at the same time both Transpose+ and Transpose- for a few seconds; both buttons will start to blink. Pressing the Preset button the complete bank will be sent to your computer as a file (MIDI file) that you can name as you prefer to have a reference.
MIDI MIDI connection MIDI (Musical Instruments Digital Interface) is a standard for data transmission between sound modules, electronic musical instruments and computers. Please note: the MIDI Out of a device is connected with the MIDI In of another device. Incoming data arriving at the MIDI In are duplicated at the MIDI Thru socket. The Numa Organ 2 sends MIDI data from the MIDI Out and at the same time via the USB port. MIDI data are received via MIDI In.
MIDI You can play and control the sounds of the Numa Organ 2 with other MIDI devices or with your computer. In the Appendix section of this manual you can find the MIDI implementation chart which shows all MIDI Control Change messages that the Numa Organ 2 supports. Control the Numa Organ 2 via MIDI Note: MIDI data sent on ch.1 are related to the Upper manual; MIDI ch.2 and 3 control the Lower manual and the Bass section.
Troubleshooting Troubleshooting Problem Possible cause Solution Numa Organ 2 does not No power is supplied. turn on. Defective power cable. Fuse is blown inside the Numa Organ 2. Please make sure that power is available and switched on. Check the power cable and the internal fuse and replace it if needed, with a fuse as specified on page XX.. Numa Organ 2 cannot be controlled via MIDI. MIDI data are not being sent on MIDI channel 1, 2 or 3. Please send MIDI data only on MIDI channel 1, 2 and/or 3.
Declarations Every product from Studiologic by Fatar has been carefully manufactured, calibrated and tested, and carries a two year warranty. Please register your product to get full support. Damage caused by incorrect transport, mounting or handling is not covered by this warranty. For any further informations please refer exlusively to your dealer and/or local distributor.
ITALIANO Manuale di Istruzione NUMA ORGAN 2 by Studiologic® 25 IT
Informazioni di sicurezza Importanti informazioni di sicurezza Leggere attentamente il manuale. Esso contiene tutte le informazioni necessarie per utilizzare questo strumento. Seguire le istruzioni nel manuale. La garanzia verrà annullata qualora venissero effettuati interventi non autorizzati nel Numa Organ 2. Possono essere utilizzati solo accessori specificati dal costruttore. Usare lo strumento solo come indicato in questo manuale. PERICOLO! Rischio di scossa elettrica. Non aprire lo chassis.
Indice Informazioni di sicurezza Il tuo nuovo Numa Organ 2 28 Tecnologia del Numa Organ 2 28 Tone Wheel Organ Models 28 Acoustic & Electronic Organ Sounds 30 Rotary Speaker & Amplificazione 31 Connessioni / Vista posteriore 32 Pannello di controllo Volume Indicazione delle funzioni nel manuale 33 33 33 Operatività / Drawbars Drawbars Come sono relazionati manuale e drawbars Estensioni con altri manuali 34 34 35 35 Operatività Pitch Wheel Rotary / Modulation Wheel Chorus / Vibrato Split Split
Il tuo nuovo Numa Organ 2 Grazie per aver scelto Numa Organ 2, uno strumento allo stato dell‘arte, concepito dai musicisti Studiologic per gli appassionati di musica vintage. Prendi l‘ispirazione dal nuovo Numa Organ 2! La sua sintesi per modelli fisici è la rivisitazione più autentica dell‘organo elettromagnetico a ruote foniche. Ma il Numa Organ 2 è molto di più! Ti raccomandiamo di leggere attentamente l‘intero manuale per poter usufruire dei vantaggi di tutte le funzioni del tuo nuovo Numa Organ 2.
Tone Wheel Organ Models Model A Model A è un altro riferimento molto popolare, con la stessa generazione di base del modello B, amplificazione incorporata ed alcune varianti circuitali che potevano forse determinare un suono più caldo rispetto ad altri strumenti dello stesso tipo (un Reverbero incorporato era anche disponibile). Il Model A è perciò diverso dal modello B e C, con un Loudness caldo e naturale e frequenze medie meno evidenti.
Acoustic & Electronic Organ Classic Organ Diapason Questo suono dal contenuto armonico ispirato ai Principali d‘Organo permette di creare timbri molto “Classici”; la possibilità di memorizzare effetti e controlli nei Preset permette di adattarli a questo suono, normalmente associato con una certa quantità di Reverb, senza effetti come Drive/Click/Leakeage (comunque utilizzabili).
Acoustic & Electronic Organ Sounds Electronic Organ Model F Electronic Organ Model F: molti organi elettronici avevano dei registri fissi (invece di Drawbars) con vari suoni su altezze uguali o diverse, adatti ad essere usati in combinazione.
Connessioni / Vista posteriore Rotary Speaker Cabinet, Page 41 Audio out L/R Page 32 Direct-out Page 32 Stereo audio in • Level Page 32 Hold • Expression Page 32 USB 1 • Mini USB 2 Page 32 Fuse Page 26, 32 Headphone out 1/2 Page 32 MIDI In•Out•Thru Page 42 Mains • Power Page 26, 32 Connessione alimentazione Usa il cavo di alimentazione in dotazione con Numa Organ 2 per connettere lo strumento alla presa di corrente.
Pannello di controllo Pitch / Modulation / Rotary Pag 36 Presets/ Sound Models Recall / store / Sounds Pag 39,40 Chorus • Vibrato 2 x 3 variazioni Pag 36 Split • Transpose •Tune Funzioni tastiera Pag 37 Drawbars per Upper, Lower, Pedal Pag 34,35 Effects Reverb, Drive, Click, Leakage, Pag 38 Percussion Pag 38 Quando usi il Numa Organ 2 per la prima volta, ti raccomandiamo di impostare il cursore del Volume della sezione Output ad un valore non superiore alla metà della sua corsa.
Operatività / Drawbars • Drawbars Drawbars I Drawbars sono un tratto caratteristico degli organi a ruote foniche. Per questo andremo ad esplorarli per primi. Nel testo, i drawbar del Numa Organ 2 sono indicati da numeri colorati ed evidenziati come segue. • Upper • Lower • Pedal 1 2 3 4 5 6 7 8 9 Usa i drawbars per impostare il timbro del Numa Organ 2. Un suono può comprendere fino a 9 onde sinusoidali.
Operatività / Drawbars • Drawbars Ad ogni pressione di un tasto vengono generati tutti e nove gli armonici. I drawbars ne regolano semplicemente il livello. Perciò puoi cambiare il timbro mentre i tasti sono premuti. Relazioni tra manuale e drawbar Nota: Negli organi elettromeccanici, sotto ad ogni singolo tasto erano posizionati nove contatti che si chiudevano contemporaneamente alla pressione del tasto stesso. Un sistema di circuiti regolava poi il volume di cia-scuno dei nove drawbars.
Operatività • Pitch • Rotary / Modulation • Chorus / Vibrato Pitch Wheel Per variare in modo continuo l‘altezza del suono di ±2 semitoni, usa la ruota Pitch posta sulla sinistra. La ruota si riposiziona al centro automaticamente al suo rilascio. Rotary / Modulation Wheel Premi il bottone On/Off dopo la ruota Modulation/Rotary per attivare il simulatore del Rotary Speaker. Il bottone On/Off si accenderà. Usa la ruota Modulation/Rotary per variare la velocità virtuale del Rotary Speaker.
Operatività • Transpose •Edit • Split • Split point Premi Split per attivare questa funzione. Il pulsante Split si illumina ed il manuale si divide in due zone. Premi Upper nella sezione drawbar per regolare il timbro della zona relativa. Premi Lower per assegnare i drawbars alla zona lower. In alternativa puoi assegnare alla zona Lower una sezione Pedal. Per far questo, premi Pedal to Lower. Il pulsante si illuminerà. Per controllare i drawbars, premi il tastino Pedal nella relativa sezione.
Operatività • Percussion • EQ / Volume • Effects Percussione Per aggiungere più elementi ritmici alla performance, puoi usare la Percussione. Questo effetto particolare si ottiene suonando “staccato“ esattamente come negli organi elettromagnetici d‘epoca. Premi On/Off per attivare la Percussione. Con i pulsanti 2nd/3rd puoi decidere su che piede viene generata la Percussione: dalla seconda armonica=4‘ (il pulsante non è acceso), o dalla terza armonica=2 2/3‘ (il pulsante si accende).
Operatività • Preset recall / store Numa Organ 2 può essere utilizzato come una master keyboard per controllare unità MIDI esterne tramite parametri MIDI completi. Premendo il tasto Dynamic TOUCH / [MIDI], si possono avere le seguenti combinazioni: • dynamic TOUCH/[MIDI] Dynamic TOUCH / [MIDI] - LED OFF: Local ON, MIDI OFF. La tastiera controlla i suoni interni, l‘uscita MIDI out è disattivata. - LED ON: Local OFF, MIDI ON.
Operatività Memorizzazione Preset Per creare una serie di suoni preferiti, si possono utilizzare tutti i parametri del Pannello di Controllo.
Preset Up/Download / Rotary esterno / Aggiornamento Si possono salvare o caricare banchi di Preset sul vostro computer. Per attivare la funzione è necessario entrare in modo Edit premendo contemporaneamente Transpose+ e Transpose- per alcuni secondi fino a quando i relativi LED lampeggiano. Premendo il tastino Preset il relativo banco memorizzato sullo strumento sarà inviato al computer come file (MIDI file) che può essere liberamente nominato per avere un riferimento.
MIDI Connessioni MIDI MIDI (Musical Instruments Digital Interface) è uno standard per la trasmissione dei dati tra tastiere elettroniche, moduli sonori, sintetizzatori e computer. Il MIDI Out di una periferica si collega al MIDI In di un‘altra. I dati che arrivano al MIDI In vengono duplicati e trasmessi dalla porta MIDI Thru. Il Numa Organ 2 invia i dati MIDI data dal MIDI Out e contemporaneamente dalla porta USB 1. I dati MIDI vengono ricevuti nel MIDI In.
MIDI Puoi suonare e controllare i suoni del Numa Organ 2 con un‘altra tastiera MIDI o con il computer. La tabelle riportata nell‘appendice (pag 48) mostra i messaggi Control Change MIDI che agiscono sui parametri del Numa Organ 2. Controllare Numa Organ 2 via MIDI Nota: tutti i dati MIDI inviati al canale MIDI 1 del Numa Organ 2 agiscono sui parametri generali o sui settaggi del manuale Upper. I dati inviati al canale MIDI 2 controllano il manuale Lower.
Risoluzione dei Problemi Risoluzione dei problemi 44 NUMA ORGAN 2 by Studiologic® Problema Possibili cause Soluzioni Il Numa Organ 2 non si accende. Non c‘è alimentazione. Cavo di alimentazione difettoso. Fusibile bruciato nel Numa Organ 2. Assicurati che ci sia corrente. Controla il cavo di alimentazione ed il fusibile (sostituiscilo se necessario con uno dello stesso tipo cf. pagina 65) Numa Organ 2 non può esser controllato MIDI. I dati MIDI non sono inviati ai canali MIDI 1, 2 or 3.
Dichiarazioni Tuti i prodotti Studiologic by Fatar sono costruiti attentamente, calibrati, testati, e sono soggetti a garanzia di due anni. Registra il tuo NUMA Organ per avere pieno supporto. Danni causati da trasporto o montaggio non conforme o da errata manutenzione non sono coperti da questa garanzia. Rimborsi di importo superire al valore dello strumento sono esclusi. Tutto questo è basato su termini e condizioni del distributore / FATAR srl, Italy.
Appendix Appendix NUMA ORGAN 2 by Studiologic® 47
Appendix MIDI Implementation Chart Parameter MIDI CC Value MIDI Ch.
Appendix Specifiche Tecniche Specifications Studiologic NUMA ORGAN 2 Keyboard Sound Engine Number of Keys 73 Type Semi-weighted action (TP8 ORGAN Waterfall) Polyphony 128 (max) Type Physical Modeling Sounds 7 Organ Sound Models Controls 9 Drawbars, Pitch wheel, Rotary/Modulation wheel, Chorus/Vibrato knob, Presets/Sounds, Split, Transpose/ Tune, Percussion, Effect (Reverb, Drive, KeyClick, Leakage), Output Volume /EQ, Dynamic TOUCH/[MIDI] Connections Audio Out Left/Right, 6.
RM. 06.