
Product Manual


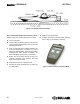
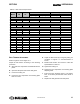
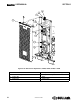
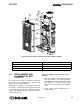
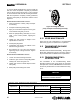
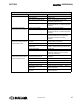

Table Of Contents
- Safety
- Description
- 2.1 Introduction
- 2.2 Compressor Component Description
- 2.3 Compressor Cooling And Lubrication System — Functional Description
- 2.4 Compressor Discharge System—Functional Description
- 2.5 Control System — Functional Description
- 2.6 Air Inlet System, Functional Description
- 2.7 Controller/Keypad
- 2.8 LCD Display
- 2.9 LED LIGHTS
- Specifications
- Installation
- Operation
- Maintenance
- 6.1 General
- 6.2 Maintenance After Initial 50 Hours of Operation
- 6.3 Maintenance Every 2000 Hours
- 6.4 Fluid Maintenance
- 6.5 Filter Maintenance
- 6.6 Air Filter Maintenance
- 6.7 Separator Maintenance
- 6.8 Belt Maintenance
- 6.9 Replacement and Alignment of Belt Pulleys
- 6.10 Hose Maintenance
- 6.11 TANK MOUNT PACKAGE MAINTENANCE
- 6.12 Troubleshooting – Introduction

SHOPTEK
™
USER MANUAL SECTION 6
66
02250180-090 R00
To correct parallel misalignment, first check that the
rear face of the compressor unit pulley is positioned
0.3in (7.5mm) off the mounting face. This is required
to ensure that the belts clear all mounting bolt heads.
With the compressor unit pulley correctly positioned,
move the motor pulley on the shaft to achieve correct
alignment.
I
NSTRUCTIONS FOR INSTALLING A PULLEY:
1. Clean all surfaces of shaft, pulley and taper
lock bushing.
2. Fit taper lock bushing inside pulley.
3. Spray oil or anti-seize compound on the grub
screw threads and gently screw in.
4. Slide the pulley/bushing assmebly on to the
shaft to the correct position, aligning the
keyway.
5. Tighten the grub screws in stages to the
specification in Table 6-2.
6. Check pulley alignment.
7. Install belts and tension as outlined in the
belt tensioning procedure.
8. Run machine for 0.5-1 hour and check the
tightening torque of the grub screws. Tighten
if necessary;
I
NSTRUCTIONS FOR REMOVING A PULLEY:
1. Loosen and remove both grub screws.
2. Install one grub screw into the jacking/disas-
sembly hole. Refer to Figure 6-12.
3. Tighten grub screw to release taper lock hub
from pulley.
4. Slide pulley and bushing from shaft.
6.10 HOSE MAINTENANCE
Fluid and air hose replacement is recommended
after three (3) years or 16,000 hours of operation.
6.11 TANK MOUNT PACKAGE
MAINTENANCE
Receiver tank should be drained daily. Change SCF
filters when indicated by gauge on housing. Refer to
dryer documentation for maintenance requirements.
6.12 TROUBLESHOOTING –
INTRODUCTION
The information in the Troubleshooting Guide
describe symptoms and usual causes for the listed
discrepancies. However, DO NOT assume that these
are the only malfunctions or fault conditions that may
occur.
NOTE
For additional troubleshooting guidelines,
consult the Controller manual.
1
2
Table 6-2: Pulley Tightening Torque Specification
Tapered Hub Size of Hex Key (mm) Number of Grub Screws
Tightening Torque
ft•lbs N•m
1210/1610 5 2 14.8 20.0
2012 6 2 22.1 30.0
Figure 6-12: Diagram of belt
pulley and taper lock bushing assembly
1. Jacking/Disassembly Hole
2. Installation Hole