A MG M A N UA L
A M G I N S TA L L AT I O N I N S T R U C T I O N S & O W N E R S’ S M A N UA L N A ME : PA RT # : A MG 3 6 ” A MG3 6 A MG 5 4” A MG5 4 Natural gas & liquid propane configurations T H A NK YOU Thank you for your purchase. We’d like to welcome you to the Summerset family of luxury outdoor kitchen products and look forward to being a part your home for years to come. As a family business with over 30 years of industry experience, we aim to deliver exceptional quality and personal service.
WARNING! READ THIS MANUAL CAREFULLY AND COMPLETELY BEFORE USING YOUR GRILL TO REDUCE THE RISK OF: Fire, Burn hazard, personal injury or property damage. Improper installation or servicing Electric Shock WARNING! THIS PRODUCT IS DESIGNED FOR OUTDOOR USE ONLY Improper installation, adjustment, alteration, service or maintenance can cause property damage, injury or death. Read this manual thoroughly before installation, use, or servicing of this product.
WARNING! SAFETY AND INSTALLATION WARNINGS • Please read all instructions before installation or operating your gas grill to prevent injury and appliance damage • All gas grills will get hot during use. Use extreme caution when operating the grill • Do not touch hot surfaces. Always use the handle to open or close the grill • Never use dented, rusty or damaged propane cylinders.
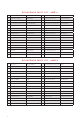
R E P L AC E A B L E PA R TS L I S T - A M G 3 6 1. Main Hood HOOD-AMG36 18. Hood Lift Assist Spring (2 ea.) 10035 2. Temperature Gauge TEMP-AMG 19. Cooking Lights (2 ea.) LIGHT BULB AMG 3. Hood Handle HOODHAND-AMG36-ROD 20. Left Rotisserie Rod Bracket AMG-RTSBKT-L 4. Hood Handle Stanchions (2 ea.) HOOD BKT-AMG 21. Right Rotisserie Rod Bracket AMG-RTSBKT-R 5. Top Front Panel Vent FRONT-AMG36-VNT-T 22. Warming Rack WARM-AMG36 6. Bottom Front Panel Vent FRONT-AMG36-VNT-B 23.
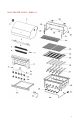
I L LU S T R AT E D PA R TS : A M G 3 6 2
B E FO R E G R IL L IN G SHIPMENT ARRIVING DAMAGED: ventilation. If you are uncertain how to categorize a partial enclosure, contact the authority having jurisdiction for help describing the space. VISIBLE DAMAGE Your AMG grill has been carefully designed for easy placement and operation on your outdoor room, patio or deck. Before installation, it is important to carefully select, plan, and prepare the location of your new grill.
IN S TA L L AT IO N WARNING! If your grill includes the optional rotisserie kit and you store the rotisserie rod at the back of the grill, always remove the rear of the cover first, carefully avoiding the rotisserie rod so it doesn’t fall from the grill. The rotisserie rod is very heavy and sharp and can cause severe personal injury. EASY ACCESS Allow clear access to the gas supply hose and regulator.
IN S TA L L AT IO N STAND-ALONE (CART) INSTALLATIONS AMG offers an optional, custom grill cart for standalone installations that utilize a standard 20 lb. propane tank. Please note the requirements below regarding propane tank usage and handling, and check the dimensions in the following section for proper clearances in your installation planning process. IMPORTANT! • • The cylinder must be constructed and marked in accordance • with the latest U.S.
GE T T IN G TO K N O W YO U R A M G OPERATING CONTROLS WARNING! • All propane gas connections must be performed by a licensed contractor or the local gas company • The gas line must be appropriately sized and installed to supply the maximum demand of the grill without loss of pressure. • The sealant used on threaded connections must be resistant to the action of propane gas. • A gas shut-off valve must be installed by a qualified plumber in an easily accessible location.
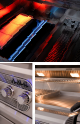
GE T T IN G TO K N O W YO U R A M G to operate the hood vent as it can become quite hot 6. Grill Hood: Your AMG hood is a double-wall design with internal, spring assist system. Always open the grill hood before lighting the grill. Keep the hood open when starting a charcoal or wood fire and when the hood thermometer temperature reads greater than 600°F. 7.
L IG H T IN G YO U R G R IL L Never connect the appliance to an unregulated gas supply line. Grills operated without a regulator are unsafe and will not be serviced until installed properly and safely. Unsafe operation without a gas regulator will void warranty of the grill. WARNING! Wear your protective gloves while using the grill or any time you come into contact with the grill while it is hot. Never use the lifting tool without your protective grilling gloves. AVAILABLE OPTIONS & ACCESSORIES 1. 2. 3.
L IG H T IN G T H E G R IL L the grill to the pallet and remove the wood bracing. Carefully cut the strapping that secures the grates in position. AMG uses sturdy tie-down cables and straps to ensure your grill arrives at your home in showroom condition. BE SURE YOU HAVE REMOVED ALL TIE DOWNS BEFORE ATTEMPTING TO LIFT THE GRILL. With at least 1 buddy, lift the grill from the pallet and place in it’s final location 7. 8. 1. 2.
O PE R AT IO N be performed after installation due to possible mishandling during shipping or installation. Periodic leak tests are recommended for safety. OPE R ATI ON NOTE! • All gas piping and connections must be tested for leaks after installation or service. All leaks must be corrected immediately. • Homeowners should only check for gas leaks in the external gas piping system from the gas supply to the gas regulator.
O PE R AT IO N WARNING! around the grill, in the cart, or in the masonry enclosure. LP GAS CYLINDERS. FILLING, REFILLING AND USE • Never move the grill when hot. When in use, portions of the grill are hot enough to cause severe burns. • Gas grills are not designed or certified for, and are not to be installed in or on recreational vehicles, portable trailers, boats or any other moving installation.
L IG H T IN G YO U R G R IL L L IGH T IN G YO UR A MG G RILL STANDARD LIGHTING PROCEDURE: Each of the burners on your AMG operate independently and must be lit, adjusted, and shut down separately. 1. 2. 3. 4. 5. Open the grill hood. Make sure all the control knobs are in the OFF position. Turn on the main gas supply. Push in any knob until fully depressed and hold in while you rotate it counterclockwise (left). You will feel and hear 1 noticeable “click” as the ignition system sparks.
COO K IN G W IT H YO U R A M G G RILL BEFO RE YO U CO O K • Before each use, perform a quick safety check of the grill and grilling area. This will cause damage to your grill not covered under your warranty. • 1. Clean and inspect the gas hose. If there are signs of abrasion, cuts, wear, abuse or leaks, do not operate the grill. Never leave your AMG unattended while in use. • Do not block or obstruct airflow to the vents at the front of your grill. 2.
COO K IN G W IT H YO U R A M G G RILL continued cooking at lower temperatures. Rotisserie cooking on a spit bastes food in its own juices. The only difference between roasting and rotisserie cooking is the use of the spinning spit. Rotisserie is generally done with indirect heat, but can also be done directly above the fire.
G R IL L FE AT U R E S 1. 2. 3. 4. Place an even, single layer of charcoal briquettes up to, or below the maximum level indicated on the fuel trays you will be using. Image 4. above shows an example of the MAXIMUM allowable level. You’ll be surprised how much heat is generated by this amount of briquettes. Light the main burners to the left and right sides of each tray and leave in the HIGH position. LEAVE THE HOOD OPEN while the gas is on and the charcoal begins to burn.
G R IL L FE AT U R E S 1. 2. 3. 4. Place a single layer of properly seasoned, cooking wood chunks up to or below the maximum level indicated on the fuel trays you will be using. Image 6. above shows the MAXIMUM allowable level to use in your grill. Light the main burners to the left and right sides of each tray and leave in the HIGH position. LEAVE THE HOOD OPEN while the wood begins to burn. Once the wood is burning at a proper level, you may turn off the main burners and close the hood if you wish.
B E FO R E G R IL L IN G 4. 5. 6. 7. pins at the front of the tool through the bracket on the front of the rear hood as shown in image. Release the handle. Take care to avoid hot metal parts of the grill while adding fuel to the baskets. When finished adding solid fuel, carefully disengage the nose pins from the bracket by lifting the front of the tool upward without releasing the tail hook. Lower the cooking grate back to it’s working position.
B E FO R E G R IL L IN G • Occasionally, you will want to be more thorough removing ash from the inside of the grill. 1. Perform a “Burn off” cleaning as described above to remove as much cooking residue as possible. Wait until the grill is completely cool, then empty the drip pan as described above. Remove the cooking grates, and then sweep ash off all the interior surfaces of your grill using a natural bristle painter’s brush, or vacuum with a brush attachment.
B E FO R E G R IL L IN G NOTE! • 1. 2. 3. 4. 5. 6. 7. 8. Rainwater can accumulate in the drip pan if the grill is not covered. If you suspect the tray has water in it, take care opening the tray to avoid spilling the water on yourself Carefully pull open the drip tray to it’s first open position. If the tray has water in it, place a bucket under the drain plug large enough to hold the water. If there is no water in the tray, proceed to step #6 below.
WA R R A N T Y Lifetime Warranty on construction and manufacturers defects Lifetime Warranty on frame and housing Lifetime Warranty on cooking grates, burners and valves One year warranty on all other parts, components and electrical Summerset Professional Grills Warranty is valid for original purchaser at original site of delivery with proof of purchase and photo documentation only. Registration form must be submitted within 30 days of the purchase date to validate the warranty.
PROBLEM POSSIBLE CAUSE WHAT TO DO 1. The grill is not getting gas. 2. Low gas pressure. 3. Propane bottle safety activated. 4. Air trapped in the gas line. 5. Defective gas regulator. 1. Check gas supply. 2. Check gas line for kinking or blockage. 3. Close all gas valves. Reset LP bottle. 4. Bleed air from gas line. 5. Replace gas regulator. An individual burner won’t light 1. Gas valve orifice is blocked. 2. Faulty valve igniter. 3. Faulty gas valve. 4. Burner is dirty or blocked. 1.
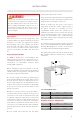
W I R I N G D I AG R A M : A M G 3 6 TRANSFORMER PLUG COOKING LIGHT (LEFT) COOKING LIGHT (RIGHT) POWER WIRE LIGHT WIRE SOCKET LIGHT WIRE STAINLESS STEEL FLEX-LINE WIRE LED LIGHTS SOCKET SOCKET LED SWITCH COOKING LIGHT SWITCH 22
WE MAKE IT ALL Summerset Professional Grills strives to meet every outdoor living expression. We offer a wide range of products from grills, refrigeration, sinks, accessories and more. Our goal is to ensure you have everything you need to create your perfect outdoor atmosphere. No matter the style or budget, Summerset will deliver an experience that will help create the ultimate backyard getaway.