
Use & Care

5
INSTALLATION INSTRUCTIONS
Use two or more people to move and install your appliance. Failure to do so can result in back or
other injury.
CAUTION: YOU MUST ALLOW THE APPLIANCE TO SIT UPRIGHT FOR 24 HOURS BEFORE
TURNING ON, TO ALLOW THE COMPRESSOR LUBRICANT TO DRAIN. Failure to do
so may adversely affect the performance and the lifetime of the unit.
1. Remove the packaging materials.
2. Remove any tape and glue residue from surfaces before turning on the appliance. Rub a small
amount of liquid dish soap over the adhesive with your fingers. Rinse with warm water and dry.
3. Do not use sharp instruments, rubbing alcohol, flammable fluids, or abrasive cleaners to remove
tape or glue. These products can damage the surface of your appliance.
4. Your appliance is heavy. When moving the appliance for cleaning or service, be sure to protect
the floor. Always pull the appliance straight out when moving it. Do not wiggle or “walk” the
appliance when trying to move it, because floor damage can occur.
5. After you remove all of the packaging materials, clean the inside of your appliance before using
it. See cleaning instructions in the Cleaning and Care section.
6. Some upright models have leveling legs. Level as necessary for best operation.
7. If your appliance has casters, after moving into place, lock the brakes on those casters supplied
with brakes. Always unlock before moving the appliance for cleaning.
Locating your Appliance
NOTE: Keep flammable materials and vapors, such as gasoline, away from appliances. Failure to do
so can result in fire, explosion, or death.
• Do not install the appliance near an oven, radiator, or other heat source, nor in a location where
the temperature will fall below 40°F (5°C). Do not place in direct sunlight.
• Check the strength of the floor before installing your appliance. It should hold the weight of a fully
loaded appliance.
• Allow at least 1” (2.5 cm) of airspace at the top and on both sides of the appliance and 1” (2.5
cm) between the back of the appliance and the wall.
• If the appliance is going to be placed against a wall, leave extra space on the hinge side so the
door can open wider than its width.
Leveling your Appliance
NOTE: If your model is equipped with front rollers, the front legs should be lowered enough to lift the
rollers off of the floor to ensure the appliance does not roll forward when the door is opened.
If your appliance is equipped with casters, the two front casters have brakes to prevent
rolling. Keep brakes locked, and unlock for moving only.
1. Locate the two front leveling legs that may be taped among the packing materials. In many
models these legs are already mounted into the underside of the appliance.
2. Screw these legs into the front holes on the bottom of the appliance. The back of the appliance
rests on two fixed supports. (Built-in models also have rear level legs that can provide more
precise leveling).
3. Adjust the front legs just enough to lift the cabinet up off the floor.
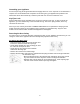
4. Place a leveling tool on top of the appliance, first side to side, then front to back. Turn the leg
counterclockwise to raise a corner. Turn the leg clockwise to lower a corner.
5. Repeat Step 4 until the appliance is level.
6. After the appliance is fully loaded, recheck with level as in Step 4.